Monday, September 28, 2015

Fall Silk Flowers

Here's a fun card that you might want to make for fall events.


Materials needed:
Soft Suede card stock 4 1/4 x 5 1/2"
Tangerine Tango card stock 4 x  1/4"
Lost Lagoon card stock 3 3/4 x 5"
Perfect Punches stamp set from Stampin' Up!
Wood grain patterned paper
Large oval punch
Orange or yellow silk flowers 3 petals
Large brad
Twine
Lost Lagoon ink pad

Tuesday, September 22, 2015

Cute Caterpillar

Here's an easy and cute caterpillar that you can make to go in shoeboxes. Boys and girls will like this one!

I actually saw these on a Pinterest post but they didn't have the antenna or the eyes. I think they are much cuter with them.

Materials needed:
Hot glue gun & glue
tweezers
Various colored pom poms
Chenille stems, brown or green
Wooden clothes pins
Wiggly eyes, tiny


1. Start with a clothes pin and a 3" chenille stem. Bend the stem in half in a v shape. Place a glob of glue on the end of the clothes pin and place the point of the V into the glue.

2. Put another glob of glue over the fold of the stem. Place a pom pom the color of your choice in the center of the glued stem.

3. Place a strip of glue down the center of the remainder of the clothes pin. Add 3 more pom poms of any color on top of the glue.


4. Add two wiggly eyes to the first pom pom. Use tweezers to pick up an eye. Put a tiny dab of glue on the back side and place in on the front of the first pom pom. Do the same to a second eye. You do not have to use tweezers but it really helps to prevent burning fingers.

This makes a fun caterpillar to put in boy and girl shoeboxes of the bottom two ages. 

Saturday, September 12, 2015

Make a Pouch for Marbles

What little boy doesn't like marbles? Well, these days, our boys in the US may like video games more but I remember when I was little, one of my brother's favorite things was to play with marbles. I think that marbles is a great item to put in your shoe boxes for the middle and older boys. If you're going to put some marbles in your box, why not make a pouch to put them in? Most marbles come in one of those net or mesh bags that really isn't any good to hold things after it's been opened. You could put them in a zip lock, but I don't think that will last a long time with daily play so I made some simple pouches from felt to be marble bags.


These are really very simple to make. 
Materials needed:
12 x 9 " sheets of felt or fabric
cord
sewing machine
Marbles to fill them with

1. Felt comes either by the yard or by the sheet. I find it easier to work with the sheets of felt although if you plan on making a lot, it might be cheaper to buy it by the yard.
On your 12 x 9" piece of felt, fold down one end about 1 1/2 to 2". Sew a straight line to secure the folded section and make a casing. 


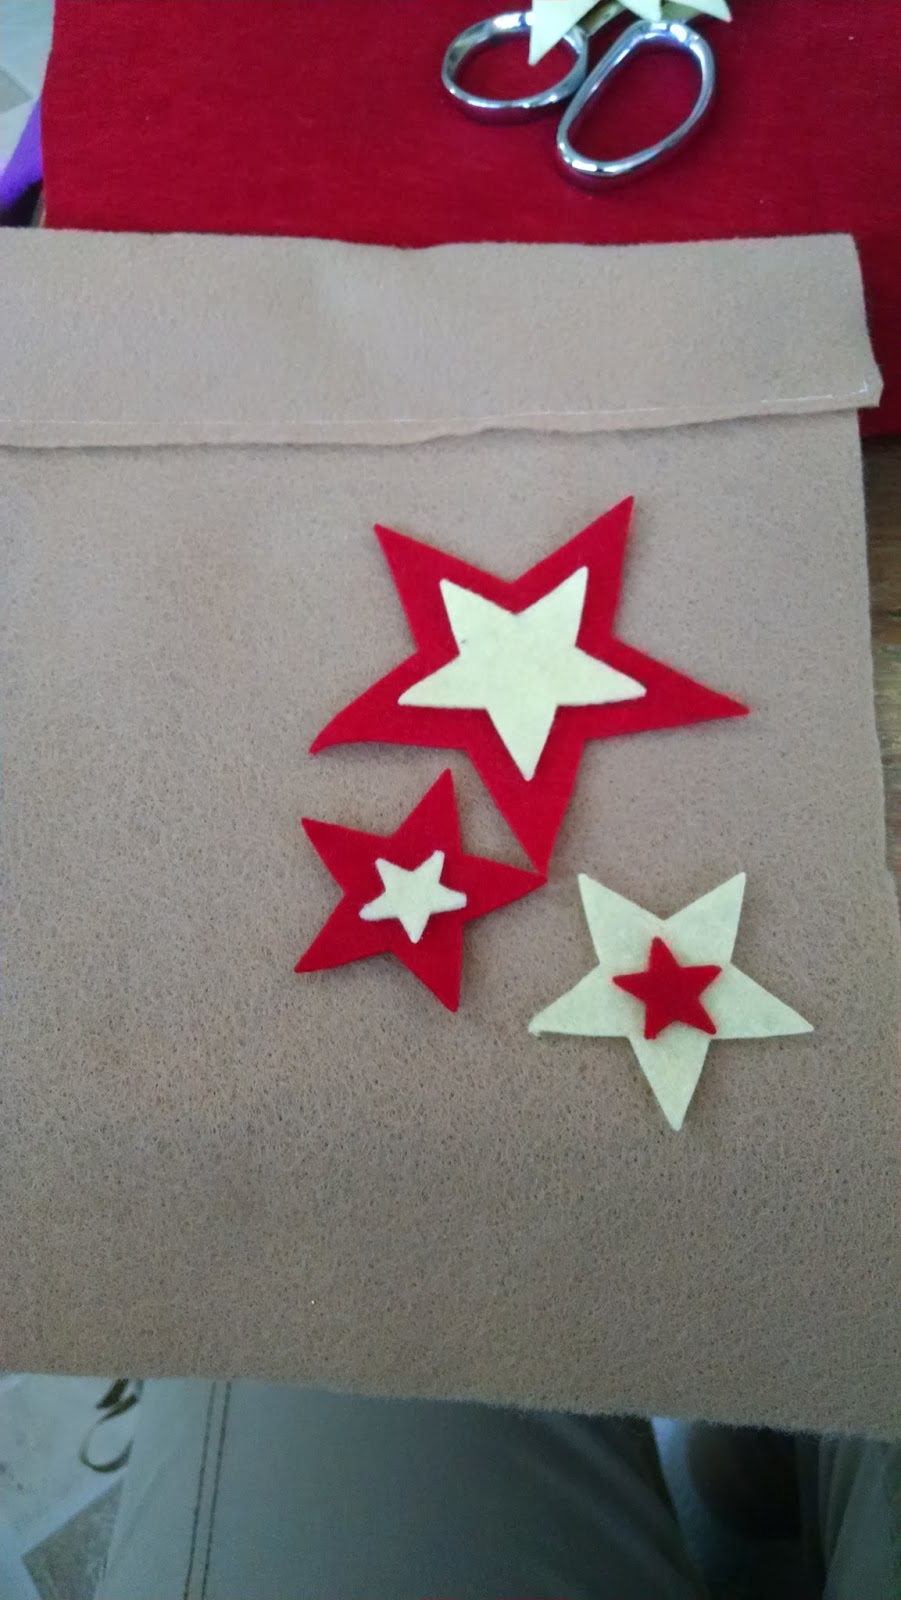
2. If you are going to decorate the pouch, you will want to sew the decorations on before you sew the seams together. I used my Big Shot and some Sizzix dies I have had for years to cut out the stars. You can free hand cut designs or use appliques, if you want.
3. Next, fold your felt together so that the right sides are together. Sew a seam across the bottom and up the side to about 1" from the top. You will want to leave an opening to thread your cord through.

4. Turn this to the outside. Cut a piece of cord twice the width of the pouch and about 4' extra. Thread it through to the end.
5. Fill the pouch with marbles,

6. If you don't wish to do the casing or your felt is not a full sheet, you can wrap the cord around the top and tie. I think the casing is better because the cord won't get lost as easily but it's up to you how you want to do it.
Have fun and pack more shoe boxes. Every shoe box is an opportunity for a child to hear the gospel of Jesus Christ.

For more information about Operation Christmas Child click here. Then go to the Operation Christmas Child link. National Collection Week will be here soon. It's the third week in November.

Wednesday, September 9, 2015

Birthday Flowers


It's been a while since I've put silk flowers on my cards. When I came across these in my closet, I thought it would be fun to use some on a card again.

Materials needed:
Flower Shop stamp set (SU #130942)
Gingham Garden patterned paper  4 1/4 x 5 1/2"
Primrose Petals ink
Wild Wasabi ink
5 Petal punch
Framelits labels dies
Brads
Sponge Dauber
Stampin' Dimensionals
Birthday stamp


There are lots of places where you can get silk flowers for your cards and other projects. My favorite way to get these is to buy a large bunch of flowers when I can find them for 50% off, usually at Hobby Lobby. When I get them home, I tear them to pieces. I pull all the petals away from the plastic stems. If they have a leaf that I like, I pull some of them off too. I take out any left over plastic bits and throw away the plastic stems. I then put the flowers and leaves in large zip lock style plastic bags. There are other places that you can buy flowers. Often you can find them in packages or bottles at your local craft store. They have some that are beautiful. It just depends on what your needs are for these.

1. Stamp several flower images and cut them out with scissors or with the 5 petal punch. Lay them aside.
2. Stamp your greeting on white card stock. Choose the framelits die that fits over your greeting nicely and cut it out with your die cut machine. Mine is a Big Shot.
3. Using a sponge dauber and Wild Wasibi ink, gently brush the edges of the label die cut. 
4. Place a small silk petal on top of a larger petal to make your flower. Insert a brad in the hole that is in the center of the silk petals or flowers. Punch a hole in the top left and the bottom right corners of your patterned paper. You might want to lay the flowers down on the paper first to see exactly where you will need your hole punched.  Insert the brad through the flowers and the hole. Bend over on the back side. Adhere this to your card base.
5. Place 3 to 5 stamped petals on the card to see a pleasing arrangement. Glue them down.
6. Place Stampin' Dimensionals on the back of the greeting on the die cut. Adhere this over the center of the card and over some of the stamped flowers. 
That's all there is to it. Have fun!

Thursday, September 3, 2015

Ribbons for her hair

This is a very simple project for items to go in your shoe boxes. It's ribbons for girls hair.

I buy ribbon on spools at Wal Mart or other stores when I find them on sale. You can get ribbon spools at my local Wal Mart for 98 cents. Some of them are 3/16" x 6 yd. Others are 3/8" x 3 yd. 

I measure 3 feet of ribbon and cut. I then wrap it around my hand and clip it with a hair barrette or a bobby pin. These are great for girls of all ages. In some countries the girls are required to have their hair short so they can just tie it around their forehead. In Dar Es Salaam, Tanzania, all school age girls are required to have their heads shaved or in braids. I think that any little girl would want something to make her feel pretty.

Fall Greetings

I can't believe it's September already! The summer has gone so far...the year is going so fast!
Here's a greeting that can be used for most any event you have coming up this time of year, birthdays, get well, hello and more. Just change the greeting on the outside to fit your need.


Materials Needed:
Serene Silhouettes stamp set (SU #127324)
Tangerine Tango card stock 2 1/2 x 3 3/4"
Pumpkin Pie card stock 4 1/4 x 5 1/2"
Lost Lagoon card stock 4 x 5 1/4"
White card stock
Always Artichoke ink
Word Window punch
Modern Label punch
Sequin strip
Brown button
Tan floss
Stampin' Dimensionals
Glue dots

1. Stamp your tree from the Serene Silhouettes stamp set using Always Artichoke ink on white card stock. Cut loosely around the tree image. Set aside.
2. I usually place adhesive directly on to my ribbon but with these sequins, I found that it was easier to place the adhesive onto the Lost Lagoon card stock first. Then I placed the sequins on the adhesive and wrapped around to the back. 
3. Layer the 3 colors of card stock and adhere. I did the Pumpkin pie, then the Lost lagoon and finally the Tangerine Tango. 
4. Place Stampin' Dimensionals on the back of the cut out tree. Adhere that to the center of the Tangerine Tango piece. 
5. Stamp your greeting on to white card stock and punch out with the Word Window punch. Punch out a Modern Label from some Tangerine Tango card stock. Layer the greeting on top of the label. Add dimensionals to the back and press down over the sequin strip.
6. Thread the floss through the holes in the button and tie. Add glue dots to the back of the button. Press on to the bottom right of the Lost Lagoon card stock. 
7. Finish out your card by adding it to a card base and stamp or write your greeting on the inside.

Have fun with the fall colors.