Wednesday, October 30, 2013

Too Spring for Fall

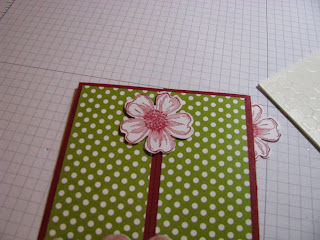
Yes, I know this card is much too spring for a fall card but I was just in this kind of mood. Besides, what's wrong with using bright colors in the fall. Some one can call the color police on me! lol

Materials needed:
 Raining Flowers stamp set (122767)
Polka Dot Parade patterned paper (#126902)
Pear Pizzazz or Certainly Celery card stock
Gumball Green In Color ink
Pear Pizzazz In Color ink
Primrose Petals In Color ink
Strawberry Slush In Color ink
3/16" Corner Punch (#119871)
Primrose Petals 3/8" Satin Stitched ribbon (#126844)
Pretty Print Textured Impressions embossing folder (132175)
Big Shot Machine

1. Cut a piece of Certainly Celery card stock 4 x 5 1/4." Place it in the embossing folder and run through the Big Shot Machine. Round the corners with your corner punch.
2. From your patterned paper, you will need to cut two pieces. Cut one 4 1/4 x 5 1/2" and the other  2 1/2 x 2 1/2." Round the corners of the smaller piece. If you are using the Polka Dot Parade paper, you will notice that this is 2 sided. Use the side with the larger dots for the larger piece. The smaller white dots use for the 2 1/2" square piece.
3.  Stamp the images. This set is a two step stamping set. Stamp the solid image with the lighter color first. Then stamp the darker color with the hollow image over the first image. This may not be exact but it will give you a nice look if you line it up carefully. Trim them out with your scissors.
4. Adhere the flower and leaf images to the top of the square small dot paper. Adhere this to the left hand side of the Certainly Celery card stock.
5. Tie a piece of ribbon about 10-12" long around the embossed card stock. Angle the ends.
6. Adhere the embossed card stock to the larger  piece of patterned paper with the larger dots side showing over the edges. The card stock should fit with about a 1/8" border all the way around.
7. Adhere the card front to a card base and add your greeting or note inside.
These bright springy colors should brighten up someone's dreary fall day!
I'll try to use some fall colors for my next card!

Monday, October 28, 2013

Baby Best Wishes

This is for a soon to be born baby named Olivia Joy. I know she will be beautiful just like the rest of her family.

Materials needed:
Flirtatious Specialty patterned paper (#122360, retired) 2 x 3 1/4"
Crushed Curry card stock   4 1/4 x 5 1/2"
Whisper White card stock 2 x 3"
Animal Stories stamp set (SU retired)
Cross My Heart stamp set (#126582)
Strawberry Slush In Color ink
Regals Candy Dots (#130932)
Candy Dots Brad Bases (#132293)
Stripes Textured Impessions embossing folder (#123128)
Hung Up Cute Clips (#129389)
Brights Collection Designer Buttons (#119747)
Glue Dots (#103683)
Stampin' Trimmer (#126889)
Big Shot

1. Place your Crushed Curry card stock into the Stripes embossing folder. Run it through your Big Shot machine.
2. Stamp the giraffe in Strawberry Slush ink (if you want a card for a boy, Bermuda Bay would be a great color) on the Whisper White card stock. Carefully place the giraffe image in your trimmer. Cut vertically at 1" and horizontally at 1" and 2." This will give you 6 one inch squares. Arrange the giraffe image in the correct order so as not to be confused later. (At least, I would be!) Place a glue dot on the back of each piece. Line them up about 1/4" apart, using the embossed stripes to help keep them even. Press down.
3. Stamp your greeting on white card stock. Trim around the edges. Adhere it to the patterned paper.
4. Place a clip on the top left hand corner. Adhere the entire piece to the right hand side.
5. Add a Candy Dots brad to the top left corner and an Olive Green button to the bottom right side. Adding the greens helps to tone down all the warm colors.
6. Adhere this to a card base and place your greeting or note inside.
Be sure you add your name or initials to some place on the back. Remember, an artist always signs her work!

Friday, October 25, 2013

Missed You Card

I bought this set of photopolymer stamps a few months ago but this is the first time I've actually used them. It was really easy to place the letters in each flag because you can see exactly where you are placing them. SU! now has several of these polymer stamp sets.

Materials needed:
Designer Typeset Photopolymer stamps (#132956)
Greeting Card Kids stamp set (#120633)
Soho Subway patterned paper (#130140)
Daffodil Delight marker
Blush Blossom marker
Strawberry Slush marker
Midnight Muse ink
Aqua Painter (#103954)
Staz On Black ink
Stampin' Dimensionals (#104430)

1. Cut the "map" look paper to 4 1/4 x 5 1/2." Use the reverse side of this same paper for the blue to stamp your greeting and arrow. Cut them out. Adhere to the top  of the patterned paper.
2. Stamp the child on watercolor paper using Staz on Black ink.
3. Use the markers and the Aqua Painter brush to color your child image. Be light with the Aqua Painter brush and wipe the brush on a paper towel between uses. Give it a few minutes to dry. Then cut out the child image.
4. Place Stampin' Dimensionals on the back of the child image. Place her on the map. The image that I chose was holding a heart. As you can see, I cut the heart off. I think she has a bit of a lost look with her finger on her cheek. Stamp or write a note on the inside.
5. Place the card front on a card base.
This card will go to a friend who missed our TOPS meeting this week.

Wednesday, October 23, 2013

Braided and Folded Chevron

For today's card, I'm giving you a link to another blog. This is My Thoughts Exactly Stamps. Last week, she had a how to on braiding. I took her tutorial and did some braiding. Here is her link. You'll want to follow her directions on the braiding.

I put these braids on a gate fold card. Go to my gate fold link for those directions. Sorry I'm having you click on so many links today.

Materials needed:
Rich Razzleberry card stock
Daffodil Delight card stock
International Bazaar patterned paper (#126920)
Whisper White card stock 5 1/2 x 8 1/2"

1. Cut 2 pieces of the colored card stock at 1/2 x 6" for each of the 2 colors. Follow the directions for braiding found on the link for My Thoughts Exactly Stamps.
2. Fold and score the white card stock and make the gate fold card according to the directions for the gate fold link.
3. Cut 2 pieces of the patterned paper 2 1/8 x 5 1/2" each. Adhere these on the front side of the gate fold card.
4. Adhere the braided chevrons to the 2 sides of the gate fold card. Be sure to put lots of adhesive on these as they are a bit heavier than we usually place on our cards.
5. Add your greeting to the inside.
Do this in black and orange and you can use it for a Halloween card!
It takes a little bit more time folding the chevrons than some other cards but it gives us a different look. It's something you might want to try.

Monday, October 21, 2013

God Bless You Gatefold Card

This is a card I made to send to a friend who is having too many problems in her life right now. I know that God will bless her even through these difficult times.

Here is the card laying down and then standing up so you can see how it opens.

Materials needed:
Summer Smooches patterned paper (retired) 2 pieces 2 1/8 x 5 1/2"
Whisper White cardstock 5 1/2 x 8 1/2"
Mixed Bunch stamp set (#125537)
Crosses of Hope stamp set (#1205647)
Trust God stamp set (#126702)
Chalk Talk Framelits Dies (#129983)
Midnight Muse ink
Sponge Daubers (#102892)
Stampin' Dimensionals (#104430)

1.  Make a gate fold card following the directions here from last Friday's card.
2. Adhere the patterned paper cut at 2 1/8 x 5 1/2" to both of the front sides.
3. Stamp the medallion and the greeting from the stamp sets on Whisper White cardstock using Midnight Muse ink. Cut out the medallion with scissors. Punch out the greeting with a die from the framelits dies set.
4. Use a sponge dauber to ink the edges of the rectangle cut out.
5. Place Stampin' Dimensionals on the left side of the medallion and the right side of the greeting. Place those as shown on the card picture.
6. Add an appropriate greeting or note on the inside of the card. I used the "trust in the Lord" scripture that is included in the Trust God stamp set.


Friday, October 18, 2013

Birthday Flowers Gate Fold card

Don't you love to get flowers for your birthday? I do. In fact, I love to get flowers any time of the year for any occasion or for no occasion at all. Here are some flowers to put on your birthday card. I also like to include some flowers on the envelope to give the receiver a sneek peek.

Materials needed:
Raspberry Ripple cardstock 5 1/2 x 8 1/2"
Old Olive Polka Dot Parade patterned paper (#126902) 2 pieces 1 7/8 x 5 1/4", 1 piece 2 5/8 x 4"
Whisper White cardstock 2 1/2 x 3 3/4", extra for stamped images
Flower Shop stamp set (#130942)
Raspberry Ripple 3/8" Satin Stitched Ribbon (#126845)
Raspberry Ripple In Color ink
Pansy punch (#130698)
Stampin' Dimensionals (#104430)

1. Cut your papers to the dimensions listed above. Lay aside.
2. Stamp 4 flower images with Raspberry Ripple ink using a stamp from Flower Shop stamp set. Punch each of these out with the Pansy punch. Lay aside.
3.Score and fold your Raspberry Ripple cardstock at 4 1/4". You can score your cardstock for the side folds but I get a better fit when I fold each side to the center fold and crease. Fold the side to touch the center fold and crease. Do this on both sides.

4. Cut 2 pieces of ribbon 3" each. Place adhesive on the back and adhere to the Old Olive patterned paper about 1" from the bottom. Wrap the ends around to the back.

5.Place adhesive on the backs of the patterned paper and center on each of the side folds. You will have a Raspberry Ripple border all the way around each piece.

6. Place Stampin' Dimensionals on no more than 2 petals of each of 3 flowers. Peel the paper backing off and place so that the dimensionals are only on one side of the card fold.


Place a flower on the top and bottom on the left side. Place the third flower in the center of the right side. Refer to the picture to see how it should be. The flowers will not be adhered all the way across the card. You want to allow it to open in the center.
7. Now you can decorate the inside of the card. When you use a dark cardstock for your base card, it is difficult for a  stamped greeting to be read. On this card I cut a piece of Old Olive Polka Dot paper 2 5/8 x 4" and a piece of white cardstock 2 1/2 x 3 3/4". Layer the white on the patterned paper. Stamp your greeting on the white and adhere the patterned paper to the inside of the card. This also helps to cover up the fold that you created when you made the gate fold of the card.
I added the fourth flower image to the bottom right of the greeting. This still gives you plenty of room for a personal note and your signature.
8. I love to have my envelopes look pretty too so I often stamp on the front or back of the envie with a stamp from the set that I'm using. I stamp 2 or 3 times on the bottom left of the envie and once on the bottom right. Sometimes I'll stamp on the back flap also. Be sure to leave plenty of room in the envie for the address and postage.


Wednesday, October 16, 2013

Naughty or Nice


Here is another Christmas card for you. You could put a cute note inside this one about who's naughty or nice and why. Have fun with it.

Materials needed:

Very Merry Tags stamp set (#130402)
Stylish Stripes Embossing Folder (#132174)
Framelits Labels Collection (#125598)
Decorative Label punch (#120907)
Raspberry Ripple cardstock 4 1/4 x 5 1/2"
Whisper White cardstock 2 x 3"
Old Olive patterned paper--this is from a retired pack from a year or two ago
Old Olive 3/8" Striped Organdy Ribbons (#129291)
Stampin' Dimensionals (#104430)
Raspberry Ripple In Color ink
Big Shot

1. Run your Raspberry Ripple cardstock through your Big Shot with it inserted into the Stylish Stripes embossing folder.
2. Cut out a 3 1/2" label from the framelits labels collection dies. 
3. Use Raspberry Ripple ink to stamp your naughty/nice greeting on white cardstock. Punch this out with the Decorative Label punch.
4. Wrap a 5" piece of Old Olive ribbon around the bottom of the card about 1 inch from the bottom. Adhere.
5. Adhere the naughty/nice label onto the Old Olive patterned paper decorative label.  Place Stampin' Dimensionals on the back of the decorative label and adhere to the center of the card near the top.
6. Adhere the card front to your card base and have fun.

Monday, October 14, 2013

Orange Butterflies and Flowers

Here is the card that I created using the leftover patterned paper from Friday's card.

Materials needed:
Flower Shop stamp set (#130942)
Teeny Tiny Wishes stamp set (#115370)
Sweet Pea patterned paper (#117161) retired, 4 1/4 x 5 1/2"
Whisper White card stock 2 3/4 x 4 1/4" plus extra from stamping flowers
Coastal Cabana card stock
Chevron Embossing Folder (#127749)
Modern Label punch (#119849)
Word Window punch (#119857)
Pansy punch (#130698)
Brights collection brads (#119470)
Stampin' Dimensionals (#104430)
Brayer
Tangerine Tango ink
Coastal Cabana ink

1. Using Tangerine Tango ink, white card stock, and the Chevron embossing folder, do the color and emboss technique found here.
2. Stamp 3 flowers from the Flower Shop stamp set in Coastal Cabana ink. Punch them out with the Pansy punch.
3. Choose a greeting from Teeny Tiny Wishes stamp set and stamp on white card stock with Coastal Cabana ink. Punch out the greeting with the Word Window punch. Punch out the Coastal Cabana card stock with the Modern Label punch. Adhere the greeting on top of the Coastal Cabana modern label.
4. Adhere the embossed card stock to the left hand side of the patterned paper. Adhere 2 flowers on top of that. The third flower adhere with Stampin' Dimensionals offset over the other flowers.
5. Choose Tangerine Tango brads from the brights brads collection and use to attach the greeting on the right hand side of the card.
6. Adhere the card front to a card base.

Sunday, October 13, 2013

Foot problems

I've been having lots of trouble with my foot lately. I blame it on 25 years in the classroom. I was not the kind of teacher who sat down all day. My hubby tells me that I'm still hyperactive! After the doctor took pictures, he said that I have tendons and ligaments that are stretched and inflamed. In other words, it hurts when I have to stand or walk for very long. I had to wear a boot for 3 weeks but that didn't help at all. The doctor decided to put me in a cast so that I could have no flexibility at all. He didn't want me moving my foot. This picture shows the creative work the tech did on my first cast. The dr. wanted my cast changed every week. When I went back for cast #3, I had a huge sore or ulcer on the back of my heal. It was 20cm by 8cm. My whole foot was very swollen also, even up to above my ankle. They couldn't treat that in a cast so back in the boot I went. The swelling scared me a bit so I've tried to  keep it propped up and put ice on it.

That was a week ago. I went back Friday for the dr to look at it. The sore is healing but slowly and the swelling is down a lot. He put a miracle medicine on it called Prisma. I am to leave the bandage on for 2 full days. Then I change it and put more medicine on it. Repeat until I see the dr. again this coming Thursday. I asked him if we would go back to a cast then or what but he just said that we will have to wait and see.

It's kind of hard to sit at my craft table when I'm trying to keep my foot up so I hope that I don't get behind on my cards and blog. So far, so good. The dr. said that if this does not take care of my foot problem, the next step would be surgery. I DO NOT WANT SURGERY! I had surgery on my rotator cuff last Nov. I will not have another surgery right before the holidays so if it comes to that, I will wait until Jan. I am praying that it doesn't come to that! I am not a good patient! My dear, sweet husband can attest to that!

Hope you have a great Sunday. Worship in the church of your choice.


Friday, October 11, 2013

Orange and Blue

I don't know if the oranges make this card fall or if the blues make it spring. I know most people think of butterflies in the spring but the monarch butterflies come through our area in the fall, usually September. The butterflies on here aren't monarchs but they do have the orange that monarchs have.
I did use several items that SU has retired but I'm sure you can find other things similiar.

Matterials:
Sweet Pea patterned paper (#117161) retired  3 x 5 1/2" & 1 1/2 x 5 1/2"
Whisper White card stock 5 1/2 x 8 1/2"
Coastal Cabana card stock 2 x 5 1/2"
Tangerine Tango card stock scrap
Sycamore Street 1/4" ribbon Tangerine Tango (#130812)
Flower Shop stamp set (#130942)
Teeny Tiny Wishes stamp set (#115370)
1 3/4" Circle punch (#119850)
Pansy Punch (#130698)
Modern Label punch (#119849)
Word Window punch (#119857)
Stylish Stripes Embossing folder (#132174)
Tangerine Tango ink
Brayer
Stampin' Dimenionals (#104430)

1. Cut your patterned paper at 4 1/4 x 5 1/2" first. Then Cut that at 3". This way the top and bottom pieces will match.
2. Score and fold your white card stock at 1 1/2" and 5 1/2". Adhere the patterned paper to the top part of the card. Use the 1 3/4" circle punch to cut half of a circle from the top left side of the paper, cutting all the way through the patterned paper and the card stock base.
3. Stamp 3 flowers from Flower Shop with Tangerine Tango ink on white card stock. Use the Pansy punch to punch the flowers out or your scissors to cut them out.
4. Adhere one flower to the front of the patterned paper, just right of center. Use Stampin' Dimensionals on a second flower and overlap it slightly over the other flower and the bottom edge of this section of the card.
5.  Click here to see the link on coloring and embossing at the same time. Follow these instructions to color and emboss the Coastal Cabana card stock with the Tangerine Tango ink and the Stylish Stripes embossing folder. Adhere the embossed card stock on the inside of the card, even with the top  fold. This will cover up the back part of the circle you punched out earlier.

6. Add Stampin' Dimensionals to the back of the third flower. Adhere it to be seen through the circle "window" of the card. (Caution: If you place it too high, the card may not fit in a regular card envelope.)
7. Adhere a 6" piece of tangerine tango ribbon across the smaller piece of patterned paper, wrapping the ends around to the back. Adhere this smaller piece(1 1/2 x 5 1/2") of patterned paper to the bottom section of the card. It will be easy to see how the pieces fit together if you cut this as I suggested in #1.
8. Stamp your greeting from Teeny Tiny Wishes with Tangerine Tango ink. Cut it out with the Word Window punch. Cut out a piece of Tangerine Tango card stock with the Modern Label punch. Adhere the greeting on to the Modern Label punch. Adhere this on top of the ribbon on the bottom section of the card.
9. Add a greeting or write a special note to the inside of the card.

Wednesday, October 9, 2013

Dahlia Birthday

Materials needed:
Raspberry Ripple card stock 4 1/4 x 5 1/2"
International Bazaar patterned paper (#126920) 4 x 5 1/4"
Perfect Punches stamp set (#120516)
Regarding Dahlias stamp set (#130327)
Satin Stitched Ribbon Raspberry Ripple (#126846)
Raspberry Ripple In Color ink
Candy Dots - Regals (#130932)
Extra Larger Oval punch (#119859)
Stampin' Dimenionals (#104430)
Whisper White card stock
Daffodil Delight card stock

1. Cut card stock and patterned paper to dimensions above.
2. Stamp dahlia on white card stock with Raspberry Ripple ink. Use scissors to cut out.
3. Stamp greeting on yellow card stock with Raspberry Ripple ink. Punch out with extra large oval punch.
4. Adhere adhesive to the back of ribbon and press on to the bottom of the patterned paper about 1" from the bottom edge.
5. Place Stampin' Dimensionals on the back of the dahlia and place the dahlia on the left side of the card, slightly overlapping the ribbon.
6. Adhere the oval greeting to the right side of the card with adhesive.
7. Place adhesive on the back of the patterned paper and adhere to the card stock.
8. Place one Candy Dot to the top right of the oval.
Adhere the card front to a card base and add a greeting to the inside of your card.


Monday, October 7, 2013

Christmas Gift Box


I have a few people who I give handmade greeting cards to each year at Christmas. This year I made some sets of cards to use for the silent auction at our Operation Christmas Child annual kick off luncheon. In the past I've made paper boxes for the sets but I felt like I wanted some sturdier boxes for the auction. I decided to decorate some of the small shirt gift boxes that you can find at almost any store.

Materials needed:
1 Shirt gift box for each set, these were 7 7/8 x 10 3/4 x 1 3/4"
       make sure that the lid fits on top of the bottom easily
1 12 x 12 " sheet of heavy patterned paper for each box, I used paper from Be of Good Cheer (#126896) for the Christmas cards and from Kaleidoscope (#115680) for the All Occasion cards.
1" Rose Red Grosgrain Ribbon (111846) for the all occasion
1" of a beige ribbon for the Christmas
1/4" Grosgrain ribbon, Daffodil Delight (#120928) for the all occasion, Real Red (#109034) for the Christmas set
Simply Scored Scoring Tool (#122334)

1. Score the patterned paper at 1" on the ends and at 4" on the sides. Also score the sides at 2". Fold the scored lines.
2. Add adhesive to all sections of the scored paper. Add extra adhesive to the center. Place the lid of the box carefully in the center of the paper and fold the paper around the edges. The long sides will fold into the inside part of the box at the 2" score lines. The shorter sides will not be completely covered to the edge.

3. Cut 40" of the 1" and the 1/4" ribbon. Place adhesive on the back of the 1" ribbon and then press it around the entire edge of the box. Line the ribbon up with the bottom edge of the lid. Leave the end loose for the time being.
4. Place adhesive on the back of the 1/4" ribbon. Press it in the center of the 1" ribbon that you've put on the box. I tried putting the 1/4" ribbon on the 1" ribbon before putting it on the box and made a big mess, so I think this way works better. At least it did for me.
5. To finish out the end of the ribbon, wrap the 1/4" ribbon behind the 1" ribbon. Fold both of them together. Add some adhesive to the folded edge and press down against the box.
6. The boxes that I found were white so I chose not to decorate the bottom of the box.
I placed a sheet of white tissue paper on the bottom of the box and used another sheet crumbled up on the side to prevent the cards from slipping.
7. I cut a piece of 12" scrap paper 1 1/2" wide and wrapped it around the cards. I added a piece of tape to hold this together. When you give a gift of cards, be sure to include envelopes that fit. It's always a nice added touch to stamp the corner or the back flap of the envelopes with a stamp from the sets that you used to make the cards. This gives it a nice look to the envelopes.

The paper that you see on the bottom left hand corner of the boxes is not needed for a gift box. I added a description of the contents since these were for a charity silent auction. 


Friday, October 4, 2013

O Come Let Us Adore Him

Here is a very simple Christmas card to do. Even though it's simple, I think that it has a powerful look.
Materials needed:

Come to Bethlehem stamp set (#120591)
Basic Gray card stock
Night of Navy cardstock 4 1/4 x 5 1/2"
Night of Navy ink
Top Note Bigz die (#113463)

1. Stamp the image of the Wise Men in Night of Navy ink on basic gray cardstock.
2. Stamp the saying in Night of Navy ink above it.
3. Run the Night of Navy card stock and the Top Note die through the Big Shot machine. Watch where you place the die so that it will be centered.
4. Adhere the frame from the Top Note to the top of the basic gray with the images stamped on them.

Wednesday, October 2, 2013

Triple Trees


Materials needed:

Old Olive card stock 4 1/4 x 5 1/2"
Patterned Pines stamp set (retired #116525, hostess set)
Night of Navy Top Note cut out left from Monday's card
Green background patterned paper 3 x 3 3/4"
Epic Day This and That Washi tape (#131269)
3/16" Corner Rounder punch (#119871)
Gumball Green In Color ink

1. Adhere the Top Note die cut left from Monday's card to the center of the Old Olive card stock. 
2. Stamp the 3 trees from the Patterned Pines stamp set in Gumball Green ink on the green patterned paper.  Use the Corner Rounder to round the corners of the patterned paper.
3. Tear a piece of Washi Tape about 4" long. Press it along the bottom edge of the patterned paper. Wrap the ends around to the back & smooth out the corners. Adhere this on to the Night of Navy cut out piece.
4. Adhere the card front on a card base. Finish with a Christmas greeting on the inside.