Wednesday, June 27, 2012

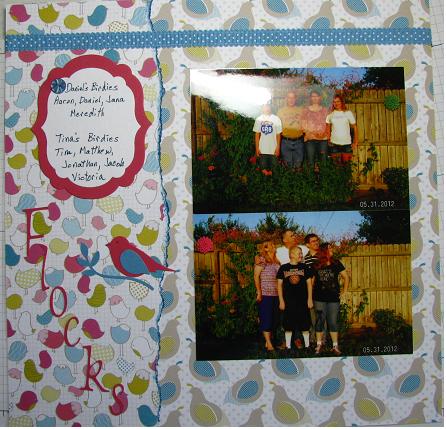
Little Flocks scrapbook page


This is a two page spread for some more pictures of family. I titled this one "Little Flocks" because the pictures are of each of my children's families. The title letters are cut from Rose Red cardstock. Again, I used paper from the Birds of a Feather (#126899) patterned paper set.


  1. Tear 2 pieces of paper from another Birds of a Feather sheet to be about 4" wide each. Ink the torn edge with Marina Mist classic ink.

2. Adhere two pictures to each page with each touching the other.

3.The birds are from the Bird Builder(#117191) punch using Marina Mist and Rose Red cardstock.

4.The journal boxes are cut with Framelits Labels Collection(#125598) from Rose Red and Whisper White cardstock. Write your journaling with a Midnight Muse marker.

5. Place a small Marina Mist button from the designer buttons(#126312) using a glue dot.

6. Place a dahlia from the Adornments In Color Dahlia Assortment(#127556) in one corner of each picture.

7. Adhere a strip of Marina Mist Scallop Dots(#122986) ribbon across the bottom of the left hand page and the top of the right hand page.

Tuesday, June 26, 2012

Another storage idea

I absolutely love the Framelits dies that Stampin' Up! carries these days. They do come in a neat little plastic pouch that I could keep them in but I wanted something a little easier to store. The unmounted or clear stamp sets from SU! come in a nice plastic case that opens easily and can stand up or lay flat for storage. You can purchase empty cases like these from SU!(#119105) in a pack of 4 for $5.95. Each case is 7 1/2 x 5 1/2." The offical name for them is Clear-Mount Stamp Cases and they are found on p. 7 of the new catalog where all the other clear mount accessories are. They are somewhat similiar to cd cases but you don't have to worry about taking out the plastic on the inside and they are a little thicker. IMO, they are perfect for storing many types of things.


I placed the info sheet into the front and laid the dies on the back. I currently have them still on the paper that they come on(it has a piece of double sided tape to hold them in place). I am considering placing a strip of magnetic tape across the back of the case & letting the dies rest on that. I've just got to remember to get some next time I'm at the store.

These cool cases could be used as storage for many types of smaller scrapbook items.

Monday, June 25, 2012

Grandchildren Scrapbook page

Well, I've been working on my scrapbook album for all the pictures that we took when the kids were all home for Jonathan's graduation so that's what you're getting right now. I will be going back to cards again soon. I'll have to get some ready to mail for all my July birthdays.

This is a 5 x 7" photo of all the grandkids & the one great. I ordered 2 packs of Birds of a Feather (#126899) patterned paper for this so they would all go together in the same album. I chose this paper because of the colors that I thought would go good with the pictures & because I like the idea of "birds of a feather" being the whole family.

For this I cut out all of their names & the title from Marina Mist cardstock. Since there are 9 of them, I felt like the names handled both the journaling and the embellishments for this page. The date is already printed on the picture. I did leave Jack, the dog, off. Maybe I should go back & put his name too.

Sunday, June 24, 2012

46 years

Today is mine & my sweetie's wedding anniversary. We've been married for 46 years. The question for me would not be how did I stay married for so many years. It is instead, "how did my sweet hubby put up with me for 46 yrs?" All I can say is that I'm still the luckiest woman in the world. My David has always loved me unconditionally. He has taught me what unconditional love truely means. I thank God for him.

Hope you enjoy Mandisa's song today, Stronger.

Saturday, June 23, 2012

Ribbon Storage Box


Here is a fairly easy box you can make for your ribbon storage. Start with an empty shoe box, whatever size you have. This one was already decorated like a zebra so I'm not covering it. Depending on your box, you may want to cover the box with patterned paper to start with.

Materials needed:
shoebox
patterned paper to decorate
ruler
long reach hole punch or sharp pointed scissors
wooden dowel about 14" long or bamboo skewer
craft knife
wire cutter


 Measure you shoebox and draw a line with pencil about half way down from the top of your box. For this box, it was 2 inches from the top.


Use the line as a guide for making the holes in your box. If you have a long reach hole punch, you should be able to punch the holes about 1" apart. Without a long reach hole punch, you will need to use sharp pointed scissors or an ice pick to make holes along the line. If you use an ice pick, you will have to push a ball point pen or other round object through the hole to make it large enough for the ribbon.


 Your holes should be about 1" apart. You can make the holes on just one side of the box or on both sides, depending on your need.
If you used sharp pointed scissors, then the inside of the holes are going to have cardboard sticking out. I suggest that you use a craft knife to cut the excess cardboard off.


Poke or punch one hole on each end of the shoe box either with you long reach hole punch or scissors. The hole should be at or near the center.  Measure your dowel or skewer to fit through the holes to reach each end of the box and stick out a bit. If you are using a bamboo skewer, you will need to cut off the point on the skewer. This can be done easily with wire cutters. If you are using a thicker dowel, you may need a saw.


Run the dowel or skewer through the hole in the end of the box and through the center of the spools of ribbon that you have. If you cut holes on each side of the box, you can turn the ribbon so that each spool is alternating direction. Pull the ribbon end through the hole and let it hang outside the box on each side. 
You will be able to see each color and style of ribbon that you have and pull the amount needed out of the box. Cut the length you need and the ribbon will still be standing in your box, ready to go the next time. Decorate your box lid and place it on top to keep your ribbon in good order.

I hope that you see this as an easy and inexpensive way to store your ribbon. As you get more ribbon, you can make more boxes to store as much ribbon as you have.

Friday, June 22, 2012

Enjoy Life Peacock SB page


Sorry I didn't get anything on my blog for you yesterday but with canning, going to the dentist and a couple of migraines, it just didn't get done. Sometimes, life just gets in the way of our hobbies! lol

 We had fun taking pictures when all the kids were here. This is one of my sweetie and I playing around.


To hide a bit of the picture behind some of the cool pattern on the Birds of a Feather(#126899) designer paper, decide exactly where you want the picture to sit. Then mark the edges with a pencil. Remember, you'll want to use an artgum eraser to erase the pencil marks later.

With a sharp craft knife, carefully cut around the pattern that you plan to tuck your picture under. Make sure that it is all cut from one pencil mark to the next and then erase the marks.
Slide the picture under the cut space and adhere it to the patterned paper.

This is the back side of the page.


Finish out your layout by adding a title, some journaling and some embellishments


 I'm so excited about SU! now carrying such a great variety of brads. I LOVE brads and SU! now has brads in brights, subtles and regals to match your great SU! classic inks. They also have my favorites, printed brads in the In Colors. The brads on the "enjoy" are from the printed ones(#122940) and the brads on the "life" are from the brights(#119740).The "enjoy life" title and the journal box were stamped from Enjoy Every Moment(#113622) retired stamp set. The words are stamped in Midnight Muse and the journal box is stamped in Marina Mist classic ink.


Wednesday, June 20, 2012

The Whole Flock SB page

This 2 page spread has pictures from a few weeks ago when the whole family was together. I used paper from SU! Birds of a Feather(#126899) patterned paper. I don't often have 8 x 10's printed but I wanted these. I printed another and have it in a frame in the den.

 Cut a piece of anther sheet from the same paper pack to 3 x 12" to use for the side strip. Using the scallop edge border punch (#119882) to scallop one side. Use Marina Mist classic ink and an ink dauber to ink the scalloped edge so it will stand out better.

The title letters and the journal box are cut from Marina Mist cardstock. The birds and leaf sprigs are cut with the Bird Builder(#117191) punch.