Showing posts with label birthday. Show all posts

Wednesday, November 4, 2015

Wood & Flower

Here's a card for fall birthdays.

Materials needed:
Chocolate Chip card stock 4 1/4 x 5 1/2"
Old Olive card stock 4 x 5 1/4"
Tan card stock 3 1/2 x 2 1/2"
Truly Grateful stamp set SU!
Bloom with Hope stamp set SU!
Pumpkin Pie striped ribbon about 6"
Orange brads
White card stock
Pumpkin Pie ink pad
Modern Label punch

Wednesday, July 22, 2015

Manly Scraps

If you are like me, and many paper crafters that I know, you have a box sitting next to your work table where you throw your scraps in to use in later projects. Well, if you are like me, that box is full and you haven't looked in it in a while. So today, I pulled some scraps out to make this manly birthday card.
Materials needed:
Best of Birthdays stamp set from SU
Be the Star stamp set from SU 
Really Rust ink
Large oval punch
Stampin' Dimensionals
Left overs
   The top scrap is 1 1/4" wide. The right side scrap is 1" wide. The background card stock is 4 1/4 x 5 1/2". I made 3 of these cards and each one has a different background card stock.
    The triangle banner pieces are made from balsa wood and were left over from a Paper Pumpkin craft kit. I stamped the stars on the triangles with Really Rust ink. I had one extra triangle so I adhered it to the inside of the card next to the greeting. You could even use left overs from the dimensionals if you use the side pieces. I use them all the time!

A simple card  from left over paper scraps.

Monday, July 13, 2015

Pretty Butterflies

Here is a card I made for a birthday but it could be used for many occasions.


Materials needed:
Happy Patterns decorative masks SU(138313)
Pretty Print textured impressions embossing folder (#13275)
White card stock 5 1/2 x 8 1/2" scored and folded at 4 1/4"
Lost Lagoon card stock 2 3/4 x 4 1/4"
Corner rounder punch
Papillon Potpourri stamp set (123759)
Bitty Butterfly punch (129406)
Elegant Butterfly punch (127526)
5/8" Whisper White Organza ribbon
Mambo Melon ink
Lost Lagoon ink
Blue Washi tape
Sponge dauber
Stampin' Dimensionals

1. Place the Lost Lagoon card stock in the embossing folder and run it through your Big Shot machine. Lay aside.
2. Center the decorative mask on top of the folded white card stock. Use the sponge dauber to pick up Melon Mambo ink from the ink pad. Holding the mask steady, dab the ink on the openings on the mask to place the color on the white card stock. Cover the card stock.
3. Adhere the Lost Lagoon embossed piece to the center of the folded white card stock.
4. Choose 3 butterflies in 2 sizes from the Papillon Potpourri stamp set, Stamp them with Lost Lagoon ink on white card stock.
5. Use the 2 butterfly punches to punch out the butterflies.
6. Wrap the white ribbon completely around the front and inside of the white card stock. Tie in a bow on the front to be on the right side of the card. Use a small amount of adhesive to secure in place.
7. Place dimensionals on the back of the large butterfly and one of the small butterflies. Place the large butterfly just over part of the ribbon on the left hand side. Place one of the small butterflies near the top of the Lost Lagoon card stock and the other below the ribbon. 
Stamp or write a greeting on the inside and send this lovely card to a friend.

Saturday, June 27, 2015

Victorian Birthday Card

Well, bringing the flu B back from my trip to Tanzania has really thrown me for a loop! I hadn't gotten the flu in probably 30 years, since I started taking the flu shot. They said that this year the flu mutated and the shot wasn't as effective. I really felt bad for a couple of weeks. I'm doing a lot better now but I still have that lingering cough!

Here's a card I made for some of my July birthdays.


Materials needed:
White card stock 5 1/2 x 8 1/2" scored and folded at 4 1/4"
Lost Lagoon card stock SU! 4 x 5 1/4"
Pink stripe patterned paper 3 3/4 x 5"
Dazzles stickers by Hot Off the Press
Birthday stamp, Vintage Rose Garden stamp set by Jennifer Ellory
Whisper White 5/8" Ribbon Organza SU (#114319)
Lost Lagoon stamp  pad SU
Ticket corner punch
Glue Dots
Stampin' Dimensionals SU

This card is simple to assemble after you cut your papers to size. 
1.Punch all four corners of the Lost Lagoon card stock and the patterned paper with the ticket corner punch. 
2. Stick the lacy stickers across the patterned paper about 1" from the bottom and wrap around to the back.
3. Adhere about 6" of the ribbon just below the stickers on the patterned paper and wrap around the back also. 
4. Use about 6" of the ribbon to tie a bow and place on top of the other ribbon with glue dots. I used 3 to get it to hold in place good.
5. Stamp the greeting with Lost Lagoon ink across the top of the patterned paper.
6. Place Stampin' Dimensionals or other dimensionals on the back of the patterned paper. Adhere it to the Lost Lagoon card stock.
7. Adhere this to the white, folded card stock.
Add a greeting or note to the inside and you are ready for a birthday.

Tuesday, May 5, 2015

May Birthday Card for Women

Here is the card that I made to send to my lady friends who have birthdays in May.

Materials needed:
Old Olive cardstock 5 1/2 x 4 1/4"
Shades of Spring patterned paper (#117160) 4 x 5 1/4", 2 x 5 1/4"
Rich Razzlelberry 1/2" ribbon (115613)
White card stock
Bloom with Hope stamp set (133952)
Old Olive marker
Perfect Plum marker

Have fun making your cards!

Monday, January 5, 2015

Victorian Lady

Well, I've finished all of my January birthday cards now. Here is the last one.
Materials needed:
Victorian lady stamp set from Hot Off the Press
Warmest Regards stamp set from SU!
First Edition patterned paper from SU! 4 1/4 x 5 1/2"
White card stock
Pastel chalks/mine are from SU! but they are now retired
Hair Spray
Certainly Celery ribbon from SU!
Large oval punch SU!
Old Olive card stock 2 3/4 x 2 3/4"
Doily from SU! or Wilton's
Mementos Black ink
Stampin' Dimenionals

This is easy to make just following the design you see on the card.
I think chalk is my favorite medium, even though I don't use it that often. There is so much you can do with it and it's so versatile! When I finish chalking my image, I spary it lightly with hair spray. This is not acid free so if you are doing something that you want to last for generations, find an acid free fixative at your local store. For cards, IMO, hair spray works just fine.

Have fun and I hope everyone who receives one of your cards appreciates the time you put into it!
Have a blessed 2015!
 

Saturday, November 1, 2014

November Birthday Card

Since November is the busiest time of the year for Operation Christmas Child, I don't know that I will have time to make or post any other cards this month. Since I have sent cards to the senior citizens at my church for years, I had to make some so they won't be disappointed. I made all the same design just using different papers. This card was made using all scraps and basic tools.
Materials needed:
Patterned paper 4 1/4 x 5 1/2"
Coordinating patterned paper 2 x 5 1/2"
White card stock
a variety of scraps to punch flowers with
Secret Garden dies from SU!
Vintage Rose Garden stamps by Jennifer Ellory
Tangerine Tango 1/4" ribbon from SU!
Scallop Border punch from SU!
Brad

1. Punch along one of the long edges of the 2 x 4 1/2" paper. Adhere it to the other patterned paper about 1/2" from the bottom edge.
2. Stamp the birthday greeting on white card stock that is cut to about 1 x 4 1/4." Adhere the greeting to the bottom right of the scalloped piece leaving a small border around the edge.
3. Make the flower by cutting 3 different sizes from the Secret Garden dies or from flower punches. Punch a hole in the center. Layer the flowers and insert the brad in the center. Adhere the flower to the top left side of the card.
4. Ahere about 6" of 1/4" ribbon across the bottom of the scalloped piece.
5. Adhere the card front on to a card base and add a message inside the card.
 

Friday, July 11, 2014

Blooming Birthday card

When I saw the "Bloom with Hope" hostess stamp set in the new SU! catalog, I knew I had to get it. So when my sweet hubby asked me what I wanted for our anniversary and my birthday (2 weeks apart), I told him money! That way I was able to order enough SU! from the new catalog that it would qualify for a party & I could get my hostess set that I wanted. I was also able to play with the new SU!Blendabilities Markers that are in the new catalog. I've been playing with them but this is the first "real" card that I've used them on. Hope you like them.


Sorry this card is sitting side ways.
 
Materials needed:
Bloom with Hope hostess stamp set (#133952)
Crisp Cantaloupe card stock 4 1/4 x 5 1/2"
Lost Lagoon card stock
White card stock
Stampin' Blendabilities markers Daffodil Delight Asst. (#130998)
Color Lifter (#129369)
Memento ink pad (#132708)
Lost Lagoon 3/8" Stitched Satin ribbon (#133672)
Modern Label punch (#119849)
Framelits Labels Collection (#125598)


One cool thing about this card is that you can use it for more than one occassion. The stamp set has stamps for both birthday and sympathy. I think it will work for either one. Here is the card with the sympathy greeting.

 
It's easy to see what to do to build this card. If you have never used the blendable alcohol ink markers, you may need to practice some before you actually place it on a card or project. With this one, at first I colored the center section (the seeds) the same color as the flower. I didn't like that so I went over it with the light Pumpkin Pie marker. I wasn't sure how it would come out but I think it did ok. 
 

Monday, July 7, 2014

Elegant Birthday

Materials needed:
Serene Silhouettes stamp set (#1277324)
Perfect Punches stamp set (#120516)
White card stock 4 x 5 1/4", 1 x 5 1/4" plus extra
Island Indigo card stock 4 1/4 x 5 1/2", 1 1/4 x 5 1/4"
Gingham Garden patterned paper (#129310) 2 1/4 x 2 1/2"
Island Indigo ink pad
1 3/4" Circle punch
Corner rounder
Large Oval punch
Stampin' Dimensionals (#104430)
Embossing Folder from Paper Studios

1. Place the white card stock in your embossing folder and run it through your Big Shot machine.
Adhere the embossed card stock to the Island Indigo card stock.
2. Adhere the 1" white card stock to the 1 1/4" Island Indigo card stock centered. Adhere this piece to the white embossed piece about 1" from the top edge.
3. Round the corners on the patterned paper and adhere it on top of the blue & white cross piece that you just put on.
4. Using Island Indigo ink on white card stock, stamp the circle image and the birthday greeting.
5. Use the circle punch to punch out the circle image and the oval punch to punch out the birthday greeting.
6.  Adhere the circle to the center of the patterned paper.
7. Place dimensionals to the back of the greeting. Place it on top of the blue and white strip.
8. Adhere the card front on to a card base and send to a friend.

Friday, February 21, 2014

Rippled Poppies

Material needed:
Pleasant Poppies background stamp (#129499)
Teeny Tiny Wishes stamp set
Greenhouse Gala patterned paper (#117167) 4 1/4 x 5 1/2"
Snow Festival patterned paper (#126908) 3 1/2 x 4"
White card stock
Old Olive card stock
Raspberry Ripple In Color ink
Gumball Green In Color marker
Raspberry Ripple In Color marker
Raspberry Ripple 3/8" Satin Stitched ribbon (#126845)
Brights Candy dots  (#130931)
Word Window punch (#119857)
Modern Label punch (#119849)
Stampin' Dimensionals (#104430)

1. Use the brush tip of the markers to color the Pleasant Poppies stamp. Stamp it on white card stock.  Cut the flower & stem images out, cutting out the excess white card stock. You will want to cut fairly close to the image but it doesn't have to be fussy cutting. Leave overlapping images and close images connected.
2. Add Stampin' Dimensionals to the back of the images, trimming the dimensionals so that they fit. Place the image on the starred patterned paper with the bottom lined of the stems lined up on the bottom of the paper.
3. Adhere this from #2 on to the Greenhouse Gala patterned paper.
4. Place adhesive on the back of about 5" of ribbon. Place it on the right side of the patterned paper wrapping the ends to the back.
5. Punch a Modern Label out of Old Olive card stock. Stamp your greeting from Teeny Tiny Wishes stamp set in Raspberry Ripple ink on to white card stock. Cut this out with the Word Window punch. Adhere the greeting on to the Old Olive Modern Label. Adhere this to the top right overlapping the ribbon.
6. Add the color dots to the greeting label to look like you've added brads or you can actually add brads if you wish.
7. Adhere the card front onto the card base. Add a greeting or a note to the inside.


Wednesday, January 1, 2014

Tri-fold Popped Balloons

I hope everyone is having a wonderful new year and you've gotten a great start to 2014. I pray that it will be a wondrous year for everyone.  Here in Texas we all make sure that we eat our black-eyed peas on New Year's Day for good luck. You get one day of good luck for each pea you eat, or at least, that's what everyone tells me. I've never been too crazy about black-eyed peas so I usually don't eat too many of them. It hasn't seemed to effect me one way or the other as far as my luck goes! I just look at Jeremiah 29:11 and know that God already has everything planned for me so I don't depend on luck! I do hope that you all have a glorious 2014!


Ok, here is a little more complicated card but I know you can do it. It is using the same pop-up technique that I used to use with my second graders. We would make 2 or 3 pop up books each year to help increase learning about different topics. So, if my second graders could do it, I know that you can too.
This is the card laying flat.
Here it is standing up. You can see the balloons "flying" in the sky.
(***I am no longer a Stampin' Up! demonstrator which means that I can use anything that I want on my blog. Previously, I could not name any brand item other than SU! in my blog. I will continue to give you the SU! item numbers when appropiate. I will also try to give you other brand info on the items that I use. It is not unusual, when I dig into my paper stash, that I will have papers that have been with me a while and I may not know where it actually came from.)

Materials needed:
Best of Birthdays stamp set (#132929)
Teeny Tiny Wishes stamp set (#
Patterned Pack II patterned paper (#114325)
Other patterned paper (I think this is a Doodle Bug design that I used here.)
Coastal Cabana card stock
white card stock 5 1/2 x 8 1/2"
1/2" Circle punch (#119869)
1" Circle punch  (#119868)
Modern Label punch (#119849)
Stampin' Trimmer with scoring blade (#126889)
Rose Red marker
Primrose Petals ink
embroidery floss

1. Cut 2 pieces of patterned paper to measure 3 x 5 1/2". Cut one piece for the front of card to measure 3 1/4 x 5 1/2". Lay aside.
2. Use the trimmer with a scoring blade to score the white card stock 3" from each end. Fold on the score lines so that it opens as a tri-fold card.

3. Turn your folded white card stock so that you are working on the outside of the second fold. Measure and mark with a pencil from the top at 1", 1 1/2", 1 3/4", and 2 1/4". Cut on the first 2 measurements 1/2" into the card, cutting both folds. Cut on the 3rd & 4th measurements 1/4" into the card, cutting both folds.
4. Fold the cut tabs back and forth 2 or 3 times.
5. Using a finger, poke the folds to the inside of the card.

 The top tab fold will stick out 1/2" and the bottom one will stick out 1/4".
6. Cut 2 Coastal Cabana card stock pieces to measure 1/2" x 2". Place a small amount of adhesive on the top side of the tabs. Lay and press the Coastal Cabana card stock pieces onto the tabs.
7. Turn the patterned paper that you will use for this part onto the back side. Measure and cut out the pieces of paper to match the tabs.
Lay the paper to fit on this section of the card. Then add adhesive to it to stick to the card.
8. Cut two 1" circles and three 1/2" circles from patterned paper.Cut 5 pieces of floss 2 to 3" each for balloon strings. Add adhesive to the back of a circle. Fold the floss so that 1/4 to 1/2" of floss hangs down and stick it to the adhesive on the back of the circle. Adhere two of the 1" circles to the front (1/2") tab and 3 of the 1/2" circles to the back (1/4") tab. Allow the floss to hang loose. Using the smaller circles on the bottom tab will give it the look of being farther away.

9. Adhere the other 3" piece of patterned paper on the back of the card to cover up the cut out tab sections. Not only will this look better, I will give the tabs more strength.
10. Adhere the 3 1/4" piece of patterned paper to the front of the card, lining the right edge up with the fold. This makes your card look a little wider and more balanced. Punch two 1" circles and one 1/2" circle to use for balloons on the front of the card. If one of the balloons on the tabs is sticking out, you can place a balloon on the front overlapping the inside balloon. Do some pen work to give the balloons dimension and to make the "strings" on the balloons on the front of the card.
11. Stamp the "celebrate" greeting from Best of Birthdays stamp set with Primrose Petals ink on Coastal Cabana card stock. Punch it out with the Modern Label punch. Adhere it to the front of the card with about 1/4" overlapping the front edge.
12. Stamp a slice of birthday cake from Best of Birthdays and a greeting from Teeny Tiny Wishes in Primrose Petals ink on the inside, center section of the card.
This card will fit in a standard invitation sized envelope. Have fun and let the balloons fly to wish your friends a happy birthday in the new year.


Wednesday, December 4, 2013

Simple & Bright Birthday

This is a simple card that conveys a happy message.

Materials needed:
Polka Dot Parade patterned paper (#126902) 4 x 5 1/4"
Whisper White card stock 5 1/2 x 8 1/2"
Bermuda Bay card stock 2 pieces each 1 1/2 x 3 1/2"
Real Red card stock 2 pieces each about 1 x 2"
Hung Up Cute Clips (#129389)
Teeny Tiny Wishes stamp set (#115370)
Bermuda Bay ink

1. Score and fold the white card stock at 4 1/4." This is your base card that we will build on.
2. Adhere the Polka Dot Parade patterned paper on to the front fold of the white card stock. Center it so that you have a border all the way around.
3. Stamp your birthday greeting in Bermuda Bay ink on white card stock scraps. Cut the greeting in half so that one piece says "happy" and the other piece says "birthday."
4. Tear the edges of the Real Red card stock to look rough. Adhere the words from #3 angled in the center of the red card stock. Adhere the red card stock at an angle on the Bermuda Bay card stock.
5. Place a clip from the Hung Up Cute Clips on each piece of Bermuda Bay. Put adhesive on the back of the Bermuda Bay card stock, going over the clips with the adhesive. Angle these to overlap on the Red Polka Dot Parade patterned paper.
6. Now add your greeting or note to the inside and you are ready to mail.

Monday, December 2, 2013

Striped Birthday Ribbons

Materials needed:
Bermuda Bay card stock 4 1/4 x 5 1/2"
Whisper White card stock 4 x 5 1/4"
International Bazaar patterned paper (#126920) 3 3/4 x 5"
Best of Birthdays stamp set (#132929)
Every Little Bit stamp set (#120558)
3/16" Corner punch (#119871)
1 1/4" Circle punch (#119861)
3/8" Midnight Muse Satin Stitched ribbon (#126847)
Tangerine Tango ink
Stampin' Dimenionals (#104430)

1. Use the corner punch to round the corners on the white card stock and the patterned paper.
2. Cut pieces of ribbon 2", 2 3/4" and 3 1/4." Place adhesive on the back of the ribbons. Adhere them to the front of the patterned paper as shown in the picture. Wrap the ends around to the back of the paper.
3. Layer the papers with Bermuda Bay on the bottom, then white card stock, and finally the patterned paper.
4. Choose 3 images from the stamp sets to use. Stamp the images in Tangerine Tango ink on white card stock.
5. Punch the images out with the 1 1/4" circle punch. Add Stampin' Dimenionals to the back of each circle. Place these on top of the ends of the ribbons.
6. Adhere the card front to a card base and add a birthday or other greeting to the inside.

Friday, November 15, 2013

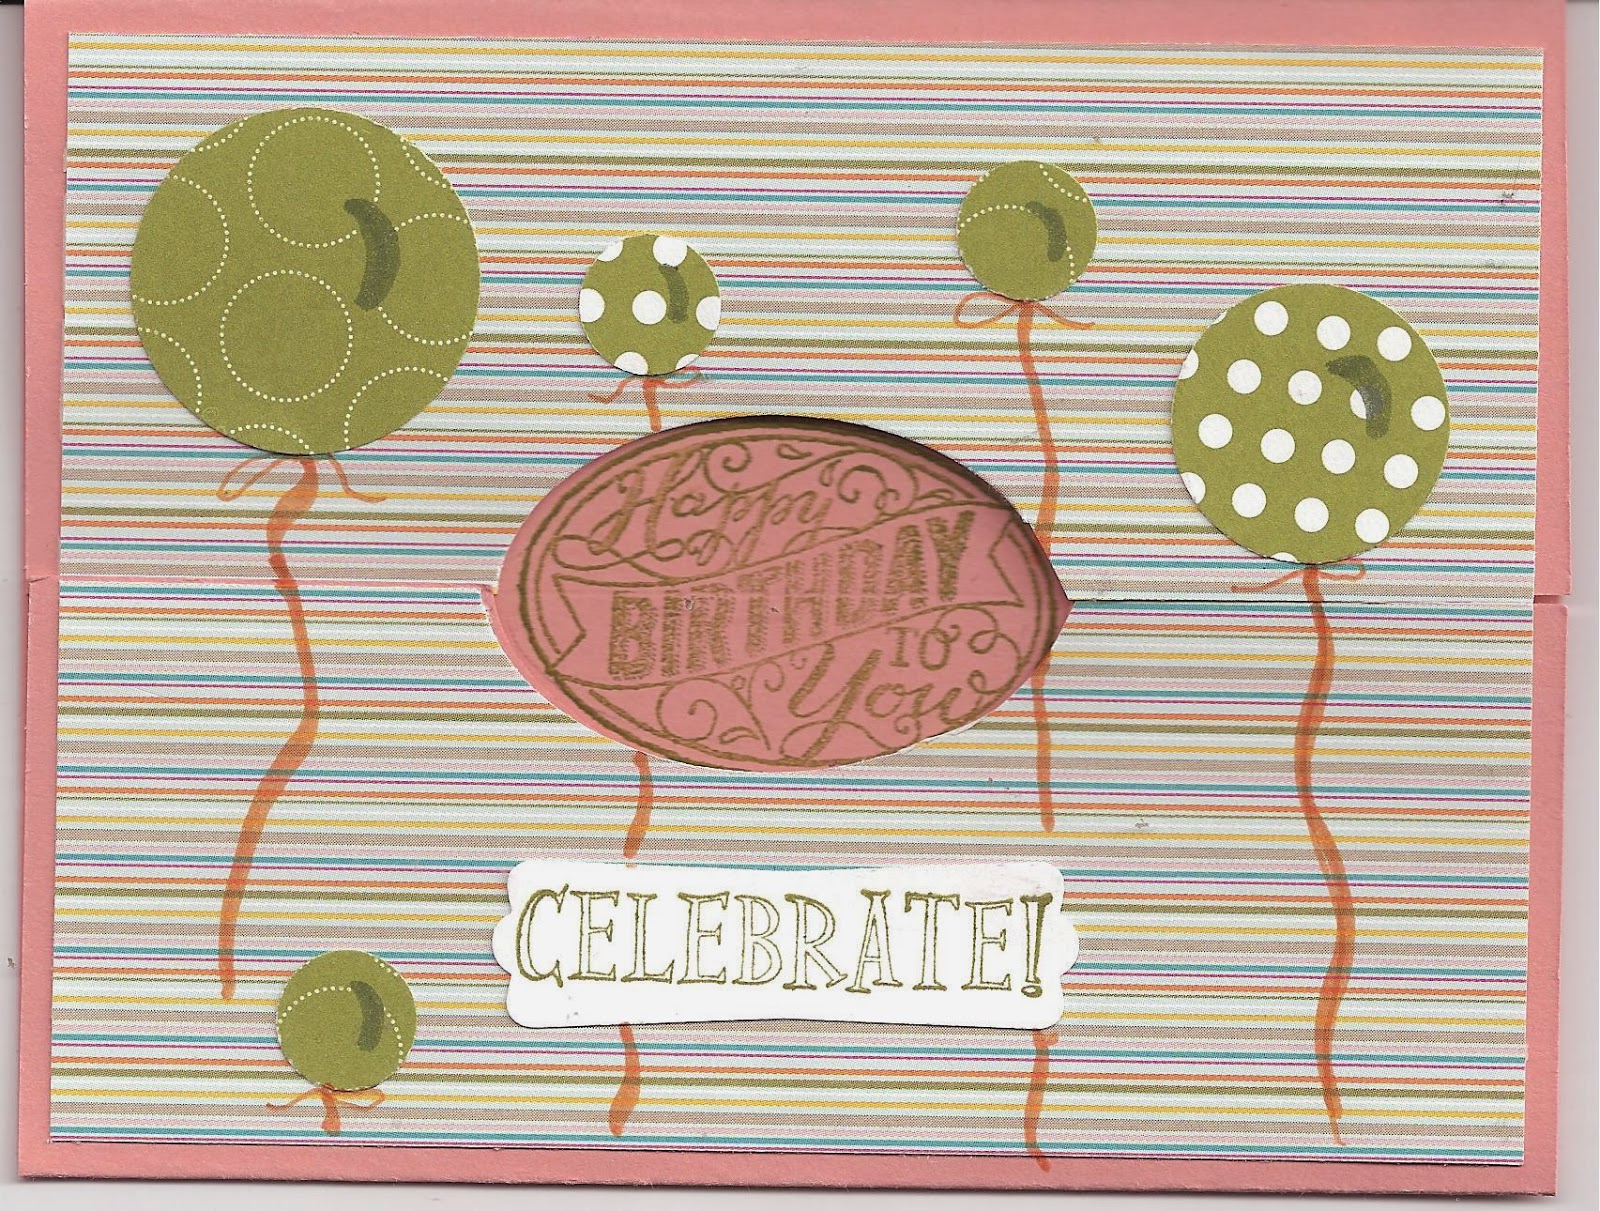
Top Flip Gate Fold Birthday

Well, so far so good this week with getting my cards on here. Hopefully, I'll be able to continue getting a card on Mon, Wed, Fri like I've been doing. Things are really getting busy for me now with Operation Christmas Child National Collection Week being next week. We've been getting our collection center ready for receiving all the shoe boxes and for doing our church packing parties. Last year, we collected over 11,000 shoe boxes from 5 Central Texas counties at our Mid-Texas OCC center, here in Temple. Those, along with over 6 million boxes collected in the US last year, went to poor children in over 130 different countries. We hope to increase our number of boxes this year so that even more children can learn about our lord and savior, Jesus Christ.

Ok, for today, we are turning our gate fold card on end... well, just flipping the card around by a quarter so that it opens top to bottom instead of side to side.

Materials needed:
Crisp Cantaloupe card stock 5 1/2 x 8 1/2"
Patterned paper from Patterns Pack II (#114325, retired) 2 pieces 2 x 5 1/4"
Polka Dot Parade pattern paper (#126902) a 1" strip about 8" long will do
Whisper White card stock
Best of Birthdays stamp set (#132929)
Extra Large Oval punch (#119859)
1/2" Circle Punch (#119869)
1" Circle Punch (#119868)
1 1/4" Circle Punch (#119861)
Modern Label punch (#119849)
Old Olive ink
Tangerine Tango marker
Old Olive marker

1. To gate fold your card, lightly score the card stock at 4 1/4". Fold each side in to touch the scored center. You can score the card stock at 2 1/8" from each side and fold there. Every time I do that, I end up with a gap where they meet in the center. It shouldn't but it always does with me, so I fold to the center.
2. Adhere the striped patterned paper on the sides of the gate fold.
3. Use your extra large oval punch to punch a 1/2 of an oval on each side. To do this, turn your punch over so you can see the placement of the card stock.
After you punch the first side, make light pencil marks on the edge of the other side to line up the punch and have the halves look like they were punched at the same time. Punch through the card stock and the patterned paper on both sides.
4. Stamp the oval birthday greeting in Old Olive ink in the center of the oval punch. If you wish, you could mark the oval with a pencil and then punch with the card open. Be sure to erase all your pencil marks.
5. Stamp "celebrate" in Old Olive ink on white card stock. Punch it out with the Modern Label punch. Adhere it to the center of the bottom side of the fold.
6. Punch out circles from the Old Olive Polka Dot Parade paper. I punched 1 circle 1 1/4," 3circles 1" and 3 circles 1/2". Since the paper is doubled sided, it is easy to use both sides of the paper to give you "different" balloons. Adhere the circles on the front of the card as shown. Lay 2 of the 1" circles aside.
7. Use the brush end of the marker to draw balloon strings from each balloon. Use the fine tip to draw ties near the balloons. Use an Old Olive marker to draw crescents on the right side of each circle balloon.
8. Open the card up. Cut 2 stripes of the striped patterned paper to measure 1/8 x 4." Adhere them to either side of the birthday oval placing them fold to fold. Adhere the two 1" circles from step 6 to the tops of these strips of paper, as shown in the picture. Use an Old Olive marker to draw crescents and strings on the circles like we did on the front.
You card is now ready to place in an envelope and mail or give to your best birthday buddy!

Friday, October 18, 2013

Birthday Flowers Gate Fold card

Don't you love to get flowers for your birthday? I do. In fact, I love to get flowers any time of the year for any occasion or for no occasion at all. Here are some flowers to put on your birthday card. I also like to include some flowers on the envelope to give the receiver a sneek peek.

Materials needed:
Raspberry Ripple cardstock 5 1/2 x 8 1/2"
Old Olive Polka Dot Parade patterned paper (#126902) 2 pieces 1 7/8 x 5 1/4", 1 piece 2 5/8 x 4"
Whisper White cardstock 2 1/2 x 3 3/4", extra for stamped images
Flower Shop stamp set (#130942)
Raspberry Ripple 3/8" Satin Stitched Ribbon (#126845)
Raspberry Ripple In Color ink
Pansy punch (#130698)
Stampin' Dimensionals (#104430)

1. Cut your papers to the dimensions listed above. Lay aside.
2. Stamp 4 flower images with Raspberry Ripple ink using a stamp from Flower Shop stamp set. Punch each of these out with the Pansy punch. Lay aside.
3.Score and fold your Raspberry Ripple cardstock at 4 1/4". You can score your cardstock for the side folds but I get a better fit when I fold each side to the center fold and crease. Fold the side to touch the center fold and crease. Do this on both sides.

4. Cut 2 pieces of ribbon 3" each. Place adhesive on the back and adhere to the Old Olive patterned paper about 1" from the bottom. Wrap the ends around to the back.

5.Place adhesive on the backs of the patterned paper and center on each of the side folds. You will have a Raspberry Ripple border all the way around each piece.

6. Place Stampin' Dimensionals on no more than 2 petals of each of 3 flowers. Peel the paper backing off and place so that the dimensionals are only on one side of the card fold.


Place a flower on the top and bottom on the left side. Place the third flower in the center of the right side. Refer to the picture to see how it should be. The flowers will not be adhered all the way across the card. You want to allow it to open in the center.
7. Now you can decorate the inside of the card. When you use a dark cardstock for your base card, it is difficult for a  stamped greeting to be read. On this card I cut a piece of Old Olive Polka Dot paper 2 5/8 x 4" and a piece of white cardstock 2 1/2 x 3 3/4". Layer the white on the patterned paper. Stamp your greeting on the white and adhere the patterned paper to the inside of the card. This also helps to cover up the fold that you created when you made the gate fold of the card.
I added the fourth flower image to the bottom right of the greeting. This still gives you plenty of room for a personal note and your signature.
8. I love to have my envelopes look pretty too so I often stamp on the front or back of the envie with a stamp from the set that I'm using. I stamp 2 or 3 times on the bottom left of the envie and once on the bottom right. Sometimes I'll stamp on the back flap also. Be sure to leave plenty of room in the envie for the address and postage.


Wednesday, August 7, 2013

Birthday Window

This fun birthday card has a double scallop edge over the ribbon. The window is open wishing your friends a happy birthday.

Materials needed:
Basic Gray cardstock 4 1/4 x 5 1/2"
Summer Starfruit cardstock 4 x 5 1/4"
Pear Pizzazz or Certainly Celery cardstock 3 3 /4 x 3 3 /4"
Marina Mist cardstock 3 3/4 x 2"
3/8" Satin Stitched Ribbon Gumball Green (#126848)
Edgelits Adorning Accents dies (#125595)
Cottage Window stamp set (#127282)
Teeny Tiny Wishes stamp set (#115370)
3/16" Corner punch (#119275)
Early Espresso ink
Gumball Green ink
Marina Mist ink

1. Adhere the Gumball Green ribbon about 1 1/4" from the bottom of the Summer Starfruit cardstock. Wrap the ends to the back of the cardstock.
2. Punch all 4 corners on the Summer Starfruit cardstock. Adhere it to the basic gray cardstock.
3. Punch the edges of the green and blue cardstocks with the Edgelits Adorning Accents die. Adhere to the Summer Starfruit cardstock placing the blue just over the ribbon a bit. Layer the green cardstock on top of the blue.
4. Stamp the window and the branch on the cardstock. Stamp the birthday greeting in blue in the window.
5. Adhere the card front to the card base.
You've just finished another birthday card and are ready to play some more. Have a happy stamping day!

Monday, August 5, 2013

Triple Birthday Flowers

If you've been watching my blog for any amount of time, you know that I do lots of birthday cards! I send birthday cards to the senior citizens at my church and also cards to the members of my TOPS group. IMO, it's always fun to get something in the mail that shows someone thought of you. Well, here's another birthday card for a sunny August.


Materials needed:
Basic Gray cardstock 4 1/4 x 5 1/2"
Pacific Point cardstock 4 x 5 1/4"
Bermuda Bay cardstock 2 1/4 x 4"
Crisp Cantaloupe cardstock 2 1/4 x 3 1/2"
Patterns Pack II (retired #114325) or other patterned papers
3/8" Striped Organdy Ribbon Marina Mist (#129292)
Secret Garden Framelits Dies (#129372)
Pacific Point ink
On Your Birthday stamp set (retired #111664)
Modern Label punch (#119849)
Candy Dots Brights (#130931)
Stampin Dimensionals (#104430)

This is a super easy card to make.
1. Adhere your ribbon to the Crisp Cantalupe cardstock and wrap the ends around to the back of the cardstock.
2. Layer the cardstock pieces on the card with adhesive as shown in the picture.
3. Pop the flowers out of patterned paper with the Secret Garden Framelits dies and your Big Shot.
4. Place a Candy Dot in the center of each flower. Adhere the flowers on the cardstock with the flowers slightly overlapping. For the 3rd flower use Stampin Dimensionals to pop it up a bit and give your card some dimension.
5. Attach it to your base card and you are ready to send it to your birthday friends!

Friday, July 26, 2013

A Shaking Birthday

I've always enjoyed cards, etc with some type of movement. Years ago I would make titles & embellishments with movement on my scrapbook pages. Well, actually, even though I learned how to make shaker boxes, it really was difficult and required a bit of time. Now SU! has come out with some great Shaker Frames that you can use on your layouts and cards. These really help make shaker boxes a lot easier!

Materials:
Birthday Basics DAP (#130145)
Whisper White cardstock 5 1/2 x 8 1/2 scored and folder at 4 1/4"
3/8" Satin Stitched Ribbon Gumball Green (#126848)
Best of Birthdays stamp set (#132929)
On Your Birthday stamp set (retired, #111664)
Raspberry Ripple In Color ink
Gumball Green In Color ink
Gumball Green marker
Printed Designer Brads, In Color (#122940)
Hung Up Cute Clips (#129389)
1 3/4" Circle Punch (#119850)
1 3/8" Circle Punch (#119860)
Extra Large Oval Punch (#119859)
Shaker Frames (#124155)
Window Sheets (#114323)
Mini Glue Dots (#103683)
glitter, sequins, etc

1. Punch a 1 3/4" circle from coordinating patterned paper. I used an extra piece of the Birthday Basics paper that I used for the card front. Cut a 1 3/4" circle from a piece of Window Sheet. (Window Sheets are a thin translucent plastic.) On the 4 1/4 x 5 1/2" of patterned paper used for the card front, punch a hole with the 1 3/8" punch. Lay all these pieces to the side.
2. Carefully peel off the shaker frame that you will use. I used the 2nd from the largest size on this card. The bottom has adhesive on it so place this on top of the extra piece of 1 3/4" patterned paper circle. Add your glitter, sequins, etc into the opening of the shaker frame.
3. Peel the top paper off the shaker frame. Lay the Window Sheet that you cut earlier on top of the adhesive on the shaker frame. You have now built your shaker box.
4. On your white cardstock, use the 1 3/4" circle punch and punch a circle on what will be the front part of the card base. Check to make sure your shaker box will fit inside this circle.


5. Adhere the shaker box to the back of the patterned paper where you cut a circle earlier. This hole was with the 1 3/8" circle punch so the patterned paper will cover up the white shaker frame. If this doesn't matter to you, you can cut them the same size. I think it looks better with the shaker frame not showing.
6. Decorate the rest of your card front. Cut a piece of the Gumball Green ribbon about 6" long. Tie it in a knot in the center of the ribbon and adhere it to the right hand side of the patterned paper.
7. Stamp a "happy birthday" greeting from the Best of Birthdays stamp set. Use the oval punch to cut this out.  Place a cute clip on top of the greeting.
8. Place adhesive on the back of the greeting and glue dots on the back of the clip. Put this near the bottom middle of the card. Place a Gumball Green brad just under the birthday greeting.
9. Place adhesive on the back of the card front but not on the back of the shaker frame/box. Carefully, put the shaker box into the hole in your card base. Even up the rest of the card front with the white card stock card base. Press to adhere.


10. On the inside you will stamp your greeting in Raspberry Ripple. Use the Gumball Green marker to draw a string from the back of the shaker box. This will make it look like a balloon on the inside of the card.

Wednesday, May 1, 2013

Celebrate your day!


This card was simple and quick to put together. I'm using it for birthdays this month by stamping a birthday greeting inside but it could be used to celebrate many different occasions.

Midnight Muse cardstock
Honeycomb Textured Impressions embossing Folder (#129378)
Designer Typeset Photopolymer Stamps (#132956)
Best of Birthdays 25 yr celebration stamp set (#132929)
Petite Pennants Builder punch (#122361)
Floral District patterned paper (#126919)

Wednesday, March 27, 2013

Silhouettes Birthday

Materials: Sycamore Street Designer Buttons (130923)
Sycamore Street 1/4" Ribbon Tangerine Tango (#130812)
Tangerine Tango cardstock 4 1/4 x 5 1/2"
Island Indigo cardstock 4 x 5 1/4"
Whisper White cardstock
Framelits Labels Collection dielits (125598)
Serene Silhouettes stamp set (#127324)
Midnight Muse In Color ink
Teeny Tiny Wishes stamp set (#115370)
Word Window punch (#119857)
Modern Label punch (#119849)