I got the results of my tests back from the dr yesterday. They feel that there is about a 90% chance that I have now developed an allergy to a pencillin antibotic that I was given during my hand surgery on July 13. That will mean that in the future I will have to always tell drs that I had a bad reaction to pencillin. I certainly don't want to ever have a reaction like I did this past couple of weeks. I am doing much better now. I am not 100% but most of my problems now are a result of the predinsone that the dr has me on. He said that we could shorten the time that I was on it but he is concerned that the allergy will pop it's ugly head up again "with a vengance." In the meantime, I can deal with the sleeplessness and other side effects. At least, I'm getting some card making done when every one else in the house is asleep! (lol)
Have you ever stamped your own background paper? Well, Betsy Feldman has! Here's what she's done with it and where I got my idea.
Here's the card I made after reading her blog.
 My idea was to make a circle template using circle punches.
1/2" circle (#119869)
3/4" circle (#119873)
1" circle (#119868)
1 1/4" circle (119861)
1 3/8" circle (119860)
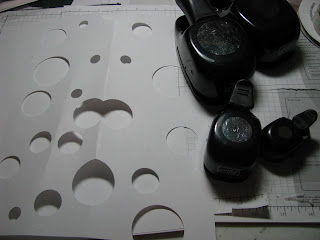 To do this, I had to fold the paper in a few spots so I could get the punch in the middle of the paper. That didn't hurt anything since this is just a template for stamping.
 I choose 3 of my favorite color of SU! classic and In Color blues, Pacific Point, Island Indigo, and Marina Mist. I first thought that I would just use the Fabulous Florets stamp set(#123027) but after I started stamping, I decided to add Field Flowers stamp set(#122762).
 Stamp the flowers inside the cut out circles. This is one time that you might want to rock & roll with your stamp to get more of the image inside the circle.

 Remove the template and you have your stamped paper. At this point you may decide to add some more images of the same or different colors. I added some leaves and stems to it.
 If you wish you may cut your paper to card size or use as is for some other project.
To my card I added a saying from Field Flowers and cut it with my circle punch. I inked the edges with Pacific Point ink and a sponge dauber.
I then stamped happy birthday from Teeny Tiny Wishes (115370). I punched it out with the Word Window punch(#119857) and mounted it on a left over piece of coordinating Summer Smooches paper (#125409). I added brads from the Brad Brights Collection (#119740) and Summer Smooches fabric brads (#125589).
This will give you a look to your cards and scrapbook pages that no one else has because you created it yourself!
Have you ever stamped your own background paper? Well, Betsy Feldman has! Here's what she's done with it and where I got my idea.

1/2" circle (#119869)
3/4" circle (#119873)
1" circle (#119868)
1 1/4" circle (119861)
1 3/8" circle (119860)
 To do this, I had to fold the paper in a few spots so I could get the punch in the middle of the paper. That didn't hurt anything since this is just a template for stamping.
 I choose 3 of my favorite color of SU! classic and In Color blues, Pacific Point, Island Indigo, and Marina Mist. I first thought that I would just use the Fabulous Florets stamp set(#123027) but after I started stamping, I decided to add Field Flowers stamp set(#122762).
I placed the template over a piece of white cardstock the stame size as the template (8 1/2 x 11"). I secured it in place with paper clips.


To my card I added a saying from Field Flowers and cut it with my circle punch. I inked the edges with Pacific Point ink and a sponge dauber.
I then stamped happy birthday from Teeny Tiny Wishes (115370). I punched it out with the Word Window punch(#119857) and mounted it on a left over piece of coordinating Summer Smooches paper (#125409). I added brads from the Brad Brights Collection (#119740) and Summer Smooches fabric brads (#125589).
This will give you a look to your cards and scrapbook pages that no one else has because you created it yourself!
No comments:
Post a Comment