I'm always looking for something inexpensive and cute to put in my Operation Christmas Child shoeboxes. Not only will these headbands be great in a little girl's shoebox, they would be a great gift for any little girl. You might even want to make one to match your child's outfit. This is a longer post than I usually place on here because it's a whole project. I hope that you enjoy making these for some little girl somewhere.
Materials:
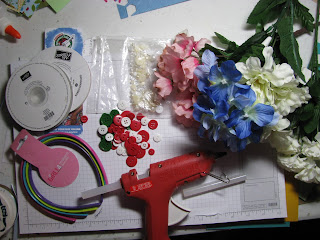
Plastic or fabric headbands. (You can usually find 4-6 of these for $1 at the Dollar Tree)
Silk flowers
Ribbon
Pearls or gems
Buttons or other embellishments
Silicone Craft Sheet (SU #127853)
Glue gun
Glue sticks
Toothpicks
Plug in your hot glue gun so that it can begin heating. ****Always be careful with a hot glue gun. It can and will burn your fingers with the glue. I have burned my fingers many times with them, even to the point of creating blisters on my hands. A hot glue gun should always be handled by an adult.****
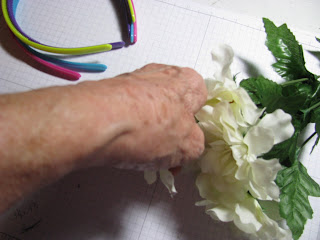
I start with a "bunch" of silk flowers that I have found at 50% off. (I usually get them at Hobby Lobby but any store where you can find them cheap works) Grab a handful of petals and pull them completely off of the stems. Lay the stems aside. I don't throw them away because I might want to use the leaves later. (I'm a bit of a hoarder so I don't throw much away) Most of this type of flower will have a plastic leaf and seman holding the petals together. Pull that apart and do throw this away. You now have several petals to work with.
Place a small amount of hot glue between the petals and stack 3 or 4 together. Use a toothpick to help push the petals together and not burn your fingers. As you can see, when I first started glueing my petals together, I forgot to grab my silicone craft sheet. Of course, the hot glue stuck to the paper I had on the table & I had to peel the paper off my flower. It can also stick to your table. That is one reason that I recommend using a silicon craft sheet, like the one you can get from Stampin' Up! under your projects. The glue peels right off of the craft sheet and doesn't damage your project.
I then hot glued the flower onto the headband. The number of flowers you place on a headband is completely up to you. I usually do odd numbers because that gives it a better look. I know that there is a design rule about odd numbers but I can't tell you what it is exactly.
For my next headband, I wanted to add a large leaf that I had. Icould have used smaller leaves also, if I had wanted.
I put hot glue on the back of the leaf and then pressed it carefully (it's hot) on the side of the headband.
I then put together some flowers like I did for the headband above. I used a smaller petal this time and put a group of 3 flowers on the headband, with the hot glue and toothpick.
I used a flat back pearl for the center of these flowers.
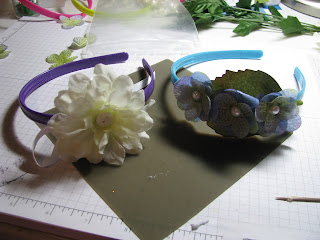
Here are two of the headbands that I have made to go in my shoeboxes. They are so cheap to make, I usually put several in the boxes for the 5-9 year old girls shoeboxes.
Plastic or fabric headbands. (You can usually find 4-6 of these for $1 at the Dollar Tree)
Silk flowers
Ribbon
Pearls or gems
Buttons or other embellishments
Silicone Craft Sheet (SU #127853)
Glue gun
Glue sticks
Toothpicks
Plug in your hot glue gun so that it can begin heating. ****Always be careful with a hot glue gun. It can and will burn your fingers with the glue. I have burned my fingers many times with them, even to the point of creating blisters on my hands. A hot glue gun should always be handled by an adult.****
I start with a "bunch" of silk flowers that I have found at 50% off. (I usually get them at Hobby Lobby but any store where you can find them cheap works) Grab a handful of petals and pull them completely off of the stems. Lay the stems aside. I don't throw them away because I might want to use the leaves later. (I'm a bit of a hoarder so I don't throw much away) Most of this type of flower will have a plastic leaf and seman holding the petals together. Pull that apart and do throw this away. You now have several petals to work with.
Place a small amount of hot glue between the petals and stack 3 or 4 together. Use a toothpick to help push the petals together and not burn your fingers. As you can see, when I first started glueing my petals together, I forgot to grab my silicone craft sheet. Of course, the hot glue stuck to the paper I had on the table & I had to peel the paper off my flower. It can also stick to your table. That is one reason that I recommend using a silicon craft sheet, like the one you can get from Stampin' Up! under your projects. The glue peels right off of the craft sheet and doesn't damage your project.
Because I decided I wanted a ribbon on this headband, I cut about 12" of ribbon to use. I looped it and place hot glue on to hold it in place. I then hot glued the ribbon to the headband. I usually attach my decorations to the side but the position is up to you.
I also added a white button to the center of the flower. You can use buttons, pearls, gems, color dots, etc to the center of your flower.
For my next headband, I wanted to add a large leaf that I had. Icould have used smaller leaves also, if I had wanted.
I put hot glue on the back of the leaf and then pressed it carefully (it's hot) on the side of the headband.
I then put together some flowers like I did for the headband above. I used a smaller petal this time and put a group of 3 flowers on the headband, with the hot glue and toothpick.
I used a flat back pearl for the center of these flowers.
There are 2 totally different headbands to place on some adoreable little girl's head. Use your own creativity to make them as many and as different as you like.
I can just picture the little girl in Hiatti who received a children's tiara in her shoebox. As she stood on top of the trash heap by her home, for that moment she was queen of the world and beautiful with her tiara. Perhaps you can help a little girl somewhere feel beautiful with the special headband that you made and placed in a shoebox for her.


No comments:
Post a Comment