Monday, July 30, 2012

Cherry Blossom Card

I posted a quick tip one day last week about using stickers that can be found on sheets of postage stamps and other places. Here are some more details about the card that I posted that day.
Regal Rose cardstock 4 1/4 x 5 1/2"
Gumball Green cardstock 2 x 4 1/4"
Polka Dot Parade DSP (#126902) 1 3/4 x 4"
Whisper White cardstock 2 x 4 1/4"
Fabulous Florets stamp set (#123027)
Primrose Petals In Color ink pad
Tenny Tiny Wishes stamp set (#127802)
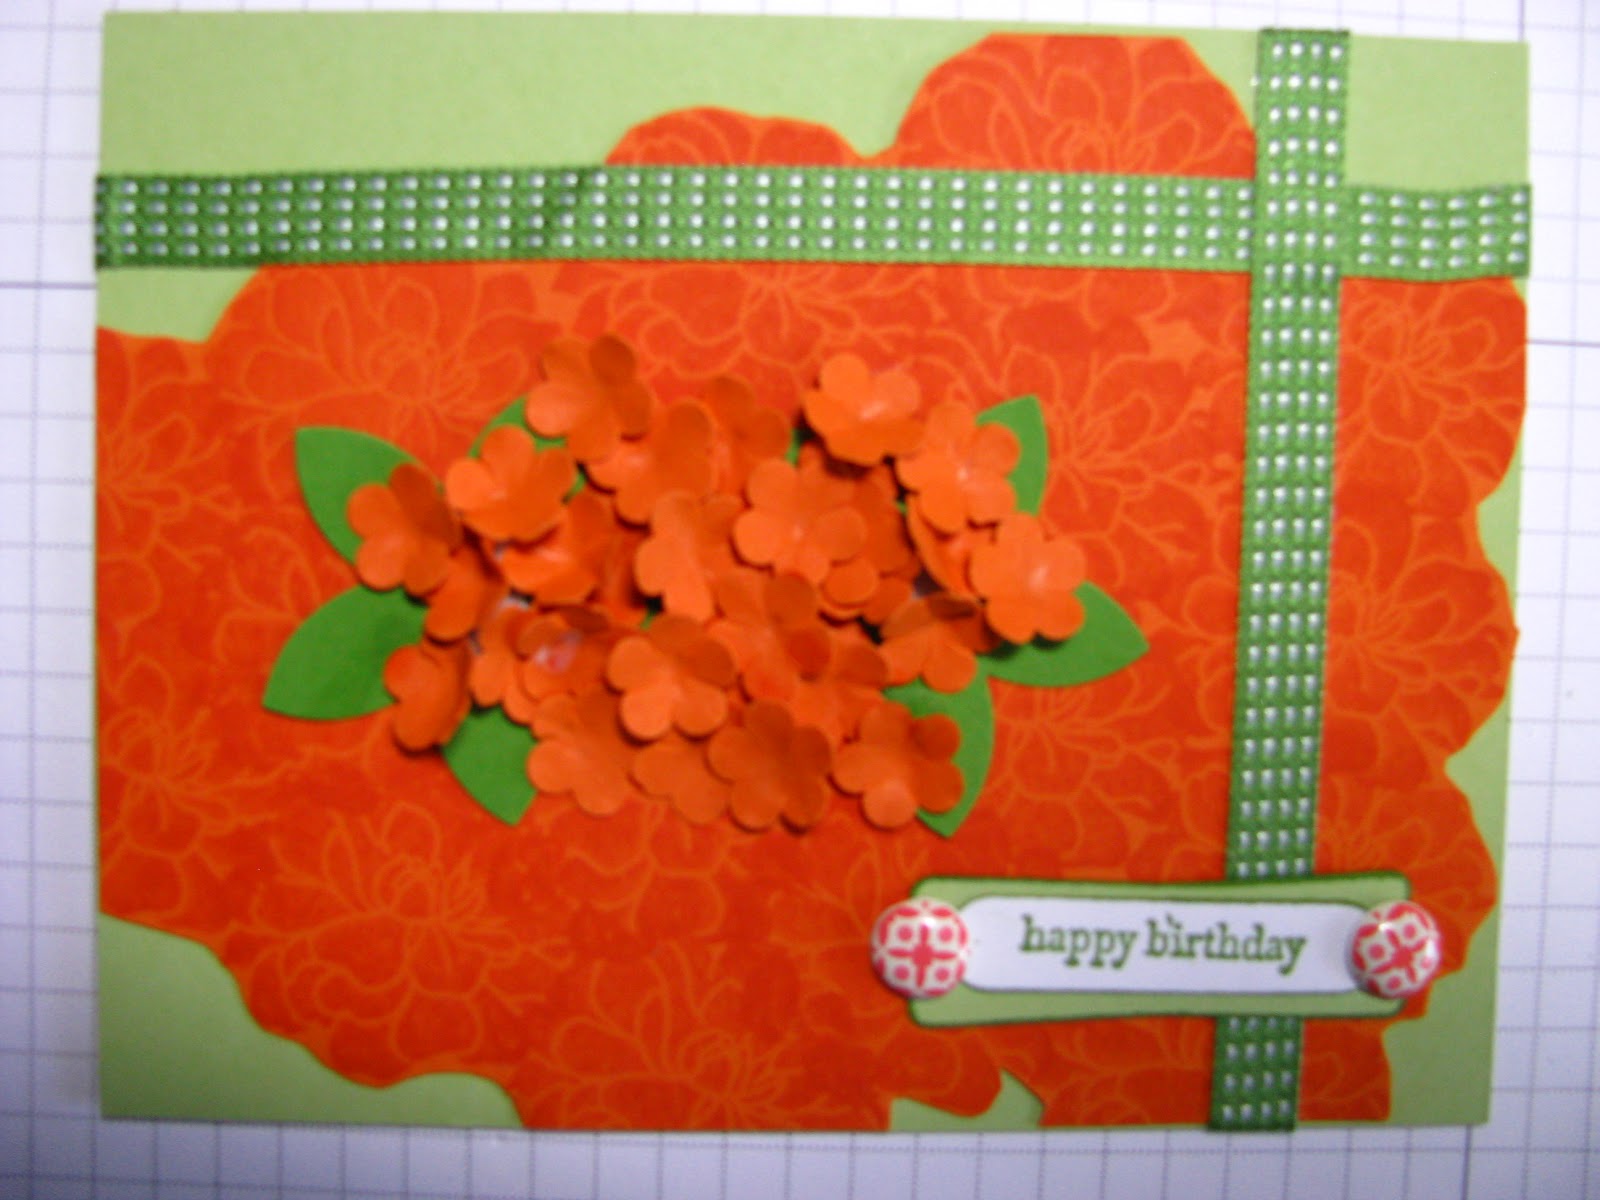
Gumball Green 3/8" stitched stain ribbon (#126848)
2 brads from 3/16" Subtles Brads collection (#119738)
Word Window punch (#119857)
Trio Flower punch (#109183 retired)
Dazzling Diamonds glitter (#102023)

For the stamped flowers, I used the "stamp off" techniques. It's very simple. I loaded my stamp up with the color and then stamped the image 3 different times on the cardstock without reinking. That gave me 3 shades of the same color on the cardstock. Then I inked and stamped 3 more times. After I cut the cardstock to size, I inked the edges with the  cardstock directly to the ink pad.

Hope you have a great time stamping!

Sunday, July 29, 2012

Lord I Lift Your Name on High

If this doesn't lift you up and make you praise the Lord, I don't know what will!

My health is improving. It's taking my longer than I would like to get my strength back but the "rash" is disappearing and I'm not in the pain that I was in earlier in the week. I get the results of my tests on Tuesday. I know that God is still in control even when I don't get to do all the things that I want to do.

Saturday, July 28, 2012

What is my blog?


This blog is in a constant state of transition. I would like to have the world's greatest blog but I am limited by both my personal knowledge and time. To begin with, I don't have the know-how or the equipment to do videos so that limit's me some as far as greatness goes. lol I do realize that there are many different types of learners and paper crafters. Some learn better with videos and some learn better with step-by-step instructions. I'm generally the step-by-step person. There have been times I have done lots of the step-by-step stuff & times I've just listed my materials. I'm sure I will continue to do this. I will try, whenever possible, with the more difficult projects to do the step-by-step method. With other items, I'll just list materials. Let me know if you have a perference.

Also, there is the idea that a daily blog is best. I've tried to do this at times but the fact is that I have a life away from my crafting and I simply do not always have the time or the ideas to do a blog every day. There will come other times when I do a daily blog but I don't guarantee how often. It will be here when it's here. I hope that none of this turns you off and that you will continue to check by as often as you can.

Much to my sorrow, I've had to pull out of the mission trip that I had planned and worked so much for. The trip is still going on and will still glorify God but I will not be going. I have had an extremely allergic reaction to a medication and have been terribley ill for the past week. I am improving and hopefully, it won't be real long until I'm back to whatever normal is. In the meantime, I know that God is still in control and He has a plan. I just don't know exactly where I fit in His plan but He will let me know when His time is right.


Friday, July 27, 2012

A Quick Tip

You can find free embellishies almost anywhere. You just have to keep you eyes & your inimagation open.
If you buy sheets of stamps like here...


it's not unusual to find a "sticker" across the top of the sheet. It is on the same sticker paper as the stamps and can be used as a decorative element on your cards. I have not checked to see if they are acid free or not.

The banner at the top of this sheet said "Cherry Blossom Centenial" and shows pictures of the cherry blossoms in bloom in Washington, DC. I didn't need the word 'centenial' so I did some cutting and resticking to make what I wanted.


It's hard to see these pale pastel colors on here but maybe you can get the idea of what I did. I cut the sticker just beyond the word centenial. I laid the tail part of the banner over the unwanted word & pieced it to look like the banner ended after blossom. I then trimmed around the banner to use on my card.


Here is how I used it on my card.

Look for this card one day next week for more directions on how to do other parts of it.


Wednesday, July 25, 2012

Bird just for you card

International Bazaar Designer Series Paper (#126920)
Papayal Collage stamp set (126612)
Teeny Tiny Wishes stamp set (#115370)
Pacific Point In Color ink
Framelits Labels Collection (#125598)
In Color printed brads collection (#122940)
glue dots (#103683)
Bashful Blue ribbon

Wednesday, July 18, 2012

Amour Eifel Tower card

Artistic Etchings stamp set (#120573)
Printed Designer Brads In Color (#122940)
Everyday enchantment Organdy Calypso Coral ribbon (#126060)
Summer Smooches DSP (#125409)
Really Rust classic ink
Simply Scored Diagonal Plate (#125586)
Word Window punch (#119857)
Modern Label punch (#119849)

Monday, July 16, 2012

surgery

The drs & I decided to have the surgery on my right hand done this past Friday. Everything went well & it is healing nicely. They told me to start moving my fingers as soon as the surgery was done. My fingers are still swollen some & THE finger is bruised pretty good but working fine. My problem now is vertigo. I've had problems with vertigo for the past 8 or so years but the past year it's been doing very well with only minor problems now & then. Well, I think the surgery, whatever, has kicked it into gear now. I'm quite dizzy and light headed and certainly don't feel like driving anywhere. I'm just going to take it easy for a few days & only go places my sweet dh can drive me.

My plan is to do a tutorial on using a score board & the new SU diagonal board. I started to work on that yesterday afternoon & discovered the batteries in my camera are dead. Until I can get some more batteries, I won't be able to take any pictures for you. Hopefully, it won't be long & I'll be able to get that up here for you.

In the meantime, please have patience with me & come back when you can. Check out some of my older posts. Maybe there is something there that you missed the first time around. I'll be back asap.

Happy Stamping!

Friday, July 13, 2012

Scrapbook Bible Study


This is a 2 page scrapbook spread layout. I've written a Bible study called "Faithbook." I taught it at my church last summer. Here is the lo that I finally did of it. I'm so far behind on my scrapbooking, actually, farther than a year but I wanted to do this one.
Happy birthday to me today!


I used paper from Comfort Cafe DSP(#126898) pack. I did 3 two page spreads with my pictures so using the paper from the same set gave them a cohesive look. For the strips on each side, I cut another sheet from Comfort Cafe 1 x 12." Cut 2 for each page. Ink them with Midnight Muse. The ribbon in between the patterned paper is 1" Bashful Blue Double Stitched Grosgrain ribbon(#111848).
The journaling boxes are cut from a Top Note Bigz die (#113463) and a Labels Collection Framelits(#125598) cut from Summer Starburst cardstock. The letting is on Summer starburst cardstock also.
If you are interested in my Faithbook Bible study to scrapbook you own faith journey, contact me. I will send it to you for the cost of copying and postage.


Monday, July 9, 2012

Greens Sympathy Butterfly


Certainly Celery cardstock 4 1/4 x 5 1/2"
Old Olive cardstock 4 x 4 1/2"
Eyelet Border punch (#119853, retired)
Just Believe stamp set (#120453)
Teeny Tiny Wishes stamp set(#127802)
Gumball Green 3/8" Satin Stitched ribbon (#126848)
Basic Pearl Jewels (#119247)
Stamp-a-ma-jig (#101049)
Beautiful Butterflies Bigz die (#114507)
Big Shot
thin wire

Sunday, July 8, 2012

Another Lee Greenwood

I found this earlier in the week when I was looking for God Bless the USA by Lee Greenwood. This song has not been released but I think it's really good.

Saturday, July 7, 2012

A Mound of Petals

For today, we've got a mound of orange flowers sitting on an orange flower background.

  1. Use a 4 1/4 x 5 1/2" piece of Certainly Celery cardstock for your background.

2. On a piece of 4 1/4 x 5 1/2" Tangerine Tango cardstock, stamp repeated flowers all over the cardstock with Tangerine Tango ink. This tone on tone look gives you a nice solid garden look.

3. Cut around the flower edges.


4. With the Trio Flower punch (#109183) from the 2009 SU! catalog, punch about 36 flowers. Since this punch is no longer available, if you don't already have it, you could use the Itty Bitty Shapes Punch(#118309). This punch has 3 shapes on it, one of which is a bitty scallop circle. It is very close to the same size as the trio flower. It will probably give you a slightly different look, but I think that it would still work fine.

5. Punch 2 flowers with the 5 petal flower punch (119880). This punch is designed for flowers but I've always thought it made great leaves. This punch is retired also but SU! has a punch called Blossom Petals Builder(#121808). It has several shapes on it that would be good for leaves also.
6. Place the leaves on top of the Tangerine Tango images that you stamped. You will want them to be a bit to the right of center.


7. Place 2 Stampin' Dimensionals(#104430) on each leaf. They do not have to be center. With a little experimenting, I found that 2 works a lot better than just one for the dimension that you want for this project. 

8. Using the end of an embroidery hook and a soft  mouse pad, push into the center of each petal. You want to give the petals some curve to make them somewhat concave in shape. There may be tools especially made for this purpose, but I've found my embroidery hook works just as well.

9. Doing the petals one at a time, place 2 or 3 petals on each of the dimensionals that you placed on the leaf. With the other petals, place a dot of liquid or school glue on the back of each petal, still working one at a time. Place the petal around the petals that you've already put on the dimensionals. You will want to overlap these and even place some on top of others until you have the look you want. I have some tweezers that I've had for years that I just love to use for working with small pieces.

10. Allow the petals about a 1/2 hour for the glue to dry before you continue.

11. Cut 2 pieces of 3/8" Gumball Green Satin Stitched Ribbon(#126848), one piece about 4 1/2" and the other piece about 6." Apply adhesive to the back of the ribbons and place them on the right and top of the card, overlapping at the corner.

12. Stamp a greeting from Teeny Tiny wishes stamp st(#115370) in Gumball Green ink onto white cardstock.

13. Punch it out with the Word Window punch(#119857). Ink the edges with Gumball Green ink.

14. Punch out a Modern Label punch(#119849) from Certainly Celery cardstock. Ink the edges wotj Gumball Green ink.

15. Adhere the greeting on top of the Modern Label punch.

16. Punch a hole at each end with your 3/16" circle punch.

17.Add a brad from the Everyday Enchantment Brad set (#126126) that was in the 2012 Sale-a-Bration catalog. If you don't have those, SU! has some fabulous new brads available this year in patterns. I just love, love, love patterned brads!

18. Attach this onto you Whisper White card base and you are ready to give it away!

Friday, July 6, 2012

Roses and Doilies

I do like it when I can use more than one stamp set on a card. I actually used 3 different stamp sets for this card, Delicate Doilies(#122592), Elements of Style (#120045) and On Your Birthday (#111664, retired).

  1. Cut a 4 1/4 x 5 1/2" piece of paper from Summer Smooches DSP(#125409) for the background piece.

2. Stamp 2 different doilies in Raspberry Ripple and Gumball Green In Color ink. Stamp the birthday greeting from Raspberry Ripple ink on Whisper White cardstock.

3. Using Raspberry Ripple and Gumball Green brush tip markers, color the roses and leaves directly onto the stamp. If you've not done this before, check out my tutorial on it here

4. Pop out the doilies using the 2 1/2" Circle punch(#120906). Adhere one to the bottom right of the background paper, going slightly off the edge. Adhere the other doily to the top left of the background paper, again going slightly off the edge. Trim the parts that go off the edge.

5. Cut around the edges of the roses that you stamped.

6. To make the roses pop, add SU! Stampin' Dimensionals (#104430) to the back of the image. For larger images like this, I like to use up my edges that are left on my dimensionals sheet. Just snip the length that you need from the edge and apply in the same way you do regular dimensionals.


7. Cut the greeting out with the Large Oval punch (#119855) and ink the edges with Raspberry Ripple In Color ink. Apply adhesive to the back and place on the bottom left corner below the roses.

8. Cut 2 pieces of Marina Mist 1/2" Scallop Dot ribbon(#122986) each about 6" long. Apply adhesive to the back of one piece and place it on the card front over the lower doily.

9. Tie the other piece in a bow. Using glue dots (#103683), put 3 on the back of the bow. Press it down over the other ribbon at the top right of the card.

10. Adhere the card front to the card base and add a greeting to the inside of your card.

Thursday, July 5, 2012

Blue sympathy Floral


Marina Mist cardstock cut to 4 x 5"
Whisper White cardstock cut to 5 1/2 x 8"
Simply Scored Scoring Tool (#122334)
Simply Scored Diagonal Plate (#125586)
Fabulous florets stamp set (#123027)
5/8" Whisper White Satin ribbon (#114616)
Teeny Tiny Wishes stamp set (#127802)
Always Artichoke classic ink
Midnight Muse In Color ink
Word Window punch (#119857)
Modern Label punch (#119849)
Brights Brads (#119740)
Midnight Muse cardstock

Wednesday, July 4, 2012

Happy 4th of July


On this July 4th, please remember all of the brave men and women who have sacrificed for us to have a free country. This includes all of those from 1776 to 2012. Not only have many given the ultimate sacrifice of their lives but many more have given time away from their loved ones. Many have missed seeing babies born, children graduate and many special events that most parents just take for granted. When a man or woman is in the military serving our country, they can't just take time off to go see their child be born or celebrate an important birthday or event. Especially, when they are deployed somewhere overseas, they have to miss many family times. This also means that the families are sacrificing for our nation's freedom. The children who miss their mommy or daddy because they are serving overseas are making sacrifices also. The spouces who go to bed by themselves at night time are making sacrifices.

I know. I've watched family members make these sacrifices and I am proud of each and every one of them. From my daughter and my grandchildren who lovingly and somewhat willingly give my son-in-law up so he can be a career Army chaplain to my grandson who spent 4 years in the Air Force. I also have another grandson who will be going to basic training for the Marines in just a few weeks. I love them all and I am very proud of what they are willing to do for our country. Next time you see a person in uniform, take a minute to say "thank you for your service." They really do need to hear it!


All of us in the USA can be proud to be an American!


Tuesday, July 3, 2012

Fixing Mistakes

It is so easy to make a mistake, a goof, a mess when you are paper crafting. If you're working with digital, all you do is hit the Undo button and start over. With paper crafting, there isn't an Undo button. But there are as many ways to fix a mistake as there are mistakes that you might make. Now, how would I know anything about fixing mistakes? Ha Ha!! It's obvious! It's because I'm human just like you and I make plenty of mistakes. I just don't show them to you!

Here are a couple of ideas that might help you in the future.

Have you ever stamped your image on cardstock that you've already used pieces of? You want your paper to go as far as possible so you try to get the most of every little piece. So I stamped a doily on cardstock that I had already stamped several images on and cut them out. When I went to punch it out with my circle punch, I was too close to where I had already cut out other images.
You can see that this isn't quite a circle. One part has a straight line and another part has a niche cut out of it. This could really make the whole card look bad. I don't want to go back and cut close to the actual image and I don't want to start over or throw this piece away. The fix is to place one part sticking off the card so that you will trim this off. You place another image or ribbon overlapping the other part. No one can see the mistakes and they won't know unless you tell them!

Now, I made this card several weeks ago and had it leaning against my embellishment drawers in my craft room. While we do have a/c in our house, this is the hottest room of the house. I had several days when I had other things I HAD to do and didn't get in to do any crafting. I assume that the adhesive melted slightly because the whole center piece had slid on top of the ribbon. It was much worse than in this picture but I tried to fix it before I took the picture. It seems logical to me that the green scalloped square would have been in the middle but the butterfly had wings trimmed off where they stuck out over the edge of the card. Any way, even though I've got it bad where it must have been, the whole card now looks lop-sided. I really don't like all the empty red space. There are times that empty space looks good and has a purpose but this just doesn't seem to be one of them.

So what am going to do? Add more ribbon! By adding another piece of the stitched ribbon to the left side of the card, it looks like it was planned that way.

There are so many things you can do to fix a mistake. All you have to do is use your imagination!

Monday, July 2, 2012

I Don't Do Pink Pink

I don't do pink very often but I thought I'd give it a try so here is what I came up with. I used lots of tools on this. I do love tools!

Word Window punch #119857
Teeny Tiny wishes stamp set #115370
Melon Mambo 1/2" Polka Dot Grosgrain ribbon #125409
Scallop Edge Border punch #119882
1 3/4" Circle Scallop punch #119854
1 1/4" Circle punch #119860
Summer Smooches DSP #125409
Printed Petals stamp set #120444
Primrose Petals In Color ink
Wild Wasibi classic ink
Adornments In Color Dahlia Assortment #127556
Stampin' Diminsionals #104430
Glue Dots #103683

Sunday, July 1, 2012

Sunday Share

My friend, Cheri's dad, Bob Jones is in a better place now. We know that he is in heaven with our Lord. Be praying for Cheri, her mom, Milie, and her aunt, Marian. They are wonderful ladies of faith but I know this is still a difficult time.