Thursday, May 31, 2012

Paper Beads Tutorial

Paper beads are actually very easy to make. You can make them from any kind of paper, cardstock, patterned paper, even construction paper. If you are going to use them on a scrapbook page, you will want to be sure that your paper is acid free. For the card yesterday, I used a paper bead as the butterfly's body.
  1. Measure the width that you need for your project. For the butterfly's body, I needed a bead that was 1" long. For this bead, I used Midnight Muse cardstock. Cut out a triangle with the width being the distance that you need, in this case 1."

2. If you are working with cardstock, you will need to work it a bit to get the cardstock more pliable. If you are using a lighter weight paper, this may not be necessary. Simply work it back and forth in your fingers, rolling it gently until the paper will roll easily.
3. Roll the paper, starting with the wide end, around a toothpick. If you want larger beads, you can roll it around a pencil or a straw. I had my second graders do this to make "spirit" necklaces every year. Make a couple of rolls with the cardstock.


4. Pour a liquid glue, such as a school glue, down the center of the triangle to near the tip. Continue rolling until you have rolled it completely. Hold it together for 30 seconds or so until it sticks.
5. When it is dry, slide it off of the toothpick. Make more beads if you need them for your project.
6. For a nice shiny coating, like I have here, cover it with SU! Crystal Effects(#101055). This will give it a firm coating as well as a shiny look.

If you have your  project ready, you can go ahead and place it onto the butterfly (or whatever project you are doing) while the Crystal Effects is still wet. It will then stick to your project without needing any additional adhesive. Be sure that you give the bead plenty of time to dry(overnight) before you put anything on top of it or inside anything. If it is not dry, it will stick to whatever it touches.

Paper beads can be used on many projects. It makes a great butterfly body, can be used to dangle from a border or make a necklace. Use your imagination! I'm sure you can find many other ways to use these.

Wednesday, May 30, 2012

Happy Thoughts

How fun has this Blog Hop been! I've loved looking at all the super ideas my fellow Glitter Queens have had on their blogs! And did you see Dee's watering can made with the petite purse die? Just too cute! And Tamara's milk carton die house was adorable too. Everyone's creations are just so fab. I can't wait to try some of the myself! If you've missed any, be sure to go back and check them out.


How often do you think of friends far away? Some I think of often; others not so much. It depends on how much they mean to me, of course. I made this card for those friends that I think of often.
  1. Start with a piece of patterned paper 4 1/4 x 5 1/2" from Summer Smooches (#125409) paper pack. This will be your background piece.

2. Cut a piece of Primrose Petals cardstock to 4 x 5." Use the Scallop Trim Border(#118402) punch to punch all the way around the cardstock.

3. Cut a piece of Gumball Green cardstock to 3 x 4." Use the Scallop Edge Border(#119882) to punch all the way around this one.

4. Place the scalloped Gumball Green cardstock piece in the Stripes(#123128) Textured Impressions embossing folder and run it through the Big Shot machine.

5. Layer these on top of each other and apply adhesive to the back of the 2 cardstocks.

6. Cut a strip of Gumball Green 3/8" Satin Stitched (#126848) ribbon about 5" long. Tie a knot in the middle of the strip. Apply adhesive to the back and press it near the bottom of the card overlapping the Primrose Petals cardstock. Wrap the ends of the ribbon around to the back.

7. Use some of the same patterned paper that you are using for your background paper to make the banner and the butterfly. Place the patterned paper on the Framelits Bitty Banners (#129267) and run it through the Big Shot to cut out the large and the small banner. Flip the small banner over so that the opposite side of the patterned paper is showing. Carefully stamp a greeting from Teeny Tiny Wishes (#115370) on to the small banner. Put adhesive on the back of the small banner and adhere it to the larger banner. Adhere this to the top left of the Gumball Green cardstock.

8. Use the same patterned paper to make a butterfly with the Beautiful Butterflies Bigz die(#114507). Place the smaller butterfly on top of the larger one with the patterned paper reversed like you see in the picture. Make a paper bead(see tomorrow's tutorial) and cover with Crystal Effects (#101055) to go in the center of the butterfly.

9. Before your adhere the butterfly,  stamp a floral image from Field Flowers(#122762) with Primrose Petals classic ink and a seed pod from the same set in Summer Starfruit classic ink. Cut them both out. Place the seed pod on top of the floral image with a Stampin' Dimensional (#104430). Adhere the flower to the center left of the Gumball Green cardstock.

10. Stamp the saying from the Field Flowers set on white cardstock with Primrose Petals classic ink. Cut around it and adhere it to the center of the green cardstock.

11. Adhere the butterfly to the bottom right corner of the card front overlapping the cardstock and ribbon. Trim off any part of the butterfly wings that stick out from the card front.

12. Choose a large button from the Bright Designer Button Collection(#119747). Run a small piece of thread or floss through the holes and tie 2 knots to hold it in place. Put  3 glue dots (#103683) on the back of the button and place it on the top right of the Primrose Petals cardstock.

13. Adhere the card front to your card base and write a note or stamp a greeting on the inside.

Ok, this is the last day of our Blog Hop. Be sure to check out what Anji has for you today. here

Tuesday, May 29, 2012

e.e. cummings quote

Day two of the Glitter Queens Blog Hop brings us some more new products and a carry over stamp set. For those of you who check out my beginner tutorials, look for one on Thursday. I'm skipping Tuesday this week to give the Blog Hop my best.
To the Tangerine Tango and Lucky Limeade colors in this piece of patterned paper from Floral District (#126919) Designer Series paper, we've added Gumball Green and Daffodil Delight to really make a card that pops!

  1. Cut the background paper to measure 4 1/4 x 5 1/2." Cut one piece of Gumball Green 3/8" Satin Stitched ribbon(#126848) and 2 pieces of Daffodil Delight 1/4" Grosgrain Stitched ribbon(#126872) each to be about 5" long. Place adhesive on the back of each piece of ribbon and put at the top of the background paper. Have the 3 ribbon pieces touching each other and in the yellow, green, yellow order. Wrap the ends around to the back.

2. On white cardstock, stamp all 3 flower images from Fabulous Florets (#123027) stamp set in Tangerine Tango classic ink. Stamp the stem and leaves in Gumball Green classic ink. Loosely cut the images out.

3. Stamp the quote in Gumball Green ink on Daffodil Delight cardstock. Cut the quote out using the 3/16" Corner rounder(#119871) to round the ends.


4. Apply adhesive to the back of the stem/leaves and place just off center on the background paper and above the ribbons.

5. Put adhesive on the back of the Daffodil Delight cardstock quote and put down over the end of the stem.

6. With a 1/16" handheld Circle (#101227) punch, punch holes at the ends of the cardstock. Add 2 Tangerine Tango fabric covered brads from the Summer Smooches collection(#125589). Bend the ends on the back of the background paper.

7. Put Stampin' Dimensionals (#104430) to the backs of the cut out flower images and place around the leaves.

8. Apply adhesive to the back of the card front and place on the card base of white cardstock.

This bright floral card can be used for many joyful occasions to send your friends. Or why have an occasion at all? Send a card just because you care.

Check out what Anji has for you today by clicking here.

Monday, May 28, 2012

Friend to Friend

Today starts the May Glitter Queens Blog Hop! Be sure to check out all of the blogs to see the goregous creations these ladies have in store for you using so many NEW SU! products. The new catalog comes out June 1 so start drooling now. I got my copy of the catalog last Wed and I'm still drooling. As demos, we were able to order a few items early. I didn't get as much as I would have liked to have but I got more than I could afford. lol Can't wait until I can order some of the other new things that are in the catalog.

The new In Colors are just beautiful! I used Gumball Green, Midnight Muse and Raspberry Ripple on this card.
  1. The background paper is from Summer Smooches (#125409) that we were able to get last month and is also in the new catalog. It cut it 4 1/4 x 5 1/2."

2. The next layer is Gumball Green cardstock that was cut to 4 x 5" and then scalloped with the Scallop Edge Border(#119882) punch.

3. I used stamps from the new Papaya Collage(#126612) stamp set for the leafy branch in Gumball Green and the bird in Midnight Muse. I cut these out and adhered them to the center of the cardstock.

4. The frame is also from Papaya Collage. It is stamped in Raspberry Ripple. I loosely cut around the outside and then cut out the middle. I placed in on the cardstock with Stampin' Dimensionals(#104430) so that it would frame the bird & leaves.

5. The "friend to friend" from Teeny Tiny Wishes(#127802c) is stamped in Raspberry Ripple. It is punched out with the Word Window (#119857) punch. Punch the Raspberry Ripple cardstock with the Modern Label (#119849) punch. Attach them over the frame using a whole dimensional on the right end. Cut a dimensional in half or cut an edge piece from the dimensional sheet to put under the bottom left edge. That way it fits over the frame without any trouble.

6. Adhere the card front to the card base and put your greeting on the inside.

Check out Anji's blog for your next hop by clicking here.

Sunday, May 27, 2012

Remember, Memorial Day

I took these pictures in front of the VA Hospital in Temple, Tx in 2009 just a few days after the Ft. Hood shooting.


Always remember and honor those who have served and are serving to keep our country free.

My sil, Mattthew, when he was in Iraq. Matthew is on the right.

Saturday, May 26, 2012

Pennants Birthday Cupcake

This fun birthday card has a secret message hidden under the cupcake.

  1. I used the wax paper technique to make the background using Tangy Tangerine and Pumpkin Pie classic inks.

2.Cut a strip of paper from the Well Worn DSP(#122359) to measure 4 1/8 x 4 1/4." Score and fold at 1 3/4" from the bottom. Adhere it to the middle of the card leaving the folded section loose.

3. Stamp a cupcake from the Got Treats(#120627) stamp set, using the brush tip on Really Rust, Tangy Tangerine and Chocolate Chip markers. Cut it out. Place Stampin' Dimensionals (#104430)on the back of the cupcake and adhere it to the folded section of the Well Worn paper.

4. Use the Petite Pennants Builder (#122361) punch to cut 3 sets of triangles from Daffodil Delight, Night of Navy cardstock and Melon Mambo patterned paper(from the Brights Collection #117155). Stick the triangles with straight edges to the ones with scallop edges, alternating colors.

5. Punch holes in the background cardstock every 1 1/4" apart and holes in the upper corners of the pennants. Use 4 small orange brads to attach them to the background cardstock.

6. Use the pennants to hold the folded section up.

7. Stamp "let's celebrate" from the On Your Birthday (#111664) set in Tangy Tangerine classic ink. Punch it out with the small oval(#120908) punch. Ink the edges with Tangy Tangerine classic ink and attach inside the folded area. When the receiver flips the section down, he/she will see the message.

8. Adhere this to a card base and you can add another message on the inside of the card to let the receiver know how much you care.

Friday, May 25, 2012

Friends Graduation

This card will go to a sweet young women named Sierra who will graduate from high school May 31. She was one of my second graders many years ago.

The background is Marina Mist cardstock cut to 4 1/4 x 5 1/2." The patterned paper is So Saffron from the Subtles Collection(#117152) cut to 4" square. The Night of Navy cardstock was cut to 3 x 5" and embossed with the Stripes (#123128) Textured Impressions embossing folder and the Big Shot.

The image from The Nicest Things(#120531) is the one that I colored with Watercolor Pencils(#101879) for that tutorial.  Happy Graduation from Teeny Tiny Wishes (#115370) was stamped in Night of Navy classic ink on white cardstock and punched out with the Word Window(#119857) punch and mounted on Marina Mist cardstock punched with the Modern Label (119849) punch. It is attached near the bottom of the Night of Navy with Filigree brads(#112577). The ribbon is Marina Mist Scallop Dots(#122986) ribbon.

Thursday, May 24, 2012

Pastel/Chalk

Pastels or chalks are really easy to work with because they are practically goof-proof. Many years ago, when I started teaching elementary school, chalks were one of my favorite things to use in coloring posters for my classroom. I think one reason that I like them, aside from the goof-proof factor, is that one the tools you use to work with chalks is one that you always have with you, your fingers. Fingers are great for smoothing and blending the chalks. There are many different ways to buy chalks but one of the best is in a set of small pastel chalks like you can get from SU! Stampin' Pastels (#120962) has 40 different colors and shades of pastel chalks and 6 applicators. The SU! Pastel set that you will see in these pictures is an older set than what is in the current catalog. I've had this set for about 5 yrs and it's still in great shape.

For this, you need your chalks, a stamp set, black classic ink, white cardstock and some cotton swabs(brand name is Q-Tips).


  1. Choose the image that you want to use and stamp it in black ink. With the chalks, you can use either the classic ink or the Staz On, since you're not using water in this method.

***TIP*** Sometimes when you stamp an image, especially a larger one, I don't get the center stamped clearly, as you can see with this one. The solution to this problem is to use something soft underneath the paper you are stamping on, such as a pad of papers or a mouse pad. That will give some movement room for your stamping & you will usually get a better image.

2.  For today's project, I'm using the same image that I used on Tuesday with the watercolor pencils so that you can see the difference in the look of the two medium. The image is from The Nicest Things (#120531). For pastels, a larger image is usually easier to work with as it can be difficult to get the chalk in the small areas, even with the applicators that come with the set.
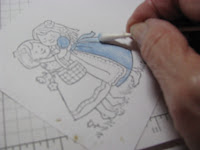
Using a cotton swab, rub the color you want on the tip of the swab. Then outline that area of your image, like you did on Tuesday. The swab will make a larger stroke than the pencils did so watch the smaller spaces. After you apply the color, use either the cotton swab, the applicator or your finger to smooth the color and pull the color into the other areas.

 The applicator works better in small areas for applying color. You can still use the swab or your finger for blending.


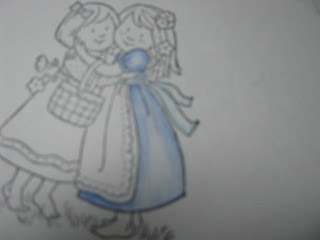
***TIP*** If you look closely at the picture on the left, you can see that I've smeared some blue chalk on the girl's face. Here we have one of the BIG reasons I call this goof-proof. Pastels/chalks are eraseable! Just take a white eraser, like comes with the SU! pastel set or an art gum eraser and erase the chalk away from where you don't want it. Very fixable!

3. Use either a swab or your finger to blend the colors together. Pay attention to where natural shadows would fall, like under the basker or in fold lines of the skirts.
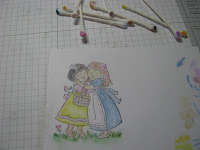
Here the picture is colored. You can see how I rubbed color on the right edge of the cardstock to check the shades that I wanted and that I used several swabs for my color.
4. There is one more step to this process that is optional. That is to spray a fixative on the chalked image. This is not required but highly recommended. Without it the chalk may rub off. There are many fixatives that are available at your hobby or craft stores but the cheapest(and it's just as good) is your basic hair spray that you probably have in the bathroom. Just give it a light spray, far less than you use for your hair. Then let it dry and you are done. I do not guarantee the hair spray to be acid free for your scrapbooking projects but since most cards won't be archieved, it works fine for them. The hair spray will bring out a brighter look with the chalks, also.
Now compare the two coloring methods to see which you like better. It's totally up to you how you color your images. There are several other ways too but these are my favorites.
The image on the left was colored with the watercolor pencils on Tuesday. The image on the right was colored with the pastels today. It just depends on the look you want & the method you perfer.

Wednesday, May 23, 2012

Scrapbooking Painted Churches

Central Texas is fortunate to have several historic painted churches from the late 1800's and early 1900's. My sweet hubby & I did a tour of 6 of them back in February of this year & I'm finally getting around to scrapbooking them. I plan to put them in their own album. I have almost 100 pictures that I took on that day trip. This is the first church that we saw in the Schulenberg area at Praha. Most of these churches are Catholic and have served the Czech people that came to this area. The inside walls are hand painted and absolutely gorgeous. If you ever have the chance to see any of them, I highly recommend it.

In my scrapbooking I most often do 2 page spreads. Rather than write out what I remembered about the churches, I googled "Texas Painted Churches" and was able to find the histories on each one that we visited. I printed the history and cut it out to fit on my paper.

This is a closer view of the left side of my spread. The background paper is from SU! Flock Together designer paper that I had left from a few years ago. The piece that I cut for the left side is from SU! Bella Bleu.

In the picture on the bottom right, you can see some of the actual painting that is done on the walls. I plan to include many more pictures of the painting that I took on my pages. Several of the churches had walls that used more blues than we normally see so I choose blues for my background papers. There were many paintings of flowers, natural life and angels throughout these churches. Most of the painting was done for the ceiling and upper sections of the walls.

I felt that accents with flowers would look good on these pages so I stamped images from the Fabulous Florets(#123027) set on white cardstock in Island Indigo, Marina Mist and Wild Wasabi. I cut those out and placed them around the pages. I used Stampin' Dimensionals (#104430) to make some of them pop up. I also ran some Bashful Blue stitched ribbon across the pages.

If you are interested in learning more about Texas Historic Painted Churches, just google them. You will find a lot of pages with historical information as well as, info about tours that you can take to see them.

Tuesday, May 22, 2012

Watercolor Pencils

One of my favorite coloring mediums is Watercolor Pencils. I'm not good with watercolor painting but I can make my images look like watercolor with these great colored pencils.


  1. To do this medium, you will need Watercolor Pencils(#101879), blender pens(#102845) or Aqua Painter (#103954), StazOn Ink(#101406) and your image. Many people use watercolor paper(#122959) which is supposed to make it look really great but I've always just used white cardstock. The image that I used today is from The Nicest Things (#120531) stamp set.
It is best to use StazOn ink or another permanent ink because the blending fluid or water might cause the classic ink outline to smear.


2. Stamp a nice clear image on your white cardstock or watercolor paper with the black StazOn ink. The StazOn is very difficult to get off of your rubber stamp but it doesn't hurt any stamping that you do later.


3. Remember, when you were in elementary school and your teacher taught you how to outline your pictures? While that is what we want to do here. Choose the color pencil that you want to work with and outline in the area. Also, go down any lines that are in the image. Color out a little bit from the outline but do not color the image solid.


4. Next, with a clean blender pen, apply the blending fluid or water onto the color that you applied. Pull the color with the pen into the areas where you didn't not put any color. In this way, you will get the color into the other areas without overwhelming the image. It will give you a lighter color in the center which is what you want to make it look like watercolor.


5. Every so often, you want to wipe the tip of your blender pen on scratch paper to rub the extra color off of the pen. You do not want too much color to build up on the pen or you won't get the subtle shading that you want. You also want to do this between colors to clean the tip of the pen before you start the next color.


6. Finish all of the areas where you want to use that color. Then go on to the next color and repeat the process until you have your entire picture complete. You can then mount it on colored cardstock to use in your card or scrapbook project.


Hope you enjoy coloring as much as I do. On Thursday, I'll talk about another coloring method that I enjoy, pastels or chalks.

Monday, May 21, 2012

Melon Mambo & Daffofil Delight Doilies

  1. The background for this card is made with some leftover Raspberry Tart designer patterned paper that I've had for a couple of years. I liked the way the Melon Mambo and Raspberry Tart looked together. I often have a tendancy to do cards with more muted tones, like pastels or earth tones, so when I do a bright one, it's a bit different for me.

2. I used a piece of Melon Mambo 1/2" Polka Dot grosgrain(#115611) ribbon for this card. Cut it about 5" long, apply adhesive to the back of it and place it about 1" from the bottom. Wrap the ends around to the back of the card front.

3. I cut 2 doilies from the speciality doily paper in the Fliratious Specialty (#122360) Designer Paper set. The third one, was cut from the middle of one of the doilies. The white on this card is the back side of one of the doilies.

4. Using stamps from the Delicate Doilies(#122592) stamp set, I stamped 2 in Daffodil Delight classic ink. The tiny flowers are punched with the Trio Flower(#109183) punch from 2009. (Yes, SU! punches last a long time) The Daffodil Delight doilies were punched with the 1 1/4" Circle (#119861) punch and the 1 3/8" Circle (#119860) punch. I adhered each layer of the doilies with SU! Dimensionals (#104430) to give them the pop up look.

5. The greeting is from the Perfect Punches (#102516) stamp set stamped in Melon Mambo classic ink. It was punched out with the Scallop Oval(#119856) punch.

I found it to be fun for me to do a bright card for a change! Maybe, I'll do them more often.  

Sunday, May 20, 2012

Friends

I'm dedicating this page today to my dear friend, Sandra. She passed away right before Christmas 2011 after a 3 year fight with cancer. We've been friends since 7th grade. She & her husband introduced David & I. We were there for each other through the years, with the births of our children, graduations, weddings, grandchildren. Sandra is missed by many but we will see her again in heaven. I have no doubt.

This is Sandra & I before Christmas, 2009.


 This is Sandra & her husband, Frankie, at our grandson's wedding in March, 2010. I do miss my dear friend.


Have a happy Sunday and remember friends.


Saturday, May 19, 2012

Box for Your Cards

There have been several times that I have made 8 -10 cards as a gift for a friend or relative, especially at Christmas. Then there is the question of how do I give them? Do I just put them in a zip lock bag or a paper sack or do I go buy a fancy box that costs more than the cards did? Well, the answer is "none of the above." What you do is make your own box to put your cards in. It is actually fairly simple when you know the measurements. For today's project, we are going to make a box to put our regular 4 1/4 x 5 1/2" cards in.

  1. Choose 2 pieces of coordinating patterned papers. For my box today I choose 2 double sided papers from the SU! Summer Smooches pack. I chose the same sheet for both because that way I can use one side for the base & the other side for the top and know that they will go well together.

2. Cut the piece for the base to 7 3/4 x 9."

Cut the piece for the lid to 6 7/8 x 8 1/8."


3. Score the base piece at 1 1/2" on all 4 sides.
Score the lid piece at 1" on all 4 sides.


Fold on all score lines.

4. Cut on one side of where the score marks cross on each corner. You want to cut so that it will fold to make a tab at each corner but not to cut the piece completely off.


5. Next add 2 small pieces of Sticky Strip(#104294) to the outside edge of each tab.

6. Peel the red top off of the pieces on one corner and press the tab to the inside edge of the lid. Do this with all 4 tabs and you will make the base of your box.


7. Now we are ready to make the lid for the box. Use the paper that is cut to 6 7/8 x 8 1/8" that you have already scored at 1" on each side.  Use the scallop edge border punch(#119882) to punch a scallop border on all 4 sides.
8. Fold on all score lines. Cut at each corner to make tabs like you did for the base. Add a small piece of Sticky Strip to each tab. Peel the red cover off and press it to the inside of the sides to form the lid for the box.
 

9. You can now decorate the outside top of the lid. I cut a piece of Marina Mist cardstock to measure 4 x 5." Build a Sizzix sandwich for your Big Shot machine with the cardstock and the Top Note Die(#113463). Cut out the top note die.
10. From an extra piece of your patterned paper, cut 3 pieces of the Framelits Labels Collection (#125598).
11. Layer them on top of the Top Note label, alternating colors, back & front, like shown. Adhere them to the Marina Mist cardstock. Then adhere that to the top of the lid.
12. Fill the box with the cards that you want to give and put the lid on.
13. Wrap a ribbon around the outside of the box. I used Marina Mist 1/2" scallop dots ribbon(#122986) and tie a bow. This can be slipped off and on the box easily if you don't add any adhesive.


Now, you are ready to give some of your favorite work to one of your favorite or not so favorite people. Hope you have fun and your friends enjoy their cards!