Friday, August 31, 2012

Elegant Butterfly

This card is easy to make but the embossed background gives it an elegance that would make it appropriate for a wedding or anniversary.

Big Shot
Beautiful Butterflies Bigz die (#114507)
Holiday Frame Textured Impressions Embossing Folder (#127820)
Twitterpated Designer Fabric (#125412)
Pearl Basic Jewels (#119247)
thin wire

Wednesday, August 29, 2012

Music Notes and Flowers with broach

Music Notes Standard Wheel (#120327)
Stampin' Around Standard Handle (#102971)
Whisper White cardstock
Gumball Green cardstock, 1 x 4 1/4"
Field Flowers stamp set (#122762)
5/8" Whisper White Satin ribbon (#114616) or 5/8" Organza Ribbon (#114319)
Marina Mist ink
Wild Wasbi ink


You can add a special little gift to a card like this by making a broach with beads and a hat pin.

Add just a dot of hot glue below the last spacer to hold the beads in place. Stick the end through the ribbon on the front of the card. Add a note to let the receiver know that she can wear this as a pin.

I makes a nice add on to the card plus it gives the person a small gift to treasure.

Cards like this would be great for a bride-to-be. Find out what the bride's chosen colors are and you'll know what colors she likes. You can make this in her colors and it will be a hit!


Tuesday, August 28, 2012

Baby Tees card

Stampin' Around Jumbo Handle (#103661)
Baby Tees Jumbo Wheel (#118621)
Watercolor Wonder Crayons
Garden Green cardstock, 2 x 3 1/2"
Old Olive cardstock, 2 1/4 x 4"
Gumball Green In Color ink
3/8" Designer Printed Brads (#122940)
Teeny Tiny Wishes stamp set (#115370)
Word Window punch (#119857)
Modern Label punch (#119849)
Stampin' Dimensionals (#104430)

To make the background paper for this cute card, just run your jumbo Baby Tees wheel across your Whisper White cardstock. If you've never done this before, here are a few tips on how-to.

Uninked Stampin' Around Cartridges are available for the wheels and you can ink these any color you wish with a reinker bottle. However, if you are only doing a few of these, it's easier to just ink up the wheel on your standard ink pad. Simply run the wheel across the ink pad several times. Be sure to get ink all the way around the wheel.


Lay your cardstock on scrap paper. Begin the wheel off of the cardstock and then roll the wheel all the way to the other side without lifting the wheel until you are done with the strip. You can use the Stampin' Around Wheel Guide (#104834) if it is available but it is not required. The wheel guide will help you get straighter lines but you can use another straight edge to accomplish the same thing.
Repeat the process until the cardstock is totally stamped.


To get the cute little baby tees that I used on the card, run the wheel on a different piece of white cardstock. Then color and cut out 3 of the tees like you see on the card.
Layer your colored cardstock and adhere the tees on top. Pop up at least one of the tees using SU dimensionals.  Add your "hello baby" greeting from the Teeny Tiny Wishes stamp set. Punch the greeting out with the punches and attach it to the card with brads.
Everyone at the baby shower will "ooh" and "aah" over your cute handmade card!

Monday, August 27, 2012

Twitterpated Fabric Flowers

More fun playing with my Twitterpated Designer Fabric (#125412)!

  1. The background paper is from the Twitterpated DSP (#125406). I just love how all the colors go together so well with my SU! products. I don't have to worry if they will match or not!

2. Using the Top Note Bigz Die (#113463) and my Big Shot, I punched my fabric with the die to add to the background. It adhered it with my regualar adhesive.

3. To make this cute art deco flowers, I cut circles using an Original Sizzix Circle die. I cut several circles of 2 different sizes and fabrics. Layer them together with each one off center a bit. I rubbed the top ones on my Primrose Petals In Color ink pad to give a bit more color. The brad is from the Summer Smooches designer fabric brads (#125589). I pulled a few threads on the circles to distress it just a bit.

4. The other flower is fabric cut with an Original Flower Power Sizzix die. I punched a Fancy Flower(#118073) punch through some designer paper from the Brights Collection (#117155) paper stack for my bottom petal. The other petals are fabric petals cut from the Twitterpated Designer Fabric.  This brad is from the In Color Printed Designer Brads (#122940).

I hope you like what I've done with adding the fabric element to my cards. Give it a try to yours for something a little different!

The ribbon tied around the left side is Marina Mist 1/4" grosgrain ribbon (#120929).

Friday, August 24, 2012

Window Curtain card

I have been having such fun playing with my Twitterpated Designer Fabric (#125412). I've always loved fabric, just not so crazy about sewing! When I was in the classroom, I would buy yards of fabric to use on my bulletin boards for the background. I always thought they looked so much nicer than just the big sheets of butcher paper that was in the work room. Well, now, thanks to the SU! designers, I get to play with fabric on my cards.

For this card, I wanted to give the idea of a window curtain or valance across the top. I cut a piece of fabric about 2" wide and 12" long. Using a running gather stitch, I loosely gathered the fabric at the top. I attached it with my Sticky Strip (#104294) to the background paper of the card and then added a scalloped piece of cardstock on top of that. I cut a piece of Melon Mambo cardstock to 1 1/2 x 5 1/2" and punched one edge with the Scallop Edge Border punch(#119882). Putting that on top of the fabric covered up my not so neat stitches and gave it the look of a cornice across the top of the window.
The greeting and the leaves are from the Just Believe stamp set (#120453) and cut out with the 1 3/4" Scallop Circle punch (#119854). The background paper is from the Brights Collection (#117155) paper stack.
The dimensional flowers are made from Marina Mist and Mambo Melon cardstock. Check out my tutorial on paper flowers for directions. I added a couple of drops of Crystal Effects (#101055) to give the flowers the dewdrop look.

Remember, any time that you make larger dimensional flowers like these, not only will they require a larger envelope or box but they require extra postage to mail. Check with your post office for current rates.

Wednesday, August 22, 2012

Cresent Window Card

I used an old Original Sizzix die, the Super Crescent Tag, to inspire me to make this fun window card.  It opens to the front for reveal bright & spunky paper and a butterfly but also is put on a card base to allow for a special greeting or a note on the inside.


Twitterpatted DSP (#125406)
Kaliedoscope DSP retired
Beautiful Butterflies Bigz (#114507)
Original Super Crescent Tag die
Gumball Green In Color ink
Simply Scored Scoring Tool (#122334)
craft knife
thin wire
Fabulous Florets
Teeny Tiny Wishes stamp set (#127802) YES! this is my favorite stamp set. I use one of the sentiments on almost every card that I make!

  1. Start with a piece white or scrap cardstock. Cut out a Super Crescent Tag with your Big Shot or ther die cut machine. This piece will be your pattern. 
2. On a piece of Twitterpatted DSP cut 4 1/4 x 5 1/2." Trace the crescent tag pattern lightly in the center of the patterned paper.
This tag is 3" wide so you will need to measure top & bottom at 1 1/2" and draw a light down the center of the trace pattern.


3. Stamp the leaves/stem with Gumball Green In color ink and the flowers with Tangerine Tango or another coordinating color. It actually looks better if you stamp your image before you cut it.


4. Using your craft knife, carefully cut the center line, the bottom line and the top curve so that it will open. DO NOT cut the left and right edges of the tag pattern.
Using your Simply Scored Scoring Tool, score the left and right edges of the tag pattern so that they will fold out.

5. Cut a piece of patterned paper (I used some leftover Kaliedscope paper) to card size, 4 1/4 x 5 1/2." Decorate this piece of paper so that it will show through the window. I used the Beautiful Butterfiles die for this and stamped a greeting from my Teeny Tiny Wishes.

6. Place adhesive on the back, outside edges of the window frame. Carefully, place this on top of the decorated patterned paper. When you are happy with it, adhere this paper on to your card base.

7. Ink the open edges of the window and using a sponge dauber, add some extra color around the outside window frame.

You can add a special message or a stamped greeting to the inside of the card base.

Monday, August 20, 2012

Scalloped Top and folds

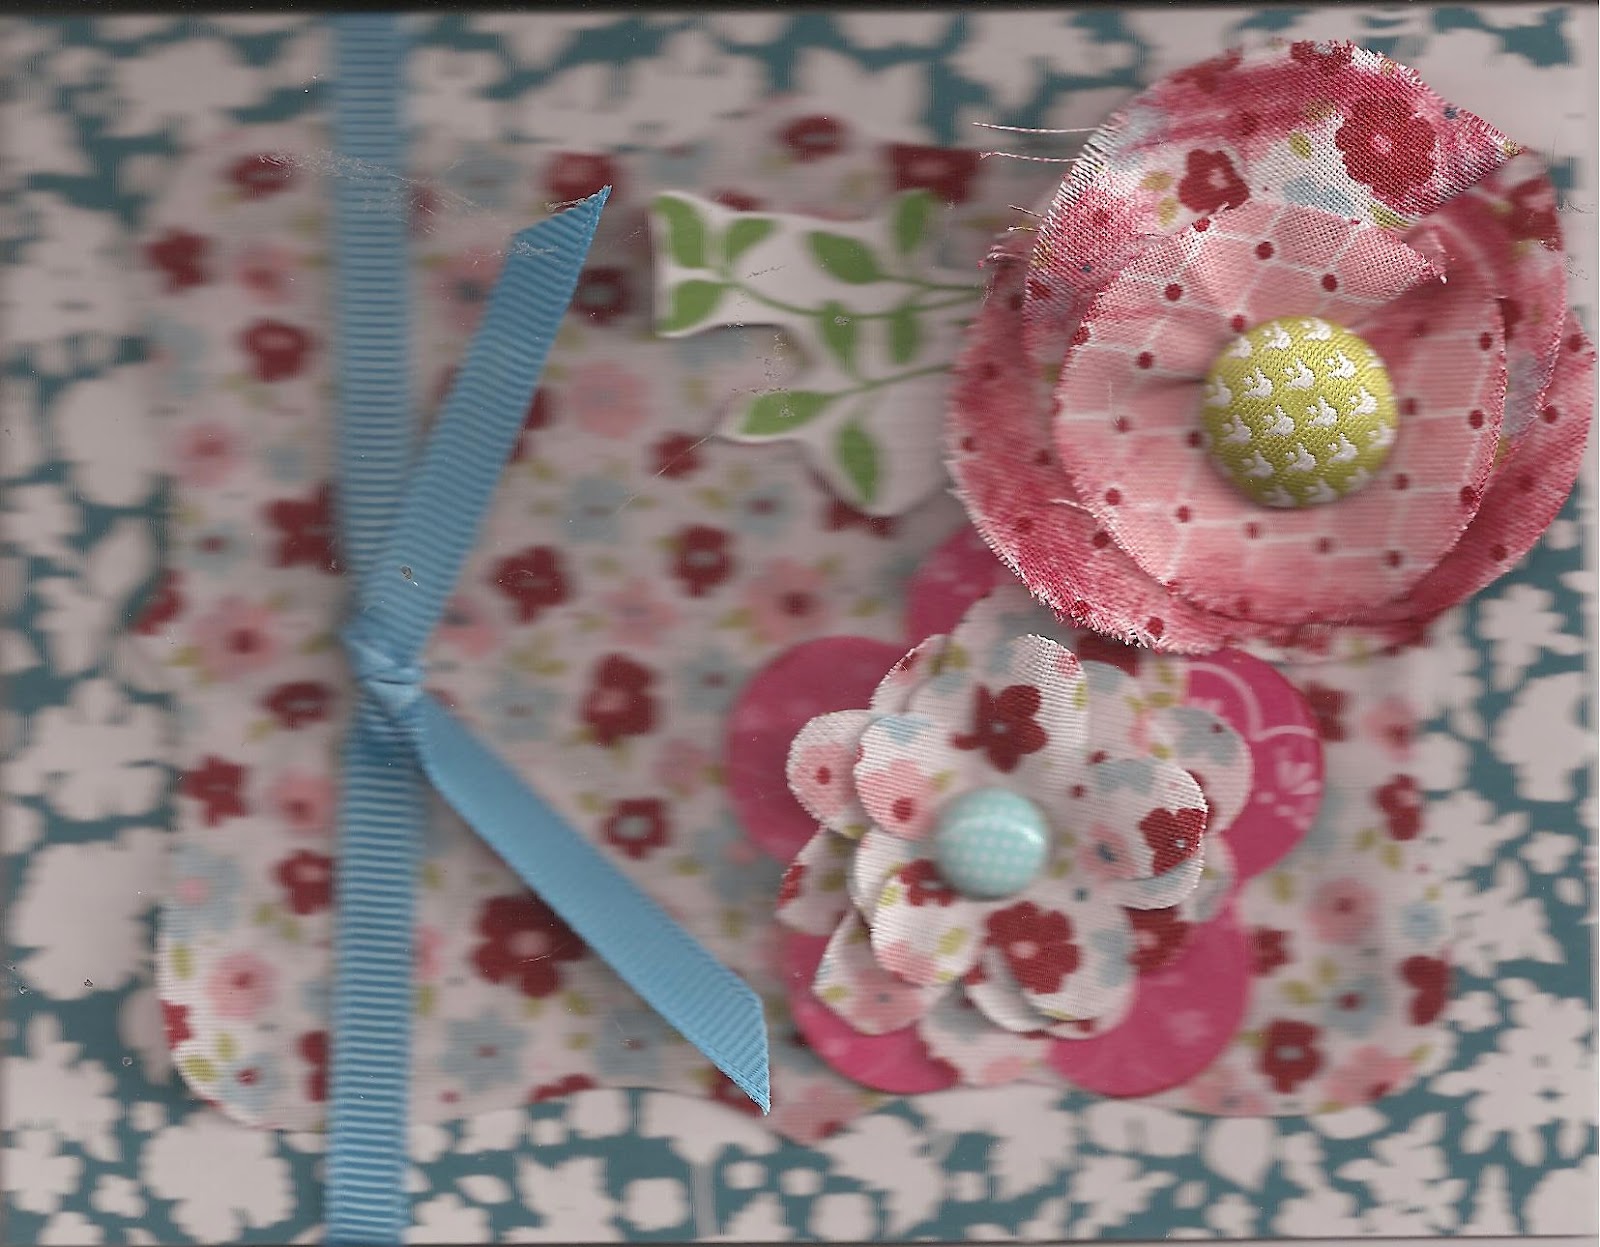
Here is a card that I put together from 2 or 3 different ones that I saw in a book. It's not the same but the parts are incorporated into it.

Twitterpated DAP (#125406)
Papaya Collage stamp set (#126612)
Falulous Florets stamp set (#123027)
Teeny Tiny Wishes stamp set (#115370)
Basic Gray cardstock
Whisper White cardstock
Midnight Muse In Color ink
Gumball Green In Color ink
Simply Scored Scoring Tool (#122334)
Scallop Edge Border punch (#119882)
1 3/4" Scallop Circle punch (#119854)
Word Window punch (#119857)
Modern Label punch (#119849)
3/8" Designer Printed Brads (#122940)

  1. Using a piece of white cardstock cut 5 1/2 x 8 1/2" score one inch from the right side (or at 7 1/2). Score again at 3 3/4." Fold.

2. Punch the scallop  edge across the entire 8 1/2" top. You can either do this with it folded (I find this very hard to press & cut) or just straight across. If you go straight across and pay close attention, you can get the scallops to line up with each other. But you do have to really watch as you punch.
Ink all the way across the top scallops with Midnight Muse ink.

3. Cut a piece of Basic Gray cardstock to 1 x 5 1/2." Cut a second piece to 1 x 2 1/2." Cut contrasting Twitterpated paper to 3/4 x 5 1/4." Adhere it to the gray cardstock and punch the top with the scallop edge border. Cut a second piece of Twitterpated paper to 3 /4 x 2." Adhere it to the smaller gray cardstock. Set aside.

4. Cut a piece of Twitterpated paper to 3 5/8 x 5 1/2" and cut the top with the scallop edge border punch.

5. Stamp a leaf/stem from Fabulous Florets in Gumball Green on white cardstock. Cut around it. Adhere to the left  side of the larger Twitterpated paper. Adhere this to the front left side of the card base.

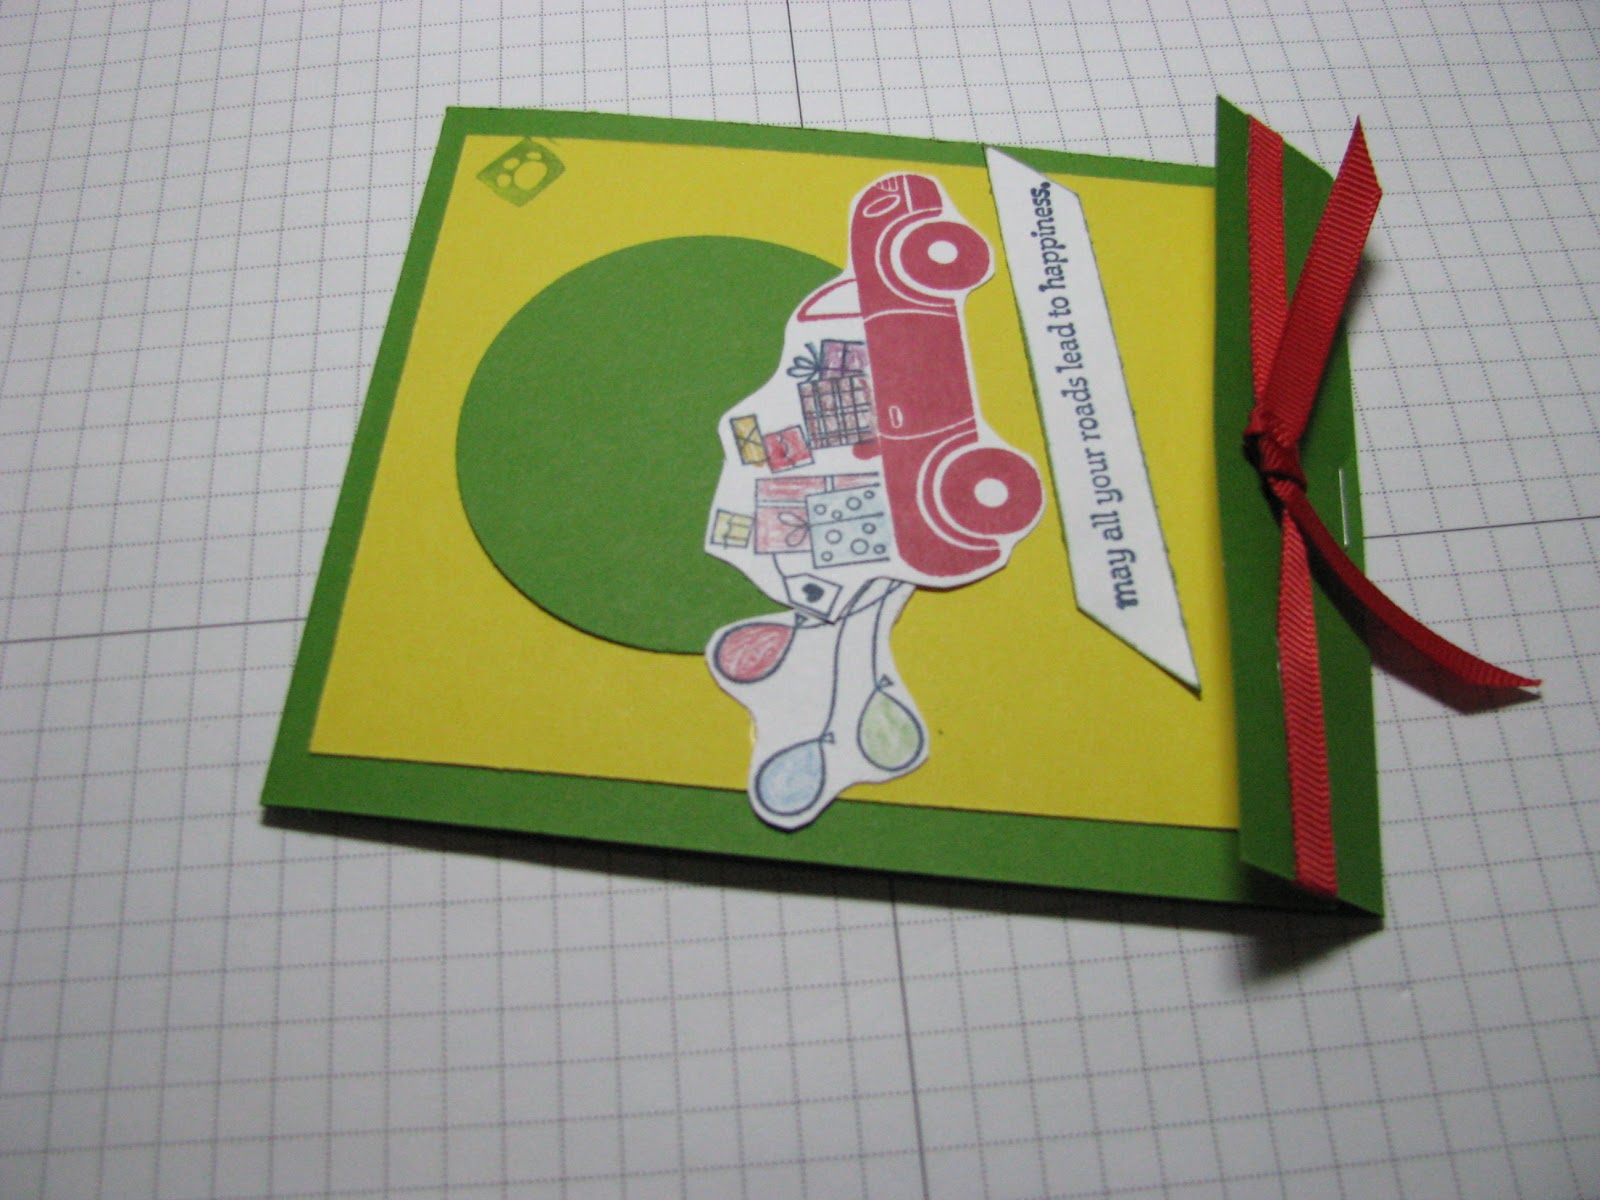
6. Stamp a greeting from Teeny Tiny Wishes in Midnight Muse ink to white cardstock. Punch out with the word window punch. Punch out a gray cardstock with the Modern Label punch. Adhere the greeting on top of the gray.
Punch a hole through the end of the greeting and the 1" fold over and add a brad. I LOVE, LOVE, LOVE brads and add them to so many of my cards. I'm SO glad that SU! had come out with a line of brads that go so well with all of their other products!

7. Stamp a rose in Midnight Muse ink onto white cardstock. Center in the Scallop Circle punch and cut out. Adhere it to the end of the gray cardstock that you put aside in step 3. Place this about 1" from the bottom of the folded over. I used Stciky Strip (#104294) to adhere this because I thought it might need a little stronger adhesive.

You can add a piece of leftover Twitterpated paper to cover up the end of the brad on the backside of the fold, if you wish. I also inked the edges of the papers with Midnight Muse ink.

Sunday, August 19, 2012

A Good Week

It's always a good week when any of my kids are around. This week we got to enjoy Tina and her son, Jonathan. They flew in to Austin last Sat and spent the week here while Jonathan was getting settled in at Baylor. He's excited to have his freshman year underway now!

We are excited too, to have an empty house again for a little while. You might remember that we had Jonathan all last school year and then Chris came & spent the summer with us. Our home seems destined to always have kids around! Anyway, Chris has gone back to UMHB in Belton; Jonathan is at Baylor and Tina is back with her family in GA. I would have liked to have seen Tina's others but Matt couldn't get the time off, Tina didn't want to drive that distance as the only driver and they couldn't afford plane tickets for 4. Maybe we'll get to see the other 2 dgks soon.

Here is a funny sketch from Tim Hawkins, one of Jonathan's favorites. I kind of like him too.

Saturday, August 18, 2012

Waterfall Netting Card

The idea for this card actually came from a book called Greetings Cards to make and treasure from Search Press in a section called "Oriental Cards" by Polly Pinder. While the book does have a small template for use with this card, the paper piecing pattern that I have include in my paper piecing section was hand drawn and designed by me. I've made several changes to this card from the one in the book.

Bashful Blue cardstock
Crumb Cake cardstock or Kraft
1 3/8" Circle punch (#119860)
Creamy Caramel classic ink (retired)
Spounge Dauber (#102892)
Just Believe stamp set (#120453) leaf stamp
Stampin' Dimensionals(#104430)
Sticky Strip (#104294)
Twigs or paper piecing pattern
Fabric, silver tulle or netting, or paper piecing pattern ( I used some tule that I have had on hand for years but SU! now has a 3 1/2" scalloped tulle ribbon {#127840} in the new holiday catalog that I think would be great for this. It's just the right width so would save on some measuring.)

  1. Cut out the "rocks" from the paper piecing patterns and daub Cremy Caramel ink onto them with a spounge dauber. Also daub some ink around the bottom edge of the card just above where the bottom "rocks" will be.


2. Punch out a white moon with the circle punch or cut it out from the paper piecing pattern. Also, stamp several leaves with Creamy Caramel ink and cut them out. You can stamp some leaves directly across the face of the moon, if you wish.


3. Put a strip of Sticky Strip across the left side of the cardstock for the full length.


4. Press the fabric or tule into the Sticky Strip. Add more Sticky Strip across the bottom 3" from the left. Measure where the fabric will come out on the card and add another piece of sticky strip there.


5. Press the tule in place gathering it slightly so it will have the flowing water effect.

6. Continue with the rest of the card decorating. Place the moon, twigs (use the real thing or the paper piecing patterns) and the leaves.

7. Add sticky strip to the backs of the rock pieces cut from Carmel or kraft cardstock.

If you used actual twigs under the top rock piece, you will need to add some Stampin' Deminsionals on here to allow room for the twigs. Place them so they will be between the twigs and hold the "rocks" in place. To stick the twigs, you will need to use pieces of sticky strip both above and below the twigs. (You may need to use some sticky strip outside of the "rock" area to hold the twigs in place. If so, you can add a bit of baby powder to the strip in areas where nothing is stuck to it. This will take away the "stickiness" of the tape.)

8. Put the rocks in place.  Add some falling leaves. Then add your greeting or note to the inside of the card.

For the paper piecing patterns to use for this card click here.


Friday, August 17, 2012

Scallop Window Card

This card was made mainly with scraps laying around on my table. I just started putting them together to see what I could come up with and I liked it!

Heard from the Heart stamp set (#111644 retired)
Printed Designer Brads (#122940)
1/4" grosgrain Marina Mist ribbon (#120929)
Polka Dot Parade DSP (#126902)
International Bazaar DSP (#126920)
2 3/8" Scallop Circle punch (#118874)
3 3/8" square Old Olive cardstock
Wild Wasabi or Old Olive classic ink

Wednesday, August 15, 2012

Back to School

Here's a card that you could send to a young friend or a teacher. As a retired elementary teacher, I know that I would have enjoyed receiving this when I was getting everything ready for the beginning of a new school year.

Greeting Card Kids stamp set (#120633)
Marina Mist cardstock
Birds of a Feather DSP (#126899)
Watercolor Pencils (#101879)
Daffodil Delight 1/4" grosgrain stitched ribbon (#126872)
Teeny Tiny Wishes stamp set (#115370)
Brights Brads collection (#119740)
Marina Mist classic ink

Monday, August 13, 2012

Making Knots & Bows for Cards

To make knots from ribbon 5/8" wide that will wrap completly around the card, measure 15" of ribbon. Wrap around card and tie, left over right, then right over left. To wrap around the card front and stick to the back(this will be covered with your card base), measure 12". 1.)Tie around the top of a Stampin' Mist container or similiar container. This is a 2 oz/60ml container. 2.) Slide off. 3.) Cut in the center of the loop. 4.) Adhere your bow/knot to the card with adhesive. Wrap ends around to the back. Length of ribbon will be adjusted somewhat with the width of the ribbon.


1.

2.

3.

4.


Simple "bunny ears" bow for a card. Cut a piece of ribbon 12." Lay it out flat. 5.) Place two fingers on each side of middle of ribbon and 6.) pull together to form "bunny ears." 7.) Tie bunny ears together and 8.) adjust as needed.

5.

6.

7.


8.

For nicer bows that go around the card, measure 2 1/2 times around the length of the card with the ribbon. Place tails even. Wrap left over right and flatten. Make sure it's straight/not twisted. Make a bunny ear in your right hand. With your left hand bring the ribbon up, over and through. Adjust as needed.


once around
twice around
half around

finished bow


I know this is not as good as an actual video but you can take it step by step here. I hope you found a couple tips to help you make better bows.
A special thanks to my sweetie, David, for taking pictures for me. Sometimes, he is more than my right hand, he's my third hand. Love him!


Sunday, August 12, 2012

Getting Ready for Baylor

My dear daughter and her oldest son are with me this week. They flew in from GA where my son-in-law is stationed to get Jonathan settled in his first year of college. Starting this week, he will become a part of that "old Baylor line." Go Bears!

I hope as my grandson, Jonathan, grows into adulthood that he will hold out his candle for all the world to see.


Who says you can't have fun praising God?

Sunday Moms

Chonda Pierce is so funny! With my baby girl here this week taking her first born to college, I thought this would fit. Hope you enjoy this funny, funny Christian woman.


Michael W. Smith...Friends

Friday, August 10, 2012

Fan Fair Birthday card

Twitterpated DSP (#125406) 4 1/4 x 5 1/2" and 3 x 4 1/4"
Twitterpated Designer fabric (#125412) 1 5/8 x 1/2"
needle, thread  Place a straight running stitch near the long edge and gather. Tie.
Scallop Edge Border (#119882) 1 1/2 x 4 1/4" Punch both sides.
glue dots (#103683) or hot glue
Stampin' Dimensionals (#104430), Use dimensionals along edge of scallop border to give it the lift to go over the gathered fabric.
Fabulous Florets stamp set (#123027)
On Your Birthday stamp set (#111664 retired)
Exra large oval punch (#119859)
Island Indigo ink

Wednesday, August 8, 2012

Simple Elegance butterfly

Textured Impressions Embossing Folder Holiday frame (#127820)
Big Shot (#113434)
Beautiful Butterflies Bigz die (#114507)
Twitterpated designer fabric (#125412)
Pearl Basic Jewels (#119247)
glue dots (#103683)
small piece of thin wire for anteannae
You could easily add a greeting or sentiment from Teeny Tiny Wishes or anther set, if you wish.

Monday, August 6, 2012

Circle Circus

Circle Circus stamp set (#115778)
On Your Birthday stamp set (#111664 retired)
Large Oval punch (#119855)
1/2" Circle punch (#119869)
1" Circle punch (#119868)
1 1/4" Circle punch (119861)
2 1/2" Circle punch (#120906)
Whisper White 1/4" grosgrain ribbon (#126877)
Polka Dot Parade DSP (#126902) 1 3/4 x 2 1/2"
Garden Green cardstock
Twitterpated DSP (#125406)
Twitterpated designer fabric (#125412)
Melon Mambo ink
Big Shot
Original Circle Sizzix die

Sunday, August 5, 2012

Testify to Love


One of my favorite artist's, Mandissa, talks about forgiving Simon Cowell for the ugly, cruel things that he said about her weight.

Here's one more item today in support of Chick-fil-a and freedom of speech.

Saturday, August 4, 2012

Summer Afternoon

For a while it seemed like too many people from my generation had forgotten the manners their parents had taught them and didn't know how to send thank you notes anymore. Thankfully, that seems to have changed. For the past couple of years, when I've given wedding, shower, baby, graduation gifts, I've gotten some very nice thank you notes. It seems that the "younger" generation has picked up a skill that many of us had forgotten. Thank you.

Here's a thank you card for a kind lady who was nice enough to bring dinner for my husband & I while I was sick. If was a nice change from the fast food that we'd been eating!

Hostess Summer Afternoon stamp set (#126427)
Watercolor Pencils (101879)
Summer Smooches DSP (#125409) 4 1/4 x 5 1/2"
International Bazaar DSP (#126920) 3 1/2 x 4 1/2"
Marina Mist cardstock 2 5/8 x 4 1/4"
Scallop Edge Border punch (#119882)
Word Window punch (#119857)
Modern Label punch (#119849)
1/2" Grosgrain Striped Old Olive ribbon (#113883)  5 1/2"
Brads Brights Collection (#119740) Old Olive brads

I don't always do much more than stamp a greeting on the inside but I did just a simple bit to this one.


Trust God stamp set (#126702) with pieces of Marina Mist cardstock left from when I punched the scallops. I've still got plenty of room to write a personal message.

Friday, August 3, 2012

Matchbook Card

It wasn't too many years ago when making "matchbooks" as mini album on scrapbook pages was popular. While we might still do that from time to time now to include some extra photos, the trend has gone the way that trends do. Why don't we take a twist on that past trend  and turn one into a cool card for birthday, off to college, vacations, etc. Here is the card I made for my grandson who will be turning 19 this week AND having a major milestone of heading to college. Watch out Waco, Jonathan is headed for Baylor!


Cut colored cardstock (I used Wild Wasabi) to 4 1/4 x 11."
Score and fold at 1" and 6 1/8" using your Simply Scored Scoring Tool (#122334).
Cut a piece of Daffodil Delight cardstock to measure 3 3/4 x 4 1/4" and another to be 3/4 x 4."
Use the 2 1/2" Circle punch (#120906) to cut the background circle.
Stamp the car, balloons, gifts, & saying on Whisper White cardstock with the Road to Happiness stampe set (#126547). Loosely cut around the images and color with Watercolor Wonder Crayons. (#119804).
Add a knotted ribbon from 1/4" Real Red grosgrain ribbon (#126875) to the fold up bottom of the matchbook. Add the Daffodil Delight cardstock strip to the back to cover the ribbon ends.
Add you greeting on the inside and as always, add money!

Wednesday, August 1, 2012

Stamping Your Own Background Paper

I got the results of my tests back from the dr yesterday. They feel that there is about a 90% chance that I have now developed an allergy to a pencillin antibotic that I was given during my hand surgery on July 13. That will mean that in the future I will have to always tell drs that I had a bad reaction to pencillin. I certainly don't want to ever have a reaction like I did this past couple of weeks. I am doing much better now. I am not 100% but most of my problems now are a result of the predinsone that the dr has me on. He said that we could shorten the time that I was on it but he is concerned that the allergy will pop it's ugly head up again "with a vengance." In the meantime, I can deal with the sleeplessness and other side effects. At least, I'm getting some card making done when every one else in the house is asleep! (lol)


Have you ever stamped your own background paper? Well, Betsy Feldman has! Here's what she's done with it and where I got my idea.

Here's the card I made after reading her blog.
My idea was to make a circle template using circle punches.
1/2" circle (#119869)
3/4" circle (#119873)
1" circle (#119868)
1 1/4" circle (119861)
1 3/8" circle (119860)

To do this, I had to fold the paper in a few spots so I could get the punch in the middle of the paper. That didn't hurt anything since this is just a template for stamping.

I choose 3 of my favorite color of SU! classic and In Color blues, Pacific Point, Island Indigo, and Marina Mist. I first thought that I would just use the Fabulous Florets stamp set(#123027) but after I started stamping, I decided to add Field Flowers stamp set(#122762).
I placed the template over a piece of white cardstock the stame size as the template (8 1/2 x 11").  I secured it in place with paper clips.

Stamp the flowers inside the cut out circles. This is one time that you might want to rock & roll with your stamp to get more of the image inside the circle.

Remove the template and you have your stamped paper. At this point you may decide to add some more images of the same or different colors. I added some leaves and stems to it.
If you wish you may cut your paper to card size or use as is for some other project.

To my card I added a saying from Field Flowers and cut it with my circle punch. I inked the edges with Pacific Point ink and a sponge dauber.
I then stamped happy birthday from Teeny Tiny Wishes (115370). I punched it out with the Word Window punch(#119857) and mounted it on a left over piece of coordinating Summer Smooches paper (#125409). I added brads from the Brad Brights Collection (#119740) and Summer Smooches fabric brads (#125589).

This will give you a look to your cards and scrapbook pages that no one else has because you created it yourself!