Monday, September 30, 2013

Joyful Christmas

 Materials needed:

Joyful Christmas stamp set (#131805)
Old Olive card stock 4 1/4 x 5 1/2"
Night of Navy card stock 4 1/4 x 5 1/2"
Whisper White card stock
Scallop Edge Border punch (#119882)
Primrose Petals In Color ink pad
Old Olive Stampin' Writer marker
Sponge dauber
Stampin' Dimenionals (#104430)
Top Note Bigz Die (#113463)
Big Shot machine

1. Using Primrose Petals ink, stamp the poinsettia from the Joyful Christmas stamp set on white card stock. With scissors, cut around the outside edge of the flower. Color the berries with the Old Olive marker. Adhere it to the center of the Old Olive card stock.
2. Stamp the "Joyful" greeting from the stamp set on white card stock. With your scallop edge border punch, punch around all four sides of the greeting to make a scalloped rectangle.
3. Use a sponge dauber to daub ink on the edges of the greeting.
4. With the Top Note die, cut out the Night of Navy card stock. Be careful to line it up carefully as you will be using the outside part of this. Put the center label part aside to save for the card on Wednesday.
5. Use Stampin' Dimenionals to adhere the Top Note "frame" to the Old Olive card stock. Watch to keep the poinsettia in the center of the framed area. Put 2 dimenionals on the back of the right hand side of the joyful greeting. Put adhesive on the left side of the greeting back. Place the greeting over the frame on the left hand side. The dimenionals on the right side will have this even across the poinsettia.
6. Adhere the card front on a card base. Add a greeting or note on the inside. There is a great one in this stamp set. And you are ready to send this Christmas greeting to a friend.

Friday, September 27, 2013

4 Views of Christmas

I wanted to see how this would look using 4 different types of "sparkle." This is a simple card to make. You just have to determine which look you like the best.
Materials needed to do all 4 versions:
Old Olive card stock  4 1/4 5 1/2"
Tempting Turquoise card stock 4 1/4 x 5"
 Basic Gray card stock  4 1/4 x 5 1/2"
Evergreen stamp set (#127973)
Calm Christmas stamp set (#132739)
Clear Embossing Powder (#109130)
Gold Embossing Powder (#109129)
Dazzling Diamonds Glitter (#102023)
Heat Tool (#129053)
Heat & Stick Powder (#100625)
Season of Style Designer Washi Tape (#132155)
Patterned paper 2 x 3 1/2"
Whisper White card stock
Pear Pizzazz ink
Old Olive ink
Primrose Petals In Color ink
Stampin' Dimensionals (#104430)

1. Place a strip of Washi tape across the center of the card stock.
2. Use 2 step stamping to stamp Christmas trees from the Evergreen stamp set on white card stock. Use the lighter color, Pear Pizzazz, for the solid tree and the darker color, Old Olive, to stamp the highlights on top.
3. Stamp the highlight stamp from Evergreen stamp set with VersaMark over the trees. Use Heat & Stick Powder and glitter, or embossing powder and your heat tool to add to the trees.
4. Cut out the tree loosely around the outside edge. Adhere the tree to the small patterned paper or pop it above the paper with Stampin' Dimensionals. Adhere this to the center over the Washi tape.
5. Add the "Peace on Earth" greeting to the top of the card.
The first card picture here has clear embossing powder on the tree. You can't see it but you can feel it.
This tree is simply 2 step stamped with nothing else added. Because the Tempting Turquoise card stock is a little smaller, I stamped Peace on Earth on the top & bottom of the base card. I then centered the card front on that.
This tree has Dazzling Diamonds glitter on it. It's hard to see on here but you can see it on the card. Because the Tempting Turquoise card stock was a bit smaller, I adhered it to the center of the front section of a basic gray card base.
This tree has the tree outline in gold embossing powder. I think it is the one that shows up best but it's just in whatever look you are wanting.
On the last 2 cards, I also stamped the greeting on white card stock and punched it out with my Extra large Oval punch (#119859). One of them I adhered directly to the card stock. The other one I popped up with dimensionals.

I hope you enjoy seeing different ways of doing the same basic design and I hope that this gives you different ideas on how to make cards using different mediums.


Wednesday, September 25, 2013

Layered Poppies

I just love the Simply Sketched Hostess stamp set! Here's a card I made with it today.

Materials needed:
Simply Sketched hostess stamp set (#129672)
Framelits Window Frame Collection dies (#129021)
Island Indigo cardstock, 4 1/4x 5 1/4"
First Edition Specialty DSP (#121878) 4 x 5 1/4"
Marina Mist cardstock 4 1/2 x 4 1/2"
Whisper White cardstock
Watercolor paper (#122959)
Staz On Black ink
Melon Mambo marker
Gumball Green marker
Primrose Petals marker
Rose Red marker
Stampin' Dimensionals (#104430)
Blender pen (#102845)
3/16" Corner punch (#119871)

1. Use your corner punch to round the corners of your patterned paper. Adhere the patterned paper on top of the Island Indigo cardstock.
2. With your Big Shot and Framelits die, cut the Marina Mist cardstock. The die I used is 3 3/4" square. Adhere this in the center of the patterned paper.
3.  Stamp the flowers with the Staz On ink onto watercolor paper. Use the marker layering technique to color the image. Cut this out with your scissors. Place Stampin' Dimensionals on the back of this image.
4. Use the brush end of the Melon Mambo marker to color the flower part of the stamp. Use the brush end of the Gumball Green marker to color the stems. Huff your breathe on the stamp to moisten it. Stamp 2 images with this on white cardstock. Using the stamp the second time will give you a dark image and a lighter image, as you see on the card.  Cut these out with scissors.
5. Adhere the 2 stamped flowers on the Marina Mist Framelits Window on each side. Pull the protective covering off of the Stampin' Dimensionals on the 3rd flower. Place it in the center of the Window, between the other 2 flowers.
6. Adhere the card front on top of a card base and be ready to send it at your next occassion!

Monday, September 23, 2013

Tag in a Pocket


Materials needed:
Birthday Basic DSP (#130145) 4 1/4 x 5 1/2"
Summer Starfruit card stock 2 3/4 x 2 1/4"
Whisper White card stock
Chalk Talk stamp set (#130634)
Chalk Talk Framelits dies (#129983)
Candy Dots Regals (#130932)
Ice Cream Parlor ribbon (#123613)
Raspberry Ripple In Color ink
Coastal Cabana In Color ink
Simply Scored Scoring Tool (#122334)

1. Stamp the tag from Chalk Talk with Raspberry Ripple ink on white card stock. Use the Chalk Talk Framelits die and your Big Shot to cut out the tag.
2. Score the Summer Starfruit card stock 1/4" from the edge on 3 sides. Fold. Add adhesive to the folded edges and press onto the center of the patterned paper to make a pocket.
3. Place a Candy Dot on each corner of the pocket. You can use brads here, either colored ones or put the coordinating candy dots on the Candy Dot brads if you want to secure the pocket more strongly but I didn't feel it necessary.  The candy dots give the impression of brads by themselves. Slide the tag into the pocket.
4. Cut 12" of ribbon. Wrap the ribbon around the card front and tie in a knot.
5. Adhere the card front to a card base and you are done.


Friday, September 20, 2013

Getting Ready for Christmas

I know that it's still 3 months until Christmas but as all crafters know, if you want to have things ready in time, you've got to start making them now. Whether it's hand crafted gifts or cards, the good crafter plans ahead. Well, I'm not planning so well this year. Usually by now, I've got 80-90 Christmas cards ready & waiting for addresses but not this year! I've made 6 or 7 different cards so far but have not decided which one I want to use for this year's card. I may just make several of each & send out a variety this year. Here's the first one for you to start getting your own ideas.
This is a fun card if you like glitter. This is hubby's favorite one so far but I'm not the biggest glitter person!

Materials needed:
Marina Mist card stock 4 1/4 x 5 1/2"
Dazzling Diamonds glitter (#102023)
Heat & Stick Powder (#100625)
Heat Tool (#129053)
Calm Christmas stamp set (#132739)
Midnight Muse In Color ink or Night of Navy ink
Versa Mark  pad (#102283)

1. Rub the VersaMark pad across the bottom half of the Marina Mist card stock making a curvy pattern at the top part. Cover the area completely with VersaMark. Be sure there are no empty spaces.
2. Using a clean sheet of paper to collect the excess powder, sprinkle the entire section of VersaMark with the Heat & Stick powder. Shake off any excess powder and pour excess back into bottle. Heat the powder until it looks almost liquid.
3. Sprinkle Dazzling Diamonds glitter over the wet heat & stick powder. Shake off excess and pour into bottle. Heat set the glitter.
4. Stamp the dove with Midnight Muse ink on the top left hand side. Stamp the Peace on Earth greeting with Midnight Muse on the center right, above(not on) the glitter section. This stamp set includes a great greeting that you can stamp on the inside of the card. "Wishing you a calm & blessed Christmas filled with the true peace of Christ the Lord." I like this greeting so much that I think I will use it for the inside on matter which outside design I choose.
I'll post more Christmas card ideas, here & there as I continue to post various fall cards.


Wednesday, September 18, 2013

Swinging Circle Card

The new Thinlits Circle Card Die is fun and makes making circle cards so much easier. The old way to make a card like this was a lot of cutting, pasting, & adding string between layers. Now with the Circle Card die, you just run it through your Big Shot and decorate! Fun & easy!


From this angle you can see that the circle flips back & forth to make a really fun card when it's standing. When it comes out of the envelope, it is closed & looks like this.
Open give you this look.
So how do we make this fun card? Here goes!

Materials needed:
Circle Card Thinlits Die (#133480)
Tangerine Tango card stock 5 1/2 x 6"
Epic Day This and That DSP (#130814) 5 1/2 x 6"
Whisper White card stock
coordinating patterned paper (what I used is 2-3 yrs old)
Perfect Punches stamp set (#120516)
Really Good Greetings set (#130333)
2 3/8" Scallop Circle punch (#118874)
Extra large oval punch (#119859)
1 3/4" Circle punch (#119850)
Chevron Border punch (#132154)
Old Olive ink
Stampin' Dimenionals (#104430)

1. Run the Tangerine Tango card stock and the Epic Day patterned paper through your Big Shot. You can probably run them through at the same time but it depends on your machine. Fold the Tangerine Tango card on the fold lines. If you will fold these back & forth a few times it will move easier.
2. On the patterned paper, cut on the score lines. Lay the patterned paper so that it will fit around the circle area and up to the score lines. This will leave you with about 3/4" of Tangerine Tango open. Adhere the patterned paper to cover both sides of the Tangerine Tango card stock.
3. Use the Chevron Border punch to cut out some V shaped chevron pieces from Tangerine Tango card stock. You need 3 pieces. If you have used the punch before, you might have some pieces left over. I had some left from the Harvest Blessings card with the tractor. Adhere these pieces pointing down on the bottom right side of the card.
4. Punch out 2 scallop circles from the coordinating patterned paper. Adhere them to each side of the swinging circle.
5. Stamp the birthday greeting from the Perfect Punches stamp set and the "all about you" greeting from the Really Good Greetings set in Old Olive ink. Use the extra large oval punch to punch out the birthday and the 1 3/4" circle punch to punch out the all about you greeting.
6. Pop up the birthday greeting with Stampin' Dimensionals and place on the front circle. Adhere the other greeting to the back of the circle.
7. You can sign you name or write a short note on the 3/4" strip of Tangerine Tango on the inside or write more on the back of the card.


Monday, September 16, 2013

Harvest Time

 For me, the color of fall is orange. This card uses the Tangerine Tango orange in the cardstock and the patterned paper to give a nice fall look.

Materials needed:
Harvest Blessings stamp set (#126452)
Afternoon Picnic patterned paper (#131390) 4 1/4 x 5 1/2"
Whisper White cardstock
Tangerine Tango card stock 3 1/2 x 4 1/4"
Old Olive card stock 2 3/4 x 3" plus extra scrap
Really Rust ink
Chevron Border punch (#132154)
Stampin' Dimensionals (#104430)

1. Stamp your tractor image with Really Rust ink on white cardstock. Cut out, leaving a slight white border around the edge. Stamp your greeting and cut out the same way.
2. Adhere the tractor to the Old Olive rectangle. Adhere the greeting to Old Olive cardstock and cut around the edge.
3. Use the Chevron Border punch to punch the top of the Tangerine Tango card stock.
4. Use Stampin' Dimensionals to pop up the Old Olive and tractor image on the Tangerine Tango card stock, below the Chevron. Adhere this to the patterned paper. Adhere the greeting below the Tangerine Tango using Dimensionals.
5. Stamp the scripture on the inside of the card with Really Rust ink. Using the negative pieces from the Chevron punch, adhere an odd number of them to the inside under the message/greeting.
6. Add your own note and sign your name and you have a great fall card that will work well for a man or a woman.

Friday, September 13, 2013

Grateful Glitter

Here's another fun glitter fall card!
Materials needed:
Tangerine Tango cardstock 4 1/4 x 5 1/2" plus extra
Whisper White cardstock 2 3/4 x 4 1/4" plus extra
Truly Grateful stamp set (#131733)
Chevron Embossing Folder (#127749)
Brayer (#102395)
Sponge Dauber (#102892)
Tangerine Tango ink
More Mustard ink
Brights Brads Collection (#119740)
Extra Large Oval Punch (#119859)
Large Oval Punch (#119855)
Epic Day This and That Washi tape (#131269)
VersaMark ink pad (#102283)
Heat and Stick powder (#100625)
Dazzling Diamonds Glitter (#102023)
Heat Tool (#129053)
Stampin' Dimensionals (#104430)

1. Rub the Tangerine Tango 4 1/4 x 5 1/2" card stock with VersaMark ink. Rub this over half of the card with a nice solid layer. Sprinkle heat and stick powder over it. Use an extra sheet of paper to catch the excess powder. Tap off excess onto the paper and pour it back into the container. Use the heat tool to heat the heat & stick powder until it is shiny. Sprinkle glitter over the powder. Tap off extra and put excess into glitter container. Use the heat tool to set the glitter. Lay this piece aside.
2. Ink the Chevron Embossing Folder with Tangerine Tango ink to do the Color and Emboss technique. Emboss the 2 3/4 x 4 1/4" piece of white card stock with the embossing folder and your Big Shot machine. Adhere this piece to the left hand side of the glittered tangerine tango card stock placing it about 3/4" from the left edge. Place a strip of orange Washi Tape down the side of the embossed piece and the side of the Tangerine Tango piece.
3. Stamp the wheat staff on white card stock with More Mustard ink. Punch it out with the Decorative Label punch or a similar punch. Use the sponge dauber and More Mustard ink to ink the edges of the label. Add Stampin' Dimensionals to the back of this piece. Place it in the center of the Chevron embossed piece. 
4. Use the Extra large oval punch to punch out an oval from the extra Tangerine Tango card stock. Stamp your greeting on white card stock and punch it out with the Large Oval punch. Adhere the greeting on to the Tangerine Tango oval.
5. Attach the greeting ovals to the right side of the card with brads.
This gives you another bright & glitterly card to send to friends.

Wednesday, September 11, 2013

Fall Thanks

With fall almost here on the calendar, I felt like doing some fallish colors. This card could be used for Thanksgiving or just to thank someone for a special deed or time. I'm not real big on Halloween and may or may not do any Halloween cards. I do like the oranges, reds, and browns of fall though and enjoy doing things with them. Hope you enjoy this card.
Materials needed:
Whisper White cardstock
Tangerine Tango cardstock 2 1/2 x 3 1/2"
Kraft cardstock
Tangerine Tango ink pad
Crumb Cake ink pad
Truly Grateful stamp set (#131733)
Curly Label punch (#119851)
Extra large Oval punch (#119859)
Modern Label punch (#119849)
Sponge Dauber (#102892)
Chevron Embossing Folder (#127749)
Brayer (#102395)
VersaMark ink pad (#102283)
Heat & Stick Powder (#100625)
Dazzling Diamonds Glitter (#102023)
Hung Up Cute Clips (#129389)
Candy Dots Brad Bases (#132293)
Brights Candy Dots (#130931)
Heat Tool
Stampin' Dimensionals (#104430)

1. Use your Brayer to ink the embossing folder with Tangerine Tango ink to do the Color and Emboss technique. (Click the link for instructions for this technique.) Emboss the white cardstock with the Chevron embossing folder and your Big Shot.
2. Rub the VersaMark ink pad on top of the Chevron embossed cardstock so that the ink sticks to just the raised lines on the right half of the card. Using a piece of paper to catch the excess powder, sprinkle Heat & Stick powder over the card. Shake off excess. Pour excess from paper back into Heat & Stick container. Use your heat tool to heat the powder just until it get shiny.
3. Using paper again, sprinkle the Dazzling Diamonds glitter over the Heat & Stick powder. Tap off excess. Pour excess glitter back in glitter container. Use your heat tool on the glitter to set it.
4. Stamp the wood grain pattern with Crumb Cake ink onto white cardstock. Stamp the acorn with Tangerine Tango ink and the "Thankful for..." greeting with Tangerine Tango ink. Cut out the rectangle around the wood grain pattern. Cut out the acorn. 
5. Use the Modern Label punch to cut out the greeting. Dab Tangerine Tango ink on a sponge dauber and ink the edges of the Modern Label punch.
6. Punch out an Extra Large Oval and a Curly Label from Kraft cardstock. 
7.  Adhere the wood grain pattern onto the Tangerine Tango cardstock rectangle. Adhere the acorn on top of the Kraft oval. Place a Stampin' Dimensional under the Kraft oval. Place this in the center of the wood grain stamped card stock. 
8. Place a clip arrow on the bottom of the wood grain piece. Add dimensionals to the back of the Tangerine Tango and place on the left hand side of the card slightly overlapping the glittered area.
9. Adhere the Curly Label punched piece to the right hand side and place the greeting over it. Attach the greeting with brads.
10. Adhere the card front to the card base and you are finished.
Have fun with the glitter, dimension and clips on this card!

Monday, September 9, 2013

Embossed and Doily

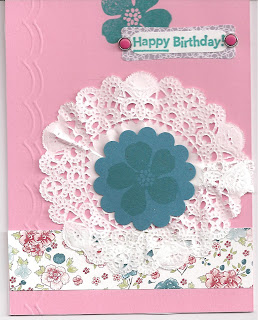
Here's a girly birthday card I had some fun with. Easy to make!

Materials needed:
Blushing Bride cardstock, 4 1/4 x 5 1/2"
Pacific Point cardstock 
Pacific Point ink pad
Twitterpatted patterned paper (from 2012)
Secret Garden stamp set (#129144)
Tea Lace Paper Doilies (#129399)
Simply Scored Scoring Tool (#122334)
Simply Scored borders Plate (#126192)
1 3/4" Scallop Circle punch (#119854)
Modern Label punch (#119849)
Word Window punch (#119857)
Candy Dots Brad Bases (#132293)
Candy Dots, Brights (#130931)

1. Choose the border from the Simply Scored Borders Plate that you want to use. Emboss it on the left side of the card stock.
2. Adhere a 1" x 4  1/4" strip of scrap patterned paper across the bottom about a 1/2" from the edge. I use Twitterpatted dsp for this.
3. Crumple the center of the doily to make a pleated look. Adhere the center to the cardstock.
4. Stamp one flower at the top of the Blushing Bride cardstock. Stamp another on a small piece of Pacific Point cardstock. Using the Scallop Circle punch, punch out the flower you just stamped. Adhere the scalloped circle to the center of the doily.
5. Stamp a greeting on white cardstock. Punch it out with the Word Window Punch. Punch out a piece of patterned paper with the Modern Label punch. Adhere the greeting on top of the Modern Label. Place it on the top right hand side of the card.
6. Punch holes on either side of the Modern Label and insert brads. Fold over on the back side. Adhere the card front to a card base. Add a greeting or note to the inside and get ready to give it to a friend.

Friday, September 6, 2013

Girl with present and her dog


I've been playing with the marker layering that I learned so here is another card. I'm still working on getting the skin tone just as I want it. For this little girl, I used Blush Blossom (which is a retired color but any light pink) and Pink Pirouette. I think it's still a little too pink so I might try adding just a tiny bit of Creamy Caramel.

Materials needed:
Island Indigo cardstock 4 1/4 x 5 1/2"
Marina Mist cardstock 4 x 5 1/4"
Pink Pirouette cardstock 4 x 5"
Bermuda Bay cardstock 3 1/2 x 4"
Doilies (#129399)
Little Friends stamp set (#122667)
Framelits Labels Collection dies (#125598)
Word Window punch (#119857)
Modern Label punch (#119849)
3/16" Corner punch
Stampin' Dimensionals (#104430)
Staz On Black Ink
Blender Pens (#102845)
Watercolor Paper (#122959)
Stampin' Markers-2-3 shades of each color used

1. Stamp the image with Staz On Black ink onto watercolor paper. Color with Stampin' Markers and blending with the blender pens for the image. (see SplitCoast Stampers for tutorial on Marker layering) Start with the lightest color and work to the darker colors.
2. Cut the Pink Pirouetter and Bermuda Bay cardstocks with the Framelits dies and your Big Shot.
3. Round the corners on the Marina Mist cardstock with the 3/16" Corner punch.
4. Adhere each layer on top of the others with the Island Indigo cardstock on the bottom. Then put the Marina Mist on. Then the doilie.
5. Add Stampin' Dimensionals to the back of the Pink Pirouette Framelit and place it on top of the doilie. Add the Bermuda Bay next and the completed image on top of it.
6. Stamp your greeting in Bermuda Bay ink and punch out with the Word Window punch. Punch a Modern Label out of Bermuda Bay cardstock and adhere the greeting on top of that. Place a Stampin' Dimensional on one end of the greeting label back and a small amount of adhesive on the other end. Place it on the top right hand corner with one end overlapping the Pink Piroutte.
7. Adhere the card front to a card base and choose your favorite girl to send it to.
Happy stamping, coloring, and layering!

Thursday, September 5, 2013

New Catalogs

I have several of the new 2013-2014 catalogs now plus some of the Holiday catalogs. If you would like to have one call me or email me. If you are local, I will bring one to you. If you are not local, mail me $5.15 for priority envelope postage & I will send you one of each.


Wednesday, September 4, 2013

Boy with Balloon and Flag


Materials needed:
Island Indigo cardstock 4 1/4 x 5 1/2"
Crushed Curry In Color cardstock 3 3/4 x 1 3/4" & a scrap at least 3 x 3"
Whisper White cardstock
Versa Mark Pad (#102283)
Staz On Ink pad, black (#101406)
Watercolor Paper (#122959)
Crushed Curry In Color ink pad
Little Friends stamp set (#122667)
Hearts a Flutter stamp set (#129252)
Hearts a Flutter Framelits Dies (#130159)
Brights Collection Brads (#119740)
1/2" Striped Grosgrain Ribbon So Saffron (#113699)
Heat and stick powder (#100625)
Dazzling Diamonds Glitter (#102023)
Stampin' Dimensionals (#104430)
Modern Label punch (#119849)
Word Window punch (#119857)
3/16" Corner punch (#119871)
Stampin' Markers, 2-3 shades of each color used
Blender Pen (#102845)
Heat Tool

1.  Using Staz On ink, stamp your image on watercolor paper (cardstock will work but watercolor paper is better). Color the image with your Stampin' Markers and blender pens. You need 3 shades of most of the colors you want. Start coloring with the lightest color first. Then use the blender pen to smooth the color out. Add the medium color color next to the areas that you want shading. Blend that color. Use the darkest color last to complete your shading. (For a tutorial on this, go to SplitCoast Sampers and search for Marker Layering).
I'm still playing around with the skin colors. On this little boy, I used Saraha Sand and Creamy Caramel for his skin tones.
2. Adhere the completed image to the Crushed Curry cardstock. Put a Stampin' Dimensional under the balloon. Use the Corner punch to round the corners. Adhere this section to the front left hand side.
3. Adhere a stip of ribbon about 5 1/2 -6" long down the right side of the card wrapping the ribbon ends around the edge of the card.
4. Stamp your greeting on white cardstock with Crushed Curry ink. Punch it our with the Word Window punch. Place that on a Crushed Curry punched with the Modern Label Punch. Punch holes on each end of the Modern Label and the Island Indigo cardstock. Add Marina Mist brads to hold it in place over the ribbon.
5. With Crushed Curry ink, stamp a tag image from the Hearts a Flutter set on white cardstock. Stamp the same image on top of it with a VersaMark pad. (If you are worried about lining it up, use a Stamp-a-ma-jig [#101049]. Since I almost always use clear mount stamps, I usually just eye-ball it.)
6. Lay a sheet of paper on your table to catch the excess and sprinkle the tag with Heat & Stick powder. Tap it off. Heat the powder with your heat tool to melt the powder. Sprinkle the Dazzling Diamonds glitter on top. Heat it briefly.
7. Use the  Hearts a Flutter die that matches your image and your Big Shot to cut it out. Place Stampin' Dimensionals on the back and place it over the ribbon near the center.
8. Attach the card front to a card base and get ready to mail!

Monday, September 2, 2013

Coloring with Markers

Coloring my images is not my strongest point and especially coloring with markers. I love my SU! markers because all the colors match the paper which matches the brads, which matches the ribbon, etc, etc. You get the idea. But I've always had problems with coloring with markers because I get those yucky marker lines. Well, I found a great tutorial on Split Coast Stampers recently that showed how to color with markers and blender pens. For my first try, I don't think I did too bad.

I've thought about trying the Copic markers and actually bought a couple but I really couldn't see spending all that money for more markers when I already the whole line of SU! markers. This tutorial from Split Coast is good. I like it because it has both the instructions written out and a video. I'll tell you some direcions for it but for a more through tutorial, go to Split Coast Stampers and search for Marker Layering.

Materials needed:
Patterned paper, I used a piece from Twitterpated which is retired 4 x 5 1/4"
Gumball Green cardstock 4 1/4 x 5 1/2"
White cardstock or white watercolor paper
Fabulous Florets (#123027)3/8"
Striped Organdy ribbon, Melon Mambo (#129293)
Pink Pirouette marker
Regal Rose marker
Melon Mambo marker
Basic Gray marker
Black Staz On ink pad
Gumball Green ink
Melon Mambo ink
Aqua Painter (#103954) or Blender Pens (#102845)
Spong Dauber (#102892)
Stampin' Dimensionals (#104430)

1. Stamp your outline images on white cardstock or watercolor paper with black Staz On ink. The watercolor paper will do a better job but cardstock will work.
2. Start with your lightest color marker, Pink Pirouette, and begin coloring your petals. Work with one petal at a time. Use the blender pen or aqua painter to spread the color over the entire petal. Remember, you can always add more color but once the color is there, you can't take it away. Start the petal near the center of the flower and work outward.
3. Next add color to the same petal with the next lightest color, Regal Rose. Don't cover the entire petal but start with a small amount near the flower center. Use the blender pen to make small circles and blend in the marker lines on the petal. Add your final color closest to the center of the flower. Again, use your blender pen to work the color in with the other colors so that the color is lighter at the outer edge of the petals and darker toward the center of the petal.
4. Go to the next petal and repeat the same process. Working one petal at a time, complete all the petals on the flower. Use the Basic Gray marker to outline the petals. This will help them to pop a bit more.
5. Cut out the petals and lay them aside for a bit.
6. On the green patterned paper, stamp 5 of the long stemmed leaves in Gumball Green ink.
7. Wrap the ribbon around the bottom of the piece and tie a bow. Adhere with your adhesive to the paper.
8. Use Stampin' Dimensionals on the backs of two of the flowers that you've colored. Place them on the leaves stamped. The third flower can be place flat with adhesive.
9. Stamp the saying from the set on white cardstock in Melon Mambo ink. Cut around the saying. Use a sponge dauber to add Gumball Green to the edges of the saying. Adhere it to the top right corner of the patterned paper.
10. Adhere this to the larger green cardstock. Place the card front on to a card base and add your greeting or note to the inside.

Hope you had fun coloring with your markers today. If you don't like how they came out, try again. Michangelo probably didn't like his first try either!