As you progress with your paper crafts, whether scrapbooking, cardmaking or both, you will start to accumulate more tools and embellishments to use with your crafting. You will start to want to find ways to organize your materials without spending more for organizing than you spend for your crafting materials. There are as many ways to organize as there are products and some of them can be quite expensive.
You will want to find a place to craft. When you start out, it is often the kitchen or dining table and you can buy plastic tubs, shoeboxes, etc to keep your craft supplies in. It won't be long until you are looking for a place you can craft without having to totally put everything away every time you have a meal. Many people start out with a closet or a nook where they can keep their items. A closet can be a great place to start because you can often place a small desk or table inside it to work on. You can find shelves to put on the sides where you can store materials. When company comes knocking, either expected or unexpected, all you have to do is close the closet door. As your crafting hobby grows, you will dream of having your own crafting room. That is ideal and a great way to have everything in one place but I know that not everyone can do that.
I've got a few tips today to help you in finding things to use for storage. A hardware store or the hardware department of a store can be a great place to start or maybe even your husband's garage might have items you can use(if he will let go of them!). A plastic hardware bin is great for storing an assortment of smaller embellishements, such as, brads, buttons, chipboard pieces and various small "found" items.
 These usually have from 25-30 small drawers in them to seperate your items. In hubby's garage, one of these might be used for nuts, bolts, nails, screws, etc. One of these costs around $10-15. Label them with the name of the contents with small pieces of paper taped on or cut a piece from an adhesive backed label. You can label by color, item, style and so on. These bins are usually easy to stack on top of each other. At this time, I have 6 of them.
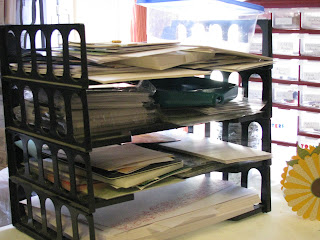 Stacking paper trays from the office supply section are great for organizing various paper items. I use mine for white cardstock, envelopes, cutting mats & other flat items.
 Be sure to watch for used items from your kitchen that will make great storage items for you supplies. Ready made cake frosting containers with lids are great for storing any number of items from cotton balls to paper clips. Label the outside with small letter stickers or write on them with a Sharpie. Old (or new) file card boxes are great for holding many items too. I've seen some people cut empty cereal boxes on the diagonal, decorate them & use them for storing papers in. Keep you eyes open for things that would normally be thrown away that you might be able to recycle or reuse in your craft room. There are many things that you could convert to storage without having to spend another penny.
 School pencil boxes can hold thread, ribbon, small templates, stencils, and many other items. If they are clear, you can see what is inside. If they are not clear, they are easy to label or to write on with a permanent marker.
 Small plastic baskets can be used for putting supplies in also, depending on your needs.
 Garage, yard or rummage sales can be great places to find organizional supplies. I've found many baskets at garage sales that I was able to buy for 10-25 cents each. Just let you mind be open and run free. One of my best garage sale buys was a used 5 piece entertainment center that I bought for just $80. I put it in my craft room and use it as a place to put many of my supplies. The center section made for a TV was perfect for my Big Shot or other die cut machine and my dies. It makes a great work area for cutting out things.
You will want to find a place to craft. When you start out, it is often the kitchen or dining table and you can buy plastic tubs, shoeboxes, etc to keep your craft supplies in. It won't be long until you are looking for a place you can craft without having to totally put everything away every time you have a meal. Many people start out with a closet or a nook where they can keep their items. A closet can be a great place to start because you can often place a small desk or table inside it to work on. You can find shelves to put on the sides where you can store materials. When company comes knocking, either expected or unexpected, all you have to do is close the closet door. As your crafting hobby grows, you will dream of having your own crafting room. That is ideal and a great way to have everything in one place but I know that not everyone can do that.
I've got a few tips today to help you in finding things to use for storage. A hardware store or the hardware department of a store can be a great place to start or maybe even your husband's garage might have items you can use(if he will let go of them!). A plastic hardware bin is great for storing an assortment of smaller embellishements, such as, brads, buttons, chipboard pieces and various small "found" items.


