Showing posts with label gift box. Show all posts

Monday, October 7, 2013

Christmas Gift Box


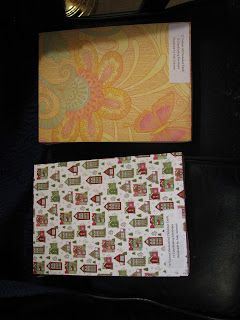
I have a few people who I give handmade greeting cards to each year at Christmas. This year I made some sets of cards to use for the silent auction at our Operation Christmas Child annual kick off luncheon. In the past I've made paper boxes for the sets but I felt like I wanted some sturdier boxes for the auction. I decided to decorate some of the small shirt gift boxes that you can find at almost any store.

Materials needed:
1 Shirt gift box for each set, these were 7 7/8 x 10 3/4 x 1 3/4"
       make sure that the lid fits on top of the bottom easily
1 12 x 12 " sheet of heavy patterned paper for each box, I used paper from Be of Good Cheer (#126896) for the Christmas cards and from Kaleidoscope (#115680) for the All Occasion cards.
1" Rose Red Grosgrain Ribbon (111846) for the all occasion
1" of a beige ribbon for the Christmas
1/4" Grosgrain ribbon, Daffodil Delight (#120928) for the all occasion, Real Red (#109034) for the Christmas set
Simply Scored Scoring Tool (#122334)

1. Score the patterned paper at 1" on the ends and at 4" on the sides. Also score the sides at 2". Fold the scored lines.
2. Add adhesive to all sections of the scored paper. Add extra adhesive to the center. Place the lid of the box carefully in the center of the paper and fold the paper around the edges. The long sides will fold into the inside part of the box at the 2" score lines. The shorter sides will not be completely covered to the edge.

3. Cut 40" of the 1" and the 1/4" ribbon. Place adhesive on the back of the 1" ribbon and then press it around the entire edge of the box. Line the ribbon up with the bottom edge of the lid. Leave the end loose for the time being.
4. Place adhesive on the back of the 1/4" ribbon. Press it in the center of the 1" ribbon that you've put on the box. I tried putting the 1/4" ribbon on the 1" ribbon before putting it on the box and made a big mess, so I think this way works better. At least it did for me.
5. To finish out the end of the ribbon, wrap the 1/4" ribbon behind the 1" ribbon. Fold both of them together. Add some adhesive to the folded edge and press down against the box.
6. The boxes that I found were white so I chose not to decorate the bottom of the box.
I placed a sheet of white tissue paper on the bottom of the box and used another sheet crumbled up on the side to prevent the cards from slipping.
7. I cut a piece of 12" scrap paper 1 1/2" wide and wrapped it around the cards. I added a piece of tape to hold this together. When you give a gift of cards, be sure to include envelopes that fit. It's always a nice added touch to stamp the corner or the back flap of the envelopes with a stamp from the sets that you used to make the cards. This gives it a nice look to the envelopes.

The paper that you see on the bottom left hand corner of the boxes is not needed for a gift box. I added a description of the contents since these were for a charity silent auction. 

Friday, October 5, 2012

Popcorn Gift Bag

You can make this gift bag using 2 sheets of 8 1/2x 11" paper or cardstock. The decorations require 1 sheet of Whisper White cardstock and 18" ribbon.

Choose 2 pieces of identical patterned paper from Snow Festival DSP (126908). This is 12 x 12" paper but the bag can be made from 8 1/2 x 11" paper or cardstock.

Trace the pattern for the bag. You can find the pattern on my Patterns page. Trace the pattern on both sheets of paper. Cut out each sheet. Only cut on the outside lines. The other lines are fold lines. Do NOT cut on the fold lines.

Use theSimply Scored Scoring Tool (#122334) to score all the lines as marked on the pattern. Score carefully because some of the lines are angled.
Fold on all the scored lines. Most of the lines will fold to the inside but the score lines for the side panels, fold the opposite way.
Before you put the two pieces together, you will want to decorate the outside of the bag.
To do that, you need the Ornament Keepsakes stamp set (#128051) and the Framelits Holiday Ornaments (#127816).

Stamp the ornament of your choice on Whisper White cardstock. Stamp 4 in Real Red and 4 in Gumball Green classic ink.

Use the Framelits Holiday Ornament dies to cut out the ornaments on your Big Shot.


Now you will score each ornament in the center using the Simply Scored Scoring Tool.

Score all 8 of the ornaments.

Place adhesive on half of one side of the back of an ornament. Attach half of another ornament to the back of this ornament. You will make four ornaments with this, 2 red and 2 green.


Place the front side of your gift bag on the table. Using Gumball Green 3/8" Satin Stitched ribbon (#126848) make a bow leaving tails about 3" long. Place glue dots on the back of the bow and adhere to the middle of the gift bag front. Place the ornaments with the hanging end against the bow.
After you have all four ornaments on the front of the bag, trim the ribbon tails at an angle.

Now, it's time to put the bag together. Fold on all score lines.
Put Sticky Strip (#104294) across the narrow side.


Pull the red strip off of the adhesive. Carefully, line up the the other side of the box(the side with 2 folds) with the edges of the narrow side. Pay special attention to lining up the top edge. Press together.


Place Sticky Strip on one of the large bottom pieces and both of the small bottom side pieces. Pull the red strip off the adhesive. Fold the small side pieces in and then the large piece. You will have one large piece wihtout sticky strip. This one goes on top of the sticky strip. You should be able to stand your box upright now.
This is great for putting a small gift in, small toys, candies, or baked goods. Add tissue paper to the top so the gifts don't show.


Your next hop is to Ronnel's Stamping Studio. Click here.