I love card making, scrapbooking and paper crafting. I will post card ideas, scrapbooking pages and tips a few times a week. Check in often so that you won't miss anything but don't plan on seeing something new here every day!
Showing posts with label scrapbooking. Show all posts
Monday, March 25, 2013
Saturday, March 23, 2013
Happy, happy, happy
Another scrapbooking layout today. Again, I used Tea for Two DSP (#129311) and Melon Mambo and Pacific Point cardstock. Yes, the title is from Phil Robertson of Duck Dynasty fame. Love that show. It's a good fun show with family values. You don't ever have to be afraid to let your kids watch it. There are never any curse words or off color humor. Just good, clean, Christian fun and values.
This is more fun from our crop day, like you saw yesterday. IMO, sometimes you don't have to make a lo fancy, just fun will do.
Friday, March 22, 2013
Togetherness
No cards today, just some scrapbook los. My friends & I got together a couple of days ago for our monthly crop. We spent a part of the time just having fun and acting silly.
The background paper is Tea for Two DSP (#129311). I just love the patterns in this set! The cardstock that I used is Melon Mambo and Pacific Point. Not a fancy lo. Just a fun one!
Friday, July 13, 2012
Scrapbook Bible Study
This is a 2 page scrapbook spread layout. I've written a Bible study called "Faithbook." I taught it at my church last summer. Here is the lo that I finally did of it. I'm so far behind on my scrapbooking, actually, farther than a year but I wanted to do this one.
Happy birthday to me today!
I used paper from Comfort Cafe DSP(#126898) pack. I did 3 two page spreads with my pictures so using the paper from the same set gave them a cohesive look. For the strips on each side, I cut another sheet from Comfort Cafe 1 x 12." Cut 2 for each page. Ink them with Midnight Muse. The ribbon in between the patterned paper is 1" Bashful Blue Double Stitched Grosgrain ribbon(#111848).
The journaling boxes are cut from a Top Note Bigz die (#113463) and a Labels Collection Framelits(#125598) cut from Summer Starburst cardstock. The letting is on Summer starburst cardstock also.
If you are interested in my Faithbook Bible study to scrapbook you own faith journey, contact me. I will send it to you for the cost of copying and postage.
Friday, June 22, 2012
Enjoy Life Peacock SB page
Sorry I didn't get anything on my blog for you yesterday but with canning, going to the dentist and a couple of migraines, it just didn't get done. Sometimes, life just gets in the way of our hobbies! lol
We had fun taking pictures when all the kids were here. This is one of my sweetie and I playing around.
To hide a bit of the picture behind some of the cool pattern on the Birds of a Feather(#126899) designer paper, decide exactly where you want the picture to sit. Then mark the edges with a pencil. Remember, you'll want to use an artgum eraser to erase the pencil marks later.
With a sharp craft knife, carefully cut around the pattern that you plan to tuck your picture under. Make sure that it is all cut from one pencil mark to the next and then erase the marks.
Slide the picture under the cut space and adhere it to the patterned paper.
Finish out your layout by adding a title, some journaling and some embellishments
I'm so excited about SU! now carrying such a great variety of brads. I LOVE brads and SU! now has brads in brights, subtles and regals to match your great SU! classic inks. They also have my favorites, printed brads in the In Colors. The brads on the "enjoy" are from the printed ones(#122940) and the brads on the "life" are from the brights(#119740).The "enjoy life" title and the journal box were stamped from Enjoy Every Moment(#113622) retired stamp set. The words are stamped in Midnight Muse and the journal box is stamped in Marina Mist classic ink.Wednesday, June 20, 2012
The Whole Flock SB page
This 2 page spread has pictures from a few weeks ago when the whole family was together. I used paper from SU! Birds of a Feather(#126899) patterned paper. I don't often have 8 x 10's printed but I wanted these. I printed another and have it in a frame in the den.
Cut a piece of anther sheet from the same paper pack to 3 x 12" to use for the side strip. Using the scallop edge border punch (#119882) to scallop one side. Use Marina Mist classic ink and an ink dauber to ink the scalloped edge so it will stand out better.

Wednesday, May 23, 2012
Scrapbooking Painted Churches
Central Texas is fortunate to have several historic painted churches from the late 1800's and early 1900's. My sweet hubby & I did a tour of 6 of them back in February of this year & I'm finally getting around to scrapbooking them. I plan to put them in their own album. I have almost 100 pictures that I took on that day trip. This is the first church that we saw in the Schulenberg area at Praha. Most of these churches are Catholic and have served the Czech people that came to this area. The inside walls are hand painted and absolutely gorgeous. If you ever have the chance to see any of them, I highly recommend it.
In my scrapbooking I most often do 2 page spreads. Rather than write out what I remembered about the churches, I googled "Texas Painted Churches" and was able to find the histories on each one that we visited. I printed the history and cut it out to fit on my paper.
This is a closer view of the left side of my spread. The background paper is from SU! Flock Together designer paper that I had left from a few years ago. The piece that I cut for the left side is from SU! Bella Bleu.
In the picture on the bottom right, you can see some of the actual painting that is done on the walls. I plan to include many more pictures of the painting that I took on my pages. Several of the churches had walls that used more blues than we normally see so I choose blues for my background papers. There were many paintings of flowers, natural life and angels throughout these churches. Most of the painting was done for the ceiling and upper sections of the walls.
I felt that accents with flowers would look good on these pages so I stamped images from the Fabulous Florets(#123027) set on white cardstock in Island Indigo, Marina Mist and Wild Wasabi. I cut those out and placed them around the pages. I used Stampin' Dimensionals (#104430) to make some of them pop up. I also ran some Bashful Blue stitched ribbon across the pages.
If you are interested in learning more about Texas Historic Painted Churches, just google them. You will find a lot of pages with historical information as well as, info about tours that you can take to see them.
In my scrapbooking I most often do 2 page spreads. Rather than write out what I remembered about the churches, I googled "Texas Painted Churches" and was able to find the histories on each one that we visited. I printed the history and cut it out to fit on my paper.
This is a closer view of the left side of my spread. The background paper is from SU! Flock Together designer paper that I had left from a few years ago. The piece that I cut for the left side is from SU! Bella Bleu.
In the picture on the bottom right, you can see some of the actual painting that is done on the walls. I plan to include many more pictures of the painting that I took on my pages. Several of the churches had walls that used more blues than we normally see so I choose blues for my background papers. There were many paintings of flowers, natural life and angels throughout these churches. Most of the painting was done for the ceiling and upper sections of the walls.
I felt that accents with flowers would look good on these pages so I stamped images from the Fabulous Florets(#123027) set on white cardstock in Island Indigo, Marina Mist and Wild Wasabi. I cut those out and placed them around the pages. I used Stampin' Dimensionals (#104430) to make some of them pop up. I also ran some Bashful Blue stitched ribbon across the pages.
If you are interested in learning more about Texas Historic Painted Churches, just google them. You will find a lot of pages with historical information as well as, info about tours that you can take to see them.
Tuesday, April 17, 2012
Scrapbook Journaling
In my opinion, journaling is one of the more important parts of scrapbooking. Without the journaling, you just have a pretty photo album. First, I want to share with you why I think journaling is so important and then, on Thursday, I'll give you a few tips about how to journal.
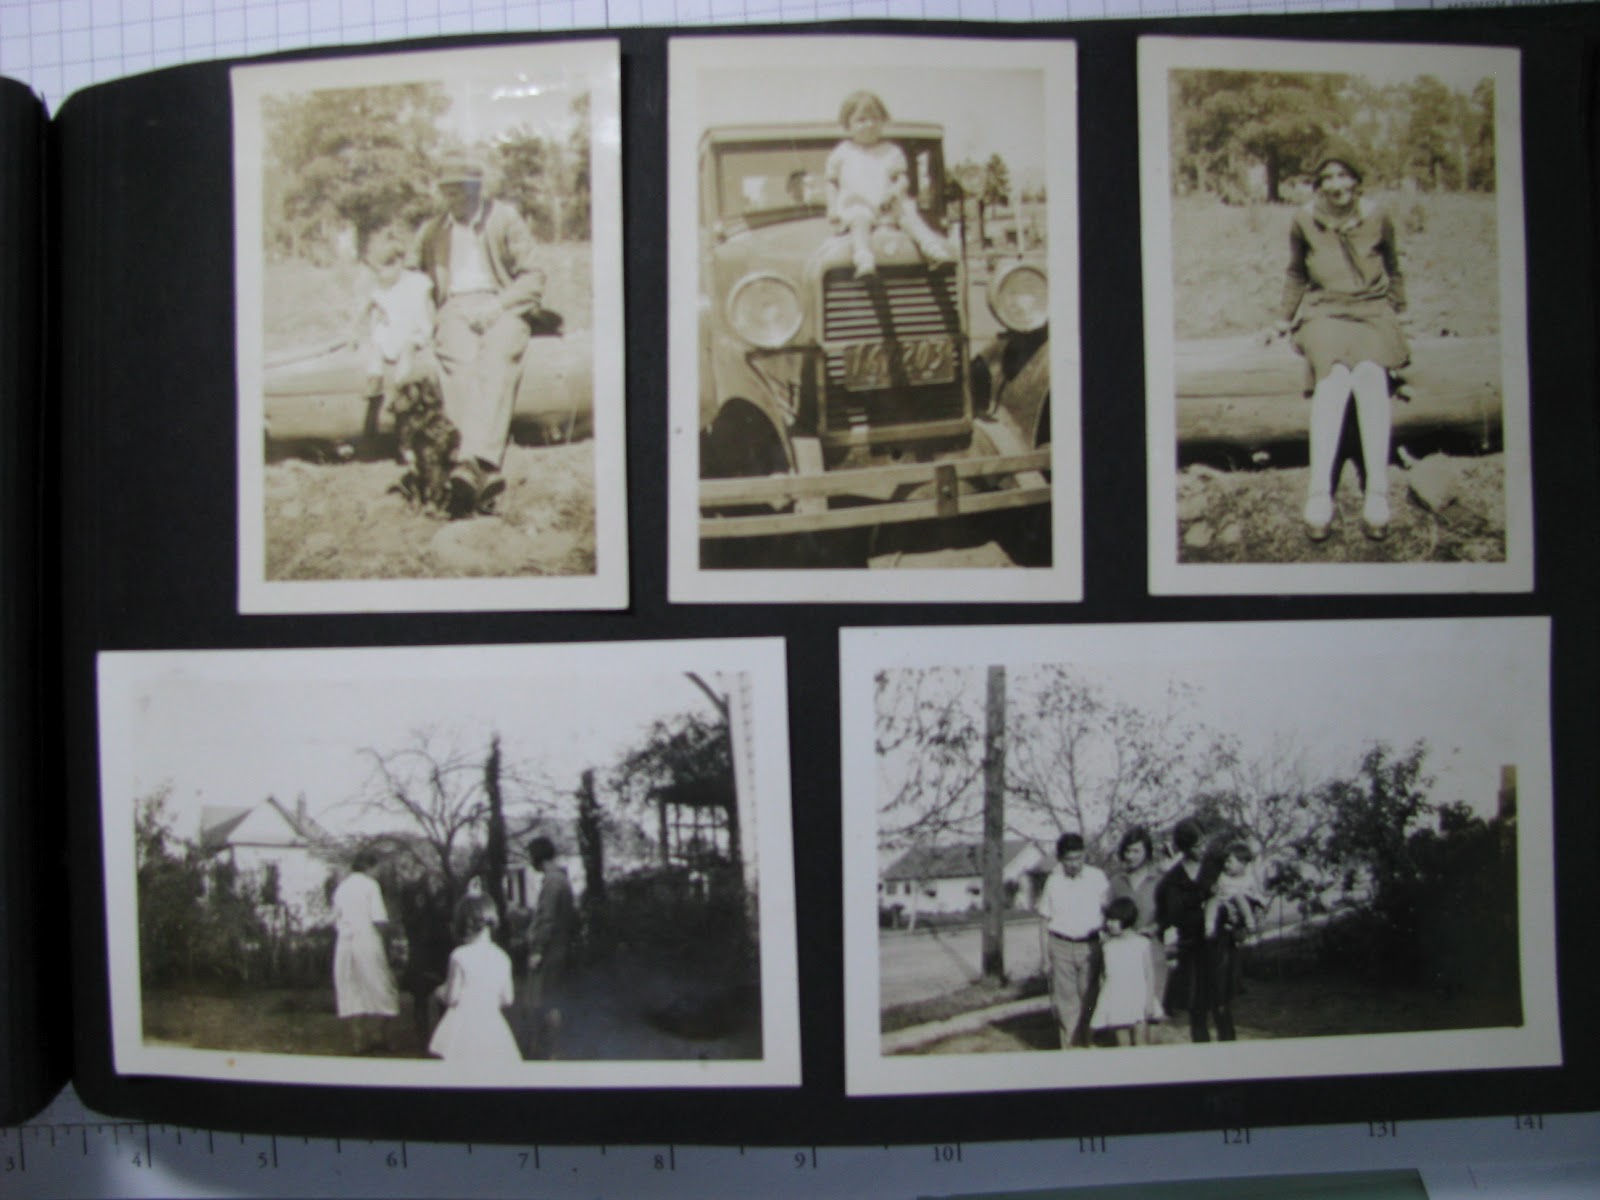
You can see the black pages and on many photos she used those photo corners that you could buy in a box of 100 to mount photos. But, like many other people, she also just glued many of the photos directly to the black paper. You see all those great ancestors of mine and their friends, cars, & houses. Looks great...but I don't have any idea who or where they are. I can make a few educated guesses but even those guesses are pretty broad.
You can see the name, Charles Z, and 10 months written directly on to this picture. The problem is that I can't find a Charles Z in my family history so I still don't know who this man & baby are.
Ok, here you can see that my grandmother took some sort of white crayon and wrote my great uncle Arnold's name above this picture. Still, I don't know how old he was in the picture or where it was taken.
I am lucky in that my grandmother did write in white crayon above and near several of the pictures in her album.
Ok, I hope that you can see why the journaling is important to me. My great-grand children can look at my albums one day and they can know who the people in the pictures are. They can know what was going on and even on some of my pages, what I was thinking and feeling. My great-grandchildren don't have to guess as to the importance of the photos in my albums. They can just read what I've got there.
My maternal grandmother was born in 1903 and died in 1999. I am very fortunate to have her photo album that dates back into the 1920's. I have used it and other photos from her in my heritage album. In so very many ways, her album was like many other from that era.
I am lucky in that my grandmother did write in white crayon above and near several of the pictures in her album.
You can see on this black page that there were several pictures with notations by them. The reason the pictures are missing is because I took them out to use in my heritage album. I had to do a bit of research to find out exactly who Arnold, Lena, Miriam & others were because they all lived in California and I have lived in Texas all my life. I only met a few of them on a few trips to visit relatives when I was a kid. Fortunately, for me, my son-in-law is very big into genelogy & has done some complete genelogies for my family. In using this, I was able to find out exactly who many of the people were and even where some of them where.
This is a page from my heritage album. The thing that makes this better than the old style albums is not the frames or stickers or other art work, but the journaling. You can see that I have written on each frame with information about who, what, when & where, as much as possible. I have also added a journaling box to the page with more information. I did this album about 10 years ago. My scrapbooking style has changed greatly since this.Ok, I hope that you can see why the journaling is important to me. My great-grand children can look at my albums one day and they can know who the people in the pictures are. They can know what was going on and even on some of my pages, what I was thinking and feeling. My great-grandchildren don't have to guess as to the importance of the photos in my albums. They can just read what I've got there.
Subscribe to:
Posts (Atom)