Tuesday, June 12, 2012

Organizing Your Paper Crafts

As you progress with your paper crafts, whether scrapbooking, cardmaking or both, you will start to accumulate more tools and embellishments to use with your crafting. You will start to want to find ways to organize your materials without spending more for organizing than you spend for your crafting materials. There are as many ways to organize as there are products and some of them can be quite expensive.

You will want to find a place to craft. When you start out, it is often the kitchen or dining table and you can buy plastic tubs, shoeboxes, etc to keep your craft supplies in. It won't be long until you are looking for a place you can craft without having to totally put everything away every time you have a meal. Many people start out with a closet or a nook where they can keep their items. A closet can be a great place to start because you can often place a small desk or table inside it to work on. You can find shelves to put on the sides where you can store materials. When company comes knocking, either expected or unexpected, all you have to do is close the closet door. As your crafting hobby grows, you will dream of having your own crafting room. That is ideal and a great way to have everything in one place but I know that not everyone can do that.

I've got a few tips today to help you in finding things to use for storage. A hardware store or the hardware department of a store can be a great place to start or maybe even your husband's garage might have items you can use(if he will let go of them!). A plastic hardware bin is great for storing an assortment of smaller embellishements, such as, brads, buttons, chipboard pieces and various small "found" items.
These usually have from 25-30 small drawers in them to seperate your items. In hubby's garage, one of these might be used for nuts, bolts, nails, screws, etc. One of these costs around $10-15. Label them with the name of the contents with small pieces of paper taped on or cut a piece from an adhesive backed label. You can label by color, item, style and so on. These bins are usually easy to stack on top  of each other. At this time, I have 6 of them.
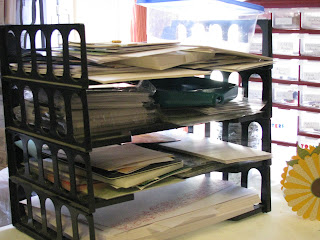
Stacking paper trays from the office supply section are great for organizing various paper items. I use mine for white cardstock, envelopes, cutting mats & other flat items.

Be sure to watch for used items from your kitchen that will make great storage items for you supplies. Ready made cake frosting containers with lids are great for storing any number of items from cotton balls to paper clips. Label the outside with small letter stickers or write on them with a Sharpie. Old (or new) file card boxes are great for holding many items too. I've seen some people cut empty cereal boxes on the diagonal, decorate them & use them for storing papers in. Keep you eyes open for things that would normally be thrown away that you might be able to recycle or reuse in your craft room. There are many things that you could convert to storage without having to spend another penny.

School pencil boxes can hold thread, ribbon, small templates, stencils, and many other items. If they are clear, you can see what is inside. If they are not clear, they are easy to label or to write on with a permanent marker.
Small plastic baskets can be used for putting supplies in also, depending on your needs.
Garage, yard or rummage sales can be great places to find organizional supplies. I've found many baskets at garage sales that I was able to buy for 10-25 cents each. Just let you mind be open and run free. One of my best garage sale buys was a used 5 piece entertainment center that I bought for just $80. I put it in my craft room and use it as a place to put many of my supplies. The center section made for a TV was perfect for my Big Shot or other die cut machine and my dies. It makes a great work area for cutting out things.

Monday, June 11, 2012

Sky High Birthday

Here is a fun card from the Up, Up & Away (122757) stamp set.
  1. Use Midnight Muse cardstock cut to 4 1/4 x 5 1/2" for your background. Cut paper from Summer Smooches(#125409) patterned paper set to 3 3/4 x 5" and adhere on top of the cardstock.

2. Using stamps from the Up, Up & Away stamp set, stamp 3 overlapping balloons using the Masking technique. Stamp these on Summer Starfruit cardstock in Midnight Muse, Gumball Green and Raspberry Ripple. Loosely cut out around the balloons and strings.

3. Use the birthday stamp from the same set to stamp your greeting on white cardstock in Raspberry Ripple. Punch the greeting out using the Extra-Large Oval(#119859) punch. Ink the edges of the oval on the Midnight Muse classic ink pad. I am really starting to love these newly reformated ink pads. They are so juicy that you really don't have to work at direct to paper inking!

4. Adhere this to the bottom left corner and the balloons to the top right corner. For fun, you might stamp "the sky's the limit" on the inside from this same set.

Sunday, June 10, 2012

Good Morning

Last week was very busy at my house. Jonathan, my grandson, graduated from high school and we had people everywhere! On Thursday night, I had all of my beloved children, grandchildren and my 1 great grandchild all at my house for supper at the same time! That's an accomplishment these days with the military, work schedules, and school. Here we are.

This is the whole family , including spouses.

These are the grandkids & the great.

David & I with out 3 kids.

Cousins having fun. 
My sweetums & I. We all had fun in the back yard that evening. We took a total of 24 pictures so I don't think you want to see all of them. lol


Mandisa is just about my favorite Christian artist these days and this is one of my favorite songs. Remember, God's mercies are new each morning!

Saturday, June 9, 2012

Scrapbook Pocket Pages

In my years of scrapbooking, I've done around 30 + albums for all kinds of events. Most have been family events or vacations but some have been gifts for others and even a few that people have paid me to do. One thing that can be done to help keep memorbilia is to make pockets. Here are some pages from various albums of mine through the years with ideas on how to do pockets. Some pockets can be small for just a few things; others can be the entire page.

Let's start with a very simple pocket.  
This is a very simple page from my "All About Me" album. This is about my favorite books. Here all I did was use a library pocket that I had. While you can find library pockets in teacher stores & office supply stores, you can also make your own with a die or find a template on the internet to use.


This is another easy pocket from a page in my heritage album. I simply folded over a piece of vellum paper in 3 parts. I attached it in 4 places with eyelets and wrote on the outside flap what I put in it. Here, I've placed driver's licenses, insurance cards, etc that had belonged to my parents while they were alive.

This pocket is simply a piece of cardstock with a ribbon ran through it. I placed adhesive on 3 sides and put one picture and two tags with journaling on them inside it. Because I knew I was not putting anything thick in the pocket, I knew that would work.


I made this pocket with colored cardstock. I measured and cut the cardstock to the size that I wanted it and then used my corner rounder on all 4 corners. I cut a piece of white paper about 1/2" wide and just a little longer than my colored cardstock. I rounded one end and drew straight lines across the paper to make it look like pages. I used a small piece of cardstock the same color as the front for a back "cover."
Drawing a line down the long edge gave it the look of a book spine. I wrote my made up title across the "front" of the book. I had several papers & certificates that I wanted to put in this pocket so I used foam tape under the ends and bottom to give the pocket the depth that I needed. The things in this pocket are VBS certificates, report cards, etc that my mother had kept for many years.
This page came from my heritage album. My mother kept just about everything! Yea! After both of my parents passed, I was able to go through boxes that she had and find many treasures. This page is part of a military layout I did of my dad's service in World War II. The pocket contains his "orders" for duty in the war. I made the pocket as a triangle to sit on the right bottom corner of the page. I used red cardstock for the triangle and white cardstock cut in strips to give it a flag look. The stars are from the punches that I did with the page border. Again, I used foam tape to lift the pocket and give it room for the papers.
Neither page of this 2 page spread had  photos on it. I had forgotten to take my camera when we went to the museum in Houston but I still wanted to document the trip. The pocket was made using a heavy patterned paper identical to the background paper. I cut the sheet in half and then cut out a large circle to make it easy to find everything that went in the pocket. The top sheet was lifted using  several SU! Dimensionals along the 3 edges.

The pockets on this page were used to help tell the story from different perspectives. I found a picture of each of the people involved in the story and cut the colored cardstock so the pictures would fit on each one. I made tages with my Sizzix machine at the time and put cute brads and ribbon on the top. I asked each person to write out the story from their point of view. I then typed the stories and adhered them to the tags. Some of the stories needed front and back!

I hope that this gives you some ideas of ways to add pockets to your scrapbook pages. Remember that everything you put on your pages doesn't have to be immediately visible to those going through your album. For this page, I slit the page protector with my craft knife so that the tags would slide through them. In the album, I have the ribbon sticking through the slit so that those who want to see can just slide the tag out without having to remove the whole page.

I am sorry that these pictures are so out of focus. When I take things with my camera, these days, the focus is not always the best. With my cards, I can simply place them on my scanner & I don't have to worry about focus or a steady hand. Most of my scrapbook pages are 12 x 12" and I don't have that large of a scanner. Anyway, hope you got some good ideas today.

Friday, June 8, 2012

A Little Birdie

 
When I was a kid and my mom would find out something, I would always ask how she knew whatever it was. Her answer was often "Oh, a little birdie told me." Using that phrase, I made today's card. A little bird could "tell" you most anything so this card could be used for any number of occasions.

I used some of the New In Colors on this card. For the background, cut Summer Starfruit cardstock to 4 1/4 x 5 1/2." The Gumball Green cardstock is cut to 3 1/2 x 4 1/2 and the Tangerine Orange is cut to 2 3/3 x 3 3/4." Cut some scrap patterned paper from the Summer Smooches collection (#125409) to 5 1/2 x 1 3/4."

With the Scallop Edge Border (#119882) shape one long edge of the Summer Smooches and the 2 short sides and 1 long side of the Gumball Green and Tangerine Tango cardstocks. Layer these with your adhesive as shown in the picture.

On white cardstock, stamp the bird from Every Little Bit(#120558) in Midnight Muse classic ink.

With the Scallop Oval (#119856) punch, pop out the birdcage and another scallop oval from white cardstock. Ink the edges with the Midnight Muse classic ink. I love these new, reformatted ink pads! The ink is so much juicyer than with the older stamp pads & it's so easy to ink the edges! (Don't throw away the scraps here.)

Use a pencil to write your saying on the blank white scalloped oval. Using a pencil first helps with your size and position of the words you want to put here. When you are satisified with it, trace over with the Midnight Muse marker.

I thought that these ovals were just screaming for brads so I put 2 on the saying and one at the top of the birdcage.

Because I just love, love, LOVE ribbon, I put 2 ribbons on this card! Cut a piece of Gumball Green 3/8" Satin Stitched ribbon(#126848) about 6 1/2" long. Place adhesive on the back and press it onto the patterned paper, wrapping the ends around to the back. Cut a piece of 1/8" Everyday Endhantment Organdy Calypso Coral ribbon(#126060) about 24" long or just leave it on the spool and wrap the ribbon around the card front, tie the bow and then cut. Put a bit of adhesive on the back of the card front to secure the ribbon. Place this ribbon on top of the green ribbon.

Now, let's add some fun to the inside of the card.

Stamp an appropriate saying on the inside of your card in Midnight Muse classic ink. I used this one from On Your Birthday (#111644) stamp set(retired).
When you used the scallop oval punch you had some leftover scraps like you see in this picture. Place adhesive on the back of about 4 of the scallops. I ran mine through a sticker maker machine that I've had for years. Then you can make a border across the bottom of the card with them.
You can add any other greeting that you wish to make the card fit your occasion.

Thursday, June 7, 2012

Distressing

Distressing is not one of my favorite techniques to use on cards or layouts but I decided that I wanted the computer printed history of this church to look "old" so I used distressing on this layout.
Distressing is actually a very easy technique. For  this today, I used direct ink to paper and tearing to get a distressed look.

Instead of cutting my side paper to mat the computer article on the history of this church, I tore it. I started with a 12 x 12" sheet of patterned paper from the Bashful Blue Designer Series paper pack (#112151). Just using my fingers, I carefully tore the paper at what looked to be about 4" from the edge.


I used one hand to guide my tearing even though it doesn't show that in the picture. When you tear towards you, you get the white edge on the back side of your paper. When you tear away from you, the white edge is on your side of the paper. To get the white edge, you must use paper with a white core. Most patterned papers have the white core.


To ink the white torn edge of the paper, simply rub the paper across your ink pad. I used Marina Mist for this part to coordinate with the colors in the layout.


The background paper is a pattern from the Beau Chateau patterned paper (#122357).
To make the background paper, the computer printed article and a picture have the old distressed look, I applied Crumb Cake classic ink to the edges of each of the items that I wanted to look distressed.

There are other ways to make paper look old, such as scraping the edges with scissors or a knife to rough up the edges but that is not a look that I'm especially fond of. If you want to learn more about this technique, you can google "paper distressing."

Wednesday, June 6, 2012

Life's Moments card

I don't do a lot of pinks but I was just in a pink mood today. Maybe the greens will off set the pink enough so that you don't feel like you've got to find some of that pink medicine for your stomach! lol

For this card, you use pink patterned paper from the Brights Collection Paper Stack(#117155). Cut the background paper to 4 1/4 x 5 1/2," the stripe paper(which is the reverse side of the other pink) to 3 1/4 x 2 1/2." The green layer is 3 x 5."

Use the scallop trim border punch(#118402) to make the border on the green and the pink stripe. Only punch one end because the other end is even with the edge of the card.

Tie a bow in a strip of Old Olive 1/2" grosgrain striped (#113883) ribbon and adhere it to the center portion of the card, on top of the layers.

Stamp 3 flowers from Printed Petals (#120444) stamp set in Melon Mambo, Regal Rose and Pink Pirouette classic ink. Cut the flowers out. The center flower can be punched with the 1 3/4" scallop circle (#119854) punch.

Punch a hole in the center of the flowers and add a small brad.

Using Certainly Celery cardstock, cut a framelit from the labels collection(#125598) and your Big Shot.

Stamp your greeting on the label frame in Melon Mambo ink and use a sponge dauber to ink the outside edge with Melon Mambo ink. The saying here is from the Elements of Style(#120045) stamp set.

Place SU! Dimensionals(#104430) on the back of the framelit and adhere above the ribbon. Place onto your card base and put a special note on the inside of your card.