Wednesday, October 31, 2012

Play with Tags

 This card is still full of lots of fall colors. Hope you're ready to enjoy fall weather! Enjoy your Halloween tonight and be careful when driving to watch out for the little kids out trick or treating.


There are so very many things that you can do with tags other than just putting who a gift is to. I used tags to decorate this card. I had fun playing with scraps of paper. With SU! patterned papers all being double sided, it gives you lots of patterns to choose from. For this I only used 2 pieces of scrap paper. For the second side, I just turned my paper over. Easy, peasy!

Sizzix Original Tag, Scallop Combo
Big Shot Die Cut Machine
Perfectly Preserved stamp set (#126692)
Lovey As a Tree stamp set (#115026)
Orchard Harvest DSP (#126895)
Brights Designer Buttons (#119747)
Glue Dots (#103683)


Tuesday, October 30, 2012

Halloween Greetings

Here is the card that I made to go in the pocket I showed you yesterday. This is just a card front with no inside to it. It slips easily into the pocket this way.
This card is one that's easy to use up some of your scraps with.


Whisper White cardstock 4 x 5" plus extra white cardstock
Orchard Harvest DSP that matches the paper you used on yesterday's pocket  3 1/4 x 4"
Island Indigo cardstock 1 1/4 x 4"
Wild Wasabi cardstock 1 1/4 x 4"
Greeting Card Kids stamp set (#120633)
Watercolor Wonder Crayons (#119804 & 119805)
Pumpkin Pie 1/2" Striped Grosgrain ribbon (#110715)

Teeny Tiny Wishes stamp set (#115370)
2 1/2" Circle Punch (#120906)
Word Window punch (#119857)


Monday, October 29, 2012

Halloween Pockets

Here's a fun pocket to make to put small treats, gift cards or greeting cards in. They would be cute decorated for Christmas with a Christmas gift card tucked inside.

Whisper White cardstock 7 1/2 x 8 1/2"
Wild Wasabi cardstock 4 1/4 x 5 1/2"
Island Indigo cardstock 2 x 4 1/4"
Orchard Harvest DSP (#126895) 3 x 4 1/4"
Scallop Edge Border punch (#119882)
3/16" Corner punch (#119871)
Pumpkin Pie classic ink
Got Treats stamp set (#120627)
Pumpkin Pie 1/2" Striped Grosgrain ribbon (#110715)
2 Printed Designer brads (#122940)
Simply Scored Scoring Tool (#122334)

On your Whisper White cardstock that is cut to 7 1/2 x 8 1/2" score the long side at 2 1/4" from the left side and 2 1/8" from the right side. This first score is up and down. Score 2" from the top all the way across. This score is side to side. Cut out the 2 squares in the top corners.

Fold on the long scores so the cardstock with meet in the middle with a slight overlap.

Use the Scallop Edge punch across one side of the patterned paper. Stamp the Got Treats pumpkin on a piece of white cardstock that is about 2 x 2". Ink the outer edges of the square. Adhere it to the center of the patterned paper.

Punch a hole in the Wild Wasabi cardstock near the center about a 2 1/4" from the top. Insert your brad.
Round the corners of the white cardstock and the Island Indigo cardstock on the flap that folds down. Punch a hole in the center about 1/4" from the bottom of the flap and the Island Indigo cardstock. Insert your second brad here. Wrap a piece of twine, thread or embroidary floss around the brads to hold the pocket closed.


Adhere the Wild Wasabi cardstock on the front of the envelope (not on the flap). Use a 1" circle punch to cut a half of a circle at the top of the Wild Wasabi cardstock and through the white pocket.

Wrap a piece of ribbon about 12" long around the flap and tie a bow.

Now you have a pocket envelope ready for your card or treats for whichever holiday you want to use it for. If you decide to do this for another holiday, of course, you will want to use colors that go with that holiday.

This is your finished pocket with a card sticking out the top. Tomorrow I'll show yu the card that I made to go inside this pocket.

Sunday, October 28, 2012

Sunday fun, giving, & worship

Happy Sunday before Halloween! Watch out for all the ghosts & goblins that will be walking from house to house. If you are out, be careful while driving in residential areas. We don't want to turn any of the little ghosts into real ghosts!

Don't run off any trick or treaters just because you don't like their costume. You never know!

Enjoy Phil Stacey as he worships.

In this video, the guys from Third Day go shopping for things for their shoeboxes for Operation Christmas Child. If you don't know about OCC, check it out here.

Friday, October 26, 2012

Fall Dots

Another simple & easy card

Bravo Burgandy cardstock 4 1/4 x 5 1/2"
Wild Wasabi cardstock 4 x 5 1/4"
Saraha Sand cardstock scrap
Orchard Harvest DSP (#126895) 2 x 3 1/2"
Textured Impressions Perfect Polka Dots (#117335)
Brads Brights Collection (#119740)
Wild Wasabi classic ink
Modern Label punch (#119849)
Word Window punch (#119857)

These 2 punches that I've used here are my 2 favorite punches, as you might have noticed with previous cards. The punches go together so easily but still can be used separately without any trouble. Any greetings that are in the Teeny Tiny Wishes (#115370) stamp set can be punched with the Word Window punch. It makes creating cards so much easier. Many other greetings will fit in this punch also but you will just have to see if yours fits.
Stamp your greeting first. Then turn the punch upside down. Fit your saying into the center of the punch & you can see if it fits or not. If it does fit, then simply punch.

Wednesday, October 24, 2012

Stripes & Dots


This is a fairly simple & quick card to make that could be used for most any occasion.

Polka Dot Parade DSP (#126902) 4 1/4 x 5 1/2"
Bravo Burgundy cardstock 4 x 5 1/4"
Sahara Sand cardstock 2 1/2 x 3"
1/2" Striped Grosgrain ribbon- Old Olive (#113883)
Textured Impressions Stripes (#123128)
Just Believe stamp set (#120453)
Old Olive classic ink

Monday, October 22, 2012

Double Thank You

Can you say thank you too many times? I doubt it. When someone does something that they really don't have to do, we should remember to tell them thank you for their efforts. My dentist gave me over 100 toothbrushes to put in my Operation Christmas Child shoeboxes. No, I'm not giving 100 shoeboxes but often, in foreign countries, the children these shoeboxes go to are extremely poor. Many of them have to share one toothbrush with the whole family. It's really great when you can place more than one toothbrush in a shoebox. I try to put 4-5 toothbrushes in each of my boxes. That way, maybe, the child can have his/her very own toothbrush and not have to share one. Anyway, I made this card to write a special note to my dentist to thank him for the toothbrushes. He even made a special point to give me different size toothbrushes so that a child won't have to use one that is really too big for his mouth! Thank you Dr. Robert Myers in Temple, Tx.

Polka Dot Parade DSP (#126902)
Comfort Cafe DSP (#126898)
Framelits Window Frame Collection (#129021)
3/8" Stitched Stain Ribbon Midnight Muse (#126847)
Modern Label punch (#119849)
Word Window punch (#119857)
Brads Brights Collection (#119740)


Sunday, October 21, 2012

Sunday Strength

It's another Sunday to Praise the Lord. I hope that you are able to go to the church of your choice. I am still praising Him even though I recently was diagnosed with a rotator cuff injury. It's on my right shoulder & at times, is very painful. It does limit me in some of the things I can do. I have cards posted for this next week because I already had them made. For time after that, I'll just have to wait & see. I'll do my best to get some on here. I think that I should be able to make some as long as I don't have to raise or lift my arm. I called my dr back & told her that the cortizone shot hadn't helped much. She is setting up for me to have an MRI and referring me to othro. Don't know when those appointments will be. I do know that even though it hurts, that God still has a plan for me. I'm just not sure what it is yet. lol

Here is Mandisa with Stronger. God will make us all stronger & that includes me with my shoulder.

Have you ever done the Bible Slide? Well, this video will show you how and give you a laugh at the same time.

Friday, October 19, 2012

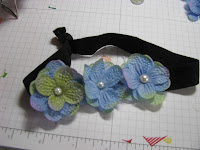
Headbands for Christmas Shoeboxes

My absolute favorite charity is Operation Christmas Child or as we call it, Christmas Shoeboxes. For more information about this charity that provides Christmas boxes for poor children all over the world, click here.
Today, I want to share 2 of the items that I've made to go in my shoeboxes. Of course, with the economy like it is, everyone always looks for inexpensive or cheap ways to give things. That's what I've done here, plus I've used up some of the stuff in my craft "stash."

At my local Dollar Tree (you can get items where ever you can find the best deal), I bought plastic headbands, stretchy fabric headbands and cards of mini clips. I like Dollar Tree because everything there is only $1. I looked and found plain bands and clips in packages 3 or 4 for $1. Then I dug in my craft closet and pulled out silk and paper flowers that I've had hanging in there for years. I used to buy the bunches of flowers and pull them all off of the plastic branches so I actually had a lot of them. I've used them in the past on cards and scrapbook pages.


These are what I got so you get the idea. The clips were in a pkg of 30 for $1 and the others were 3 or 4 bands for $1.


 First, I put the mini clips on a cardboard sheet. This way I could make sure that they actually worked and I could work with them easier. I used hot glue for all of these so my SU! Silicone Craft Sheet (#127853) was a dream to work with.
Place a blob or a large drop of hot glue on one clip. Then put one small flower petal on the glue & mash it down. It helps to have an old tweezer or other metal item to use to mash down. That helps prevent burning your fingers. (I always burn my fingers anyway, but it does help.)

These is what they can look like when finished. You can put a small flat back gem in the center of each or leave it empty.


First, you will want to build several flowers using your hot glue gun and your silicone craft sheet. When you build it on your silicone sheet, it will come up easily and not bring paper or other things with it.

I build several flowers before I put them on the head bands.

Put a bead of hot glue along the front of the  head band, whether fabric or plastic. Place your flowers in the hot glue and mash down so they will stick good. Your completed headbands will look like these.


Clean up is a breeze with your silicone craft sheet! No matter how much hot glue you get on it, it will pull right off. The most you might have to do it scratch a little off with your fingernail. I've used the silicone craft sheet with other glues & it works great but I didn't realize how great it was until I used it with hot glue!


While I've made these for my shoeboxes, you could make them for a craft fair or your children or grandchildren. Just have fun with them!

Wednesday, October 17, 2012

That Old Tractor

Here's another card that goes to my grandson in San Diego. We used to have a small farm when he was about 8 to 12 yo. (Acutally, we had it longer than that) He loved to come out when my husband was baling & hauling in the hay so that he could help too. Our tractor was old and looked at lot like this one. lol Dh would put the grandkids up on the seat & put it in gear so it would just creep along. He would walk along beside it. All the grandkids loved "driving" the tractor.

Comfort Cafe DSP (#126898) 4 1/4 X 5 1/2" and 1 x 4 1/4" reverse side
Midnight Muse cardstock 1 x 5 1/2"
Really Rust cardstock 1 x 4 1/4"
Scallop Edge Border punch (#119882)
3/16" Corner punch (#119871)
Whisper White cardstock 2 7/8 x 2 1/2"
Really Rust classic ink

Monday, October 15, 2012

Fall Fruit


I know a lot of people with October birthdays so I've got a lot of cards to make. Plus, I'm still making at least one card a week to send to my grandson in Marine basic training in CA.
Here's one that could be used for a nice happy fall or happy Thanksgiving card.


Orchard Harvest DSP (#126895) 4 1/4 x 5 1/2"
  reverse side of 2 sided paper  3 1/2 x 4 1/2"
Perfectly Preserved stamp set (#126692)
Framelits Cannery Set (#127822)
Paper Piercing Pack Essentials (#126187)
Paper Piercing Tool (#126189)
Teeny Tiny Wishes (#115370)
Pumpkin Pie 1/2" Grosgrain striped ribbon (#110715) about 12"
Brads Brights Collection (#119740)
Word Window punch (#119857)
Modern Label punch (#119849)

Sunday, October 14, 2012

Sunday Math

Math can be difficult for some people; easy for others. One thing is for certain is that math is all around us even if we don't want it to be. Math is very precise as this video shows us. The patterns in math can be amazing. Watch this video to see what it takes for 101% to be achieved.

Top of this Sunday morning to you. Here's one of my favorites from Mandisa. This is a great wake up song for a Good Morning. You should feel God's hope rising in you when you finish with this.

Friday, October 12, 2012

My Hero

Orchard Harvest DSP (#126895)
Early Espress cardstock 4 x 4"
Tangerine Tango cardstock 3 x 3"
Gumball Green cardstock 2 x 3 1/2"
star shaped brad
Hero Jumbo wheel (#116229, retired)
Stampin' Around Jumbo Handle (#103661)
Tangerine Tango classic ink

This is another card to my grandson in Marine basic training. Got a letter from him this week. He's doing great but says that it's harder than he ever imagined.

Wednesday, October 10, 2012

Hey, Cupcake!

Here is a cupcake birthday card for you.

Whisper White cardstock
Marina Mist cardstock
Twitterpated DSP (#125406) 1 1/2" x 4 1/4" and a small scrap
Create a Cupcake stamp set (#121915)
1 3/4" Circle Punch (#119850)
Word Window punch (#119857)
Modern Label punch (#119849)
1/8" Mini Brads (#122941)
Primitive Primrose In Color ink
Raspberry Ripple In Color ink
Early Espress classic ink
Daffofil Delight classic ink

Monday, October 8, 2012

Fall Trees

Here's a card that could be used for many occasions in the fall.  You could also use the Teeny Tiny Wishes stamp set(#115370) to stamp a Happy Thanksgiving and place it on the botton left of the card.

Basic Gray cardstock 4 1/4 x 5 1/2"
Comfort Cafe DSP (#126898)  3 1/2 x 4 1/2"
Whisper White cardstock 2  x 2"
scrap fall themed paper
1 1/4" Square punch (#119865)
3/16" Corner rounder punch (#119871)
Lovely As a Tree stamp set (#115026)
Really Rust classic ink

Sunday, October 7, 2012

I'm proud of my grandson

I've been showing you the cards I've made & sent to my grandson in Marine basic training each week. Thought that I would show you a little bit about what he is going through. This video was filmed at Paris Island, NC. My grandson is at Camp Pendleton, San Diego, CA so, of course, he's not in this video. The marines, whether they are in NC or CA do the same things in basic training. If my memory is correct, my grandson has just finished week 4 of his training. It's hard for me to watch a video and think that they are teaching him to kill other people but I do understand that in combat situations, it's kill or be killed. In that respect, I hope that he learns well!

Yes, I am very proud of the members of my family serving our country. In addition to this grandson in Marine basic, I have another grandson who was in the Air Force for 4 yrs and a son-in-law who is a chaplain in the US Army. They all give me reason to be proud!

Now for a lighter note:
here's another Tim Hawkins video.

Have a happy Sunday! Remember Jesus love you.

Saturday, October 6, 2012

And the Winner Is...

The winner of the blog candy from me for this week's blog hop is Sarah Biswabic.

Sarah, if you will email me your mailing address, I will get these 2 markers out to you asap. Congratulations and thank you for looking & leaving comments!
These are SU! markers in Marina Mist and Tangerine Tango.

Friday, October 5, 2012

Popcorn Gift Bag

You can make this gift bag using 2 sheets of 8 1/2x 11" paper or cardstock. The decorations require 1 sheet of Whisper White cardstock and 18" ribbon.

Choose 2 pieces of identical patterned paper from Snow Festival DSP (126908). This is 12 x 12" paper but the bag can be made from 8 1/2 x 11" paper or cardstock.

Trace the pattern for the bag. You can find the pattern on my Patterns page. Trace the pattern on both sheets of paper. Cut out each sheet. Only cut on the outside lines. The other lines are fold lines. Do NOT cut on the fold lines.

Use theSimply Scored Scoring Tool (#122334) to score all the lines as marked on the pattern. Score carefully because some of the lines are angled.
Fold on all the scored lines. Most of the lines will fold to the inside but the score lines for the side panels, fold the opposite way.
Before you put the two pieces together, you will want to decorate the outside of the bag.
To do that, you need the Ornament Keepsakes stamp set (#128051) and the Framelits Holiday Ornaments (#127816).

Stamp the ornament of your choice on Whisper White cardstock. Stamp 4 in Real Red and 4 in Gumball Green classic ink.

Use the Framelits Holiday Ornament dies to cut out the ornaments on your Big Shot.


Now you will score each ornament in the center using the Simply Scored Scoring Tool.

Score all 8 of the ornaments.

Place adhesive on half of one side of the back of an ornament. Attach half of another ornament to the back of this ornament. You will make four ornaments with this, 2 red and 2 green.


Place the front side of your gift bag on the table. Using Gumball Green 3/8" Satin Stitched ribbon (#126848) make a bow leaving tails about 3" long. Place glue dots on the back of the bow and adhere to the middle of the gift bag front. Place the ornaments with the hanging end against the bow.
After you have all four ornaments on the front of the bag, trim the ribbon tails at an angle.

Now, it's time to put the bag together. Fold on all score lines.
Put Sticky Strip (#104294) across the narrow side.


Pull the red strip off of the adhesive. Carefully, line up the the other side of the box(the side with 2 folds) with the edges of the narrow side. Pay special attention to lining up the top edge. Press together.


Place Sticky Strip on one of the large bottom pieces and both of the small bottom side pieces. Pull the red strip off the adhesive. Fold the small side pieces in and then the large piece. You will have one large piece wihtout sticky strip. This one goes on top of the sticky strip. You should be able to stand your box upright now.
This is great for putting a small gift in, small toys, candies, or baked goods. Add tissue paper to the top so the gifts don't show.


Your next hop is to Ronnel's Stamping Studio. Click here.

Thursday, October 4, 2012

Stocking Gift Card Holder

Here is a gift card holder that certainly says Christmas and Santa.

You can free hand draw or print out my pattern from my pattern page to use.

Start with an 8 1/2 x 11" sheet of Real Red cardstock. Trace the stocking pattern on one half of the cardstock.


Fold the cardstock in half and cut out 2 stockings at the same time.


Cut the toe and heel pieces from Garden Green cardstock and the white for the top from Whisper White cardstock. Adhere these pieces with adhesive.

Stamp Joy at Christmas from the Perfect Punches stamp set (#120516) with Gumball Green. Punch this out with the 1 3/4" Scallop Circle punch (#119854). Adhere it to the front of the stocking.

Mark where you will make the slits to hold the gift card in place. Some gift cards are different sizes so you might want to place it on the back stock piece and mark instead of using the marks on my pattern.


Place the 2 stocking pieces together and punch four 1/4" holes along the left side of the stocking.
Measure and cut about 20" of Gumball Green 3/8" Satin Stitched ribbon (#126848).
Thread the ribbon through the holes starting at the top. Once you reach the bottom hole, turn the stocking over and thread the ribbon back through the holes going to the top of the stocking. At the top, tie a double knot and clip the ends.
Keep the ribbon straight as you thread it through the holes.


Place the gift card on the inside and write to and from on the top white of the stocking.

Sorry, Ronnel, I forgot to link to you! I'll fix that right now so that any future hoppers will see it.

Go to Ronnel's Stamping Studio here

Wednesday, October 3, 2012

A Merry Christmas


Marina Mist cardstock
Whisper White cardstock
Bells & Boughs stamp set (#121142)
Primrose PetalsSatin Stitched 3/8" ribbon (#126844)
Scallop Oval punch (#119856)
Glue Dots (#103683)
Stampin' Dimensionals (#104430)
Sponge Dauber (#102892)

To do the twisted ribbon, place a glue dot on the back of the ribbon at each place where it touches the card. The poinsettias are stamped twice with the top one on Stampin' Dimensionals.


To go to Ronnel's Studio click Next

To go Back to Jenny's blog