Showing posts with label doilies. Show all posts

Friday, August 29, 2014

A Different Way to Use a Doily

I love the look of doilies. It always reminds me of the Victorian age when ladies were always very proper. Not that ladies have to always be proper! I'm certainly not! But sometimes, I just like that look.
Materials needed:
Flower Shop stamp set (#130942)
Patterned paper (This is from Kalioscope from SU! It's been retired for a few years. I'm just trying       to use up some of my papers.)
Pumpkin Pie ink
Melon Mambo ibnk
Brights Brads (#119740)
Word Window punch
Teeny Tiny Wishes stamp set

On this first card, I have the doily set in the center which is what you will see most often. I placed the flowers with colors to match my patterned paper in the center. This looks perfectly fine but sometimes, I want something different.

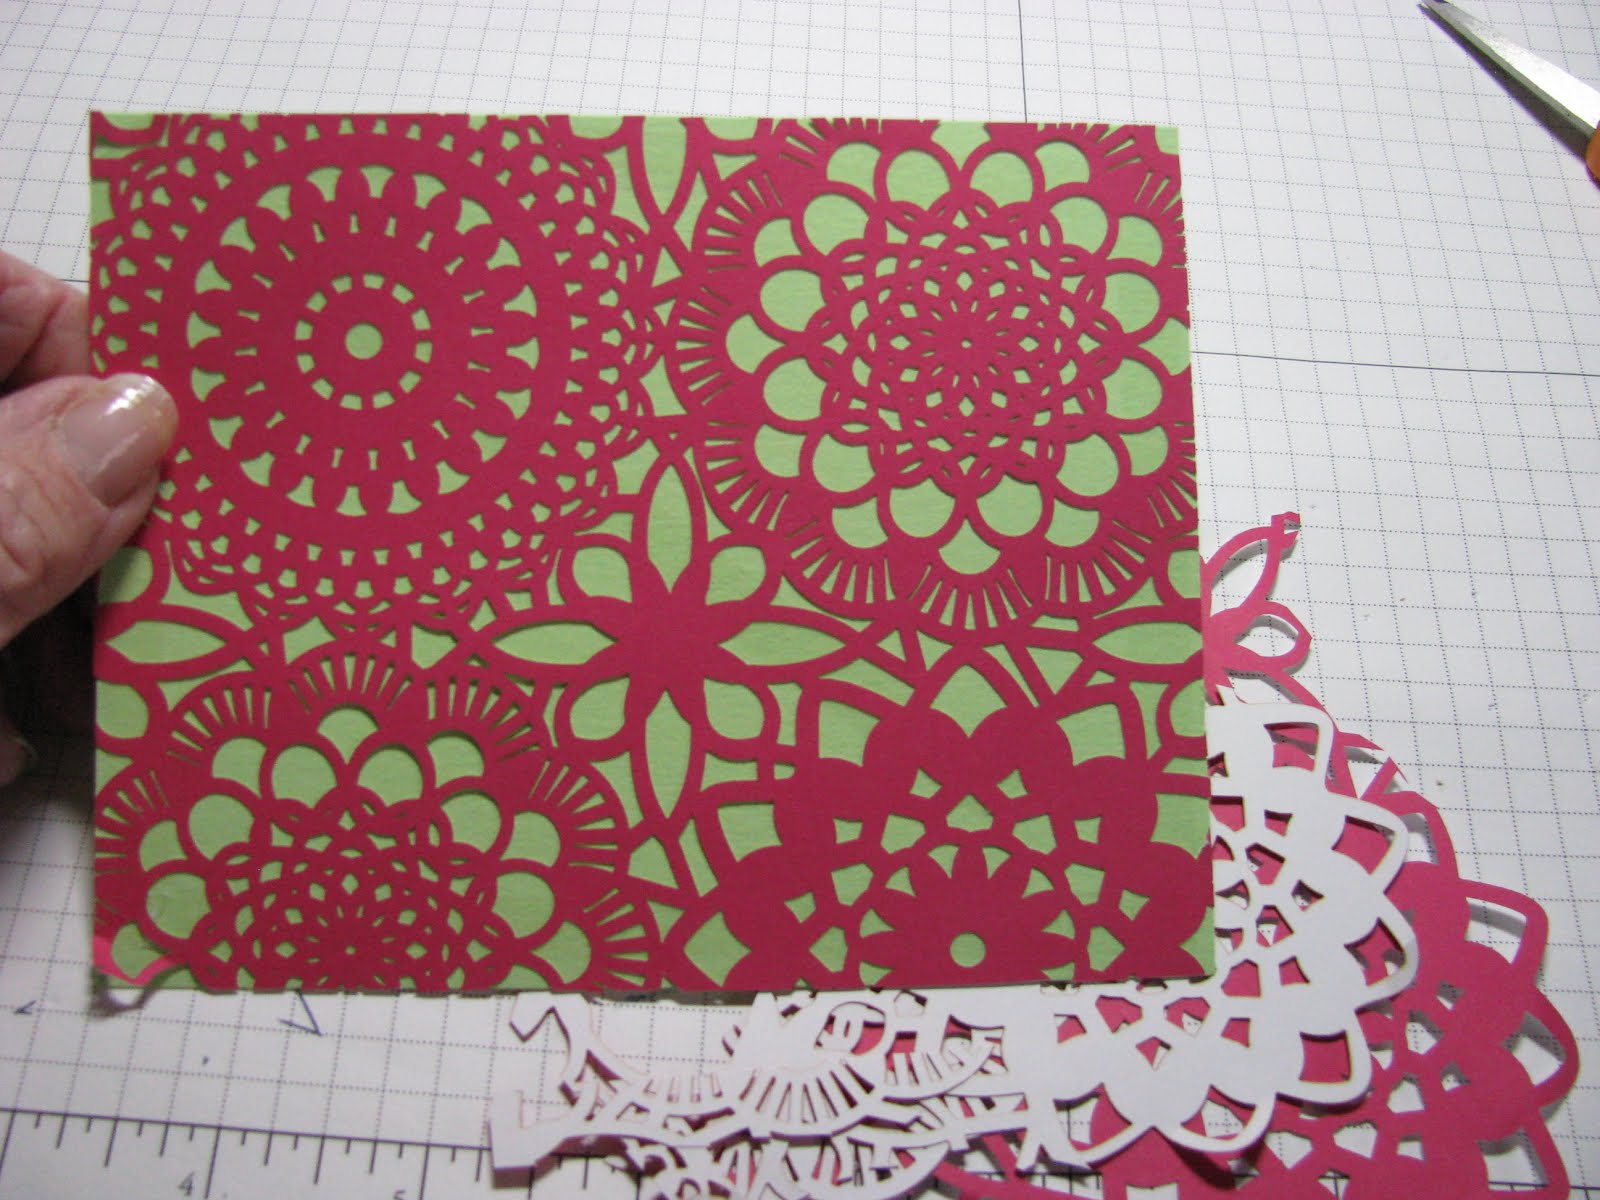
On this card, I didn't want to cover up the beautiful butterfly on the paper but I still wanted to use a doily. I folded the doily in half and place it on the patterned paper. After adhering it, I cut the excess half off even with the paper. It gives a different look using the same stamps and colors.

I hope you like seeing things a little different some times.

Monday, July 21, 2014

Blooming Birthday

Here is a femine cards made largely with old, retired or left over materials. Of course, you can always use new materials for your cards, but all those things you've been saving can make great cards too.

Materials needed:
Bloom with Hope stamp set (hostess, # 133952)
The Good Shepherd patterned paper from Flair Designs 3 7/8 x 5"
Raspberry Ripple card stock 4 1/4 x 5 1/2"
Certainly Celery card stock 1 3/4 x 3 7/8"
White card stock
Raspberry Ripple marker
Old Olive marker
Raspberry Ripple ink pad
Doilies (SU # 129399 or Wilton's smallest)
Stampin' Dimensionals (#104430)
Certainly Celery 5/8" Grosgrain Ribbon (#109050, retired) about 7"
Very Vintage buttons (#129327)
Glue dots

1. Cut all your papers to the sizes listed. Use the markers to ink up the flower and leaf parts on the image. On a piece of white card stock, stamp this image from the Bloom with Hope stamp. Cut it loosely around the edges.
2. Adhere the patterned paper on to the Raspberry Ripple card stock.
3. Place adhesive on the back of the ribbon. Press it over the patterned paper on the right hand side about 1/2" from the right edge. Wrap the ends around to the back of the card stock.
4. Place adhesive on the solid part of the back of the doily. Center it on the card and press it down.
5. Stamp the greeting from the Bloom with Hope stamp set with Raspberry Ripple ink on the top left side of the Certainly Celery card stock piece. Adhere this piece of card stock to the center of the doily. You  might like a slightly off center look. If so, place the card stock just below the center of the doily as I did.
6. Place Stampin' Dimensionals to the back of your stamped image. Adhere it over the ribbon and doily on the card. Place glue dots on the back of the button and press it on the bottom left side of the Certainly Celery card stock.
7. Adhere the card front to a card base. Decorate the inside as you please being sure to add a nice message either from a stamp or hand written.

Be thinking about Operation Christmas Child. I know it's still a long ways until collection week in November but if you start buying items for your shoeboxes now, you can be way ahead of the game come collection week. You  might even pack more shoeboxes this year if you start early. For more info about Operation Christmas Child, go to Samaritans Purse..
 

Friday, July 6, 2012

Roses and Doilies

I do like it when I can use more than one stamp set on a card. I actually used 3 different stamp sets for this card, Delicate Doilies(#122592), Elements of Style (#120045) and On Your Birthday (#111664, retired).

  1. Cut a 4 1/4 x 5 1/2" piece of paper from Summer Smooches DSP(#125409) for the background piece.

2. Stamp 2 different doilies in Raspberry Ripple and Gumball Green In Color ink. Stamp the birthday greeting from Raspberry Ripple ink on Whisper White cardstock.

3. Using Raspberry Ripple and Gumball Green brush tip markers, color the roses and leaves directly onto the stamp. If you've not done this before, check out my tutorial on it here

4. Pop out the doilies using the 2 1/2" Circle punch(#120906). Adhere one to the bottom right of the background paper, going slightly off the edge. Adhere the other doily to the top left of the background paper, again going slightly off the edge. Trim the parts that go off the edge.

5. Cut around the edges of the roses that you stamped.

6. To make the roses pop, add SU! Stampin' Dimensionals (#104430) to the back of the image. For larger images like this, I like to use up my edges that are left on my dimensionals sheet. Just snip the length that you need from the edge and apply in the same way you do regular dimensionals.


7. Cut the greeting out with the Large Oval punch (#119855) and ink the edges with Raspberry Ripple In Color ink. Apply adhesive to the back and place on the bottom left corner below the roses.

8. Cut 2 pieces of Marina Mist 1/2" Scallop Dot ribbon(#122986) each about 6" long. Apply adhesive to the back of one piece and place it on the card front over the lower doily.

9. Tie the other piece in a bow. Using glue dots (#103683), put 3 on the back of the bow. Press it down over the other ribbon at the top right of the card.

10. Adhere the card front to the card base and add a greeting to the inside of your card.

Thursday, March 15, 2012

Wedding Card

I don't do very many wedding cards these days but our young children's minister at our church got married this past weekend. I like to do cards in the bride's colors but I couldn't find out what they were so I went with the pinks and greens that are so popular right now.
I choose Certainly Celery cardstock for the front base, cut 5 1/2 x 4 1/4."
1. I had some of the gorgeous doily paper from the Flirtatious Specialty pack (#122360) left over so I checked to see if my piece would fit over the Certainly Celery. I adhered it tothe top of it & then cut the extra off.


You will find that the front of the card is sticky from adhesive at this point but I'll tell you how to handle that in a bit.
2. Next I used some patterned paper from the Raspberry Tart collection that was offered a couple years ago. I had a large enough piece to cut a doily using the Sizzlet Large Paper Doily die (#125592) that is in the current Ossasions Mini catalog until April 30. I ran this through my Big Shot(#113439) to cut it. I just LOVE this die! I applied adhesive to the back of the doily and place it on the left hand side hanging over the card edge a bit. I then trimmed it off. You'll want to leave the lower right corner of this doily loose to slide a flower under it later.
3. Now let's take care of that excess adhesive that's making the front of the card so sticky. Sprinkle a small amount of baby powder over the front of the card. Use a stiff bristle paint brush to rub the powder in slightly. Then turn the card over the trash can & tap the back to remove the powder. You may need to brush the card a little to get rid of all the excess powder but then your card will be sticky free.

4. Because this card was for our children's minister, I stamped a cross from the Crosses of Hope set(#120567) in Certainly Celery Classic ink. I cut around the edges and then sponged the edges with Certainly Celery ink. I like to sponge edges when they aren't just straight lines because it's so much easier to get the curves.
I adhered it to the center of the large doily on the left side of the card.


5. The next step I did backwards so the pictures won't look quite right but this is better. I stamped a rose from 5th Avenue Floral (#113734) using VersaMark ink pad on Whisper White cardstock. I sprinkled it with Clear Stampin Emboss Powder (#109130) and shook off the excess. I then used my heat tool to melt the embossing powder. Trim around the edge of the rose, then put adhesive on the back of it. Slide the rose just under the edge of the large doily where you left it loose. Let the rose hang over the bottom edge of the card a bit & trim off.


6. Next wrap 1/4" Whisper White Grosgrain ribbon(#109025) around the card and tie a bow. Adjust your bow to look how you want it & secure with glue dots (#103683). Then adhere this card front to your Whisper White card base.
7. On the inside of the card, I stamped the perfect greeting from God's Blessings stamp set (#114972) in Melon Mambo classic ink. This says "May the Gof of love be the heart of your marriage, the light of your home, and the ever-present partner in your new life together." I just love it!
8. Ok, now for the last step...I don't like what I call "naked" envelopes. Because this was not going in the mail, I stamped "for the newlyweds" from Tenny Tiny Wishes (#115370) on the front of the envelope. I also stamped part of the same rose that I used on the card on the bottom left corner of the envelope.
Tomorrow look for my flower garden!
Now check out what Bridgett has for you today! Stamping with Bridgett