Showing posts with label butterfly. Show all posts

Monday, April 6, 2015

Felt Flowers and Butterflies

It's April already and I'm running behind, as usual. lol I spent my afternoon a few days ago getting my April birthday cards made. I had made a few last week for the first few days of the month but didn't get them scanned for you. So now, that I've got my cards for the rest of the month done, I'll share them with you.

Today, I'm sharing the one that I did for the ladies I know with April birthdays. It's spring time now and we've had some beautiful days here in Central Texas. We've had some cool ones too but nothing too bad. I wanted to do springy so here is the card.


Materials needed:
Pool Party card stock 4 1/4 x 5 1/2
Shades of Spring patterned paper 2 1/2 x 3"
Butterfly stamp (this is one I've had from years. I'm pretty sure it's from SU! but I don't know which set)
Felt
Secret Garden Framelits dies
Jewels Basic Pearls
White satin ribbon 5/8"
Strawberry Slush ink
Teeny Tiny Wishes stamp set
Word Window punch
Pretty Birds embossing folder by Jennifer Ellory
Stampin' Dimensionals
Glue dots

It's pretty easy to just look at the card and see how it's made. The only thing you might not be sure of it the felt flower. I took of piece of felt and cut it with one of the Secret Garden flower dies. The original dies will cut up to 4 pieces of felt with no problem but the Framlits dies will only cut 2 at a time and sometimes only one does good.  After you cut out the felt flower, place a glue dot in the center of the flower. Pinch the felt around the glue dot and it will look a bit more like petals. Then you can put the felt on the flower with glue dots. The rest of the card is pretty much like it looks. Easy peasy! Have fun.

Friday, March 13, 2015

Butterflies in Flight


Hope you enjoy this one. 
I am in Dallas as this posts at the annual OCC Connect Conference. I hope to learn lots and maybe have some more fun shoebox things to share with you when I get back. 

Thursday, February 12, 2015

Butterfly Garden


Materials needed:
Butterfly Garden embossing folder and stamp set by Jenny Ellory
Old Olive card stock
Calypso Coral card stock
Strawberry Slush ink
White satin ribbon

Wednesday, October 15, 2014

Dollar Tree and scraps Card

This card is a bit blurry because the butterfly is thick and made the other part move when I scanned it.
Materials needed:
Burlap & feathers butterfly from Dollar Tree
Scrap card stock 2 x 3 1/2"
Scrap patterned paper 2 1/2 x 3 1/2"
Solid color card stock 4 1/4 x 5 1/2"
Teeny Tiny Wishes stamp set
Word Window punch
Modern Label punch
Butterfly brads from a craft store
Glue dots

This was very easy to put together. I did put plenty of glue dots on the butterfly to hold it in place. I put 5-6 glue dots. This card can not be mailed in a regular envelope because of it's thickness. I requires a larger envelope and extra postage.

Wednesday, September 24, 2014

Fall Butterflies and Flowers

I found these butterflys at Dollar Tree when I was in there a few days ago looking for items for my Operation Christmas Child shoeboxes. There were 2 butterflies on a card for a dollar. I used papers from my scrap box, adhesive, glue dots, and brads to put these together in just a few minutes.


Materials needed:
Burlap & feather butterflies
Mellow Moss and Lost Lagoon card stock, each 4 1/4 x 5 1/2"
Night of Navy card stock 3 1/2 x 3 1/2"
Old Olive card stock 2 x 2 1/2"
Patterned paper from Greenhouse Gala
Tangerine Tango card stock
Tangerine Tango ink
White card stock
Word Window punch
Modern Label punch
Teeny Tiny Wishes stamp set
Brads
Glue dots

1. I cut the card stock and patterned paper to fit from the scraps that I had and adhered them to the background card stock.
2. I placed several glue dots to the body of the butterfly and a couple to one wing. These butterflies have a heavy body so I put 5 or 6 glue dots on each one to hold it in place.
3. Stamp the greetings on white card stock and punch out with the word window punch. Put out a modern label from Tangerine Tango card stock. Adhere together.
4. Adhere the greeting to the top right of the card and secure in place with brads. The brads on the blue background are brads that I've had for several years.The ones on the green background are from SU and I've had them a couple of years. These were the last ones I had so that's why I didn't use the same brads on each card.

Friday, August 29, 2014

A Different Way to Use a Doily

I love the look of doilies. It always reminds me of the Victorian age when ladies were always very proper. Not that ladies have to always be proper! I'm certainly not! But sometimes, I just like that look.
Materials needed:
Flower Shop stamp set (#130942)
Patterned paper (This is from Kalioscope from SU! It's been retired for a few years. I'm just trying       to use up some of my papers.)
Pumpkin Pie ink
Melon Mambo ibnk
Brights Brads (#119740)
Word Window punch
Teeny Tiny Wishes stamp set

On this first card, I have the doily set in the center which is what you will see most often. I placed the flowers with colors to match my patterned paper in the center. This looks perfectly fine but sometimes, I want something different.

On this card, I didn't want to cover up the beautiful butterfly on the paper but I still wanted to use a doily. I folded the doily in half and place it on the patterned paper. After adhering it, I cut the excess half off even with the paper. It gives a different look using the same stamps and colors.

I hope you like seeing things a little different some times.

Monday, July 7, 2014

Elegant Birthday

Materials needed:
Serene Silhouettes stamp set (#1277324)
Perfect Punches stamp set (#120516)
White card stock 4 x 5 1/4", 1 x 5 1/4" plus extra
Island Indigo card stock 4 1/4 x 5 1/2", 1 1/4 x 5 1/4"
Gingham Garden patterned paper (#129310) 2 1/4 x 2 1/2"
Island Indigo ink pad
1 3/4" Circle punch
Corner rounder
Large Oval punch
Stampin' Dimensionals (#104430)
Embossing Folder from Paper Studios

1. Place the white card stock in your embossing folder and run it through your Big Shot machine.
Adhere the embossed card stock to the Island Indigo card stock.
2. Adhere the 1" white card stock to the 1 1/4" Island Indigo card stock centered. Adhere this piece to the white embossed piece about 1" from the top edge.
3. Round the corners on the patterned paper and adhere it on top of the blue & white cross piece that you just put on.
4. Using Island Indigo ink on white card stock, stamp the circle image and the birthday greeting.
5. Use the circle punch to punch out the circle image and the oval punch to punch out the birthday greeting.
6.  Adhere the circle to the center of the patterned paper.
7. Place dimensionals to the back of the greeting. Place it on top of the blue and white strip.
8. Adhere the card front on to a card base and send to a friend.

Wednesday, April 23, 2014

Butterfly Circles

Materials needed:
Summer Smooches patterned paper (#125409) 4 1/4x 5 1/2" plus
Vintage Blooms by Jennifer Ellory 3 x 3 1/2"
Serene Silhoutes stamp set (#127324)
Wild Wasabi card stock  3 1/4 x 3 3/4"
White card stock
Chevron embossing folder (#127749)
Strawberry Slush ink
2 1/2"Circle punch (#120906)
Small Butterfly punches
Brayer

1. Punch a circle from white card stock. Put Strawberry Slush ink on the embossing folder following the technique here. Place the circle in the center of the embossing folder and run it through your Big Shot machine. Take out of the folder and lay aside.
2. Adhere the Vintage Blooms paper on to the Wild Wasabi card stock. Adhere that to the top section of the Summer Smooches patterned paper about 1/4" from the top.
3. Cut a strip of Summer Smooches patterned paper 1" wide and about 4" long. Cut a triangle out of one end to make a ribbon look banner. Adhere it to the bottom part of the card about 1/2" from the bottom edge.
4. Stamp the image from Serene Silhoutes stamp set on white card stock with Strawberry Slush ink. Cut around the edges. Adhere it to the center of the chevron circle made in #1. Adhere this to the bottom right corner of the Vintage Bloom rectangle.
5. Use small butter punches (I could not find a brand name on the ones that I have & I don't remember where I got them.) to punch 3 butterflies out of patterned paper. Adhere them to the banner on the bottom.
6. Adhere the card front to a card base.

Monday, July 9, 2012

Greens Sympathy Butterfly


Certainly Celery cardstock 4 1/4 x 5 1/2"
Old Olive cardstock 4 x 4 1/2"
Eyelet Border punch (#119853, retired)
Just Believe stamp set (#120453)
Teeny Tiny Wishes stamp set(#127802)
Gumball Green 3/8" Satin Stitched ribbon (#126848)
Basic Pearl Jewels (#119247)
Stamp-a-ma-jig (#101049)
Beautiful Butterflies Bigz die (#114507)
Big Shot
thin wire

Wednesday, May 30, 2012

Happy Thoughts

How fun has this Blog Hop been! I've loved looking at all the super ideas my fellow Glitter Queens have had on their blogs! And did you see Dee's watering can made with the petite purse die? Just too cute! And Tamara's milk carton die house was adorable too. Everyone's creations are just so fab. I can't wait to try some of the myself! If you've missed any, be sure to go back and check them out.


How often do you think of friends far away? Some I think of often; others not so much. It depends on how much they mean to me, of course. I made this card for those friends that I think of often.

  1. Start with a piece of patterned paper 4 1/4 x 5 1/2" from Summer Smooches (#125409) paper pack. This will be your background piece.

2. Cut a piece of Primrose Petals cardstock to 4 x 5." Use the Scallop Trim Border(#118402) punch to punch all the way around the cardstock.

3. Cut a piece of Gumball Green cardstock to 3 x 4." Use the Scallop Edge Border(#119882) to punch all the way around this one.

4. Place the scalloped Gumball Green cardstock piece in the Stripes(#123128) Textured Impressions embossing folder and run it through the Big Shot machine.

5. Layer these on top of each other and apply adhesive to the back of the 2 cardstocks.

6. Cut a strip of Gumball Green 3/8" Satin Stitched (#126848) ribbon about 5" long. Tie a knot in the middle of the strip. Apply adhesive to the back and press it near the bottom of the card overlapping the Primrose Petals cardstock. Wrap the ends of the ribbon around to the back.

7. Use some of the same patterned paper that you are using for your background paper to make the banner and the butterfly. Place the patterned paper on the Framelits Bitty Banners (#129267) and run it through the Big Shot to cut out the large and the small banner. Flip the small banner over so that the opposite side of the patterned paper is showing. Carefully stamp a greeting from Teeny Tiny Wishes (#115370) on to the small banner. Put adhesive on the back of the small banner and adhere it to the larger banner. Adhere this to the top left of the Gumball Green cardstock.

8. Use the same patterned paper to make a butterfly with the Beautiful Butterflies Bigz die(#114507). Place the smaller butterfly on top of the larger one with the patterned paper reversed like you see in the picture. Make a paper bead(see tomorrow's tutorial) and cover with Crystal Effects (#101055) to go in the center of the butterfly.

9. Before your adhere the butterfly,  stamp a floral image from Field Flowers(#122762) with Primrose Petals classic ink and a seed pod from the same set in Summer Starfruit classic ink. Cut them both out. Place the seed pod on top of the floral image with a Stampin' Dimensional (#104430). Adhere the flower to the center left of the Gumball Green cardstock.

10. Stamp the saying from the Field Flowers set on white cardstock with Primrose Petals classic ink. Cut around it and adhere it to the center of the green cardstock.

11. Adhere the butterfly to the bottom right corner of the card front overlapping the cardstock and ribbon. Trim off any part of the butterfly wings that stick out from the card front.

12. Choose a large button from the Bright Designer Button Collection(#119747). Run a small piece of thread or floss through the holes and tie 2 knots to hold it in place. Put  3 glue dots (#103683) on the back of the button and place it on the top right of the Primrose Petals cardstock.

13. Adhere the card front to your card base and write a note or stamp a greeting on the inside.

Ok, this is the last day of our Blog Hop. Be sure to check out what Anji has for you today. here

Saturday, May 12, 2012

Doilies, Flowers & twirling Butterfly


For this card, I used a whole sheet of 8 1/2 x 11" white cardstock and a whole sheet of 8 1/2 x 11" Wisteria Wonder cardstock. I also used a sheet of Wisteria Wonder doily paper from the Flirtatious Speciality (#122360) patterned paper.

There are a lot of steps to this card, so if you don't normally print out the instructions for it, you might want to consider doing that for this one.

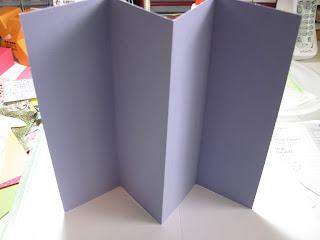
 Score and fold both sheets of cardstock at 5 1/2." Put the white cardstock aside for now.
Score and fold the Wisteria Wonder cardstock at 2 3/4" from each end. When you fold this, you will want it like an accordian fold.

With a pencil, mark the center fold of the Wisteria Wonder cardstock at 4 1/4" to show you the center. Mark the fold at 1 1/4" from the top and the bottom. These marks will help you in lining up your punch. Use the 2 1/2" Circle Punch(#120906) to punch the hole in the center. Line up your punch, looking at the back side, so that you will be punching a half circle.

The punch a half circle at the top and bottom on the fold line.


Lay the cut piece of Wisteria Wonder on top of the white cardstock. Lightly trace the 3 circles that you made. Using a doily stamp from the Delicate Doilies (#122592) set, stamp a doily in Melon Mambo classic ink in each of the openings. If you are using clear mounted stamps, it will be easy to see where to stamp. If you are using wood mounted stamps, you might want to use the Stamp-a-ma-jig(#101049) to help you line them up. After you have them stamped, use an art gum eraser to erase the pencil lines.
Now, you are ready to decorate the inside of the card. For mine I used Melon Mambo classic ink and Wild Wasabi ink. I used images from the Fabulous Florets (#123027) stamp set.
My greeting is from the Teeny Tiny Wishes(#115370) set. I stamped it in Wisteria Wonder ink on white cardstock. I used the Word Window (#119857) punch to punch it out. I punched out a label from Melon Mambo paper with the Modern Label (#119849) punch. I adhered the greeting to the label and attached it to the cardstock with some brads I had on hand.


Cut out 2 of the smallest butterflies on the Beautiful Butterflies(#114507) die and your Big Shot cutting machine. Cut one from left over Wisteria Wonder patterned paper and one from Melon Mambo patterned paper.

Cut a piece of sewing thread about 6" long. Place adhesive all over the back of one of the butterflies. Lay the middle of the thread across the center of the butterfly. Place the other butterfly on top of the first one.


Lay the butterfly in the center of your circle. Pull the thread taunt above and below the circle. Tape each end to the cardstock.

You are ready to attach the inside Wisteria Wonder to the outside white cardstock. Pay close attention to your folds. You want to adhere the two ends/left and right panels of the Wisteria Wonder to the white cartdstock. Put adhesive ONLY on the back of the left and right panels, like is shown in the picture. Do not put adhesive on the center parts of either cardstock.
Turn the Wisteria Wonder over and carefully line up the edges. Be sure that the center fold comes out.
You can now decorate the front of your card. I used a sheet of Wisteria Wonder patterned paper from the Flirtatious Speciality paper, listed above. This piece had a doily pattern in the center of the paper that I wanted to use. To make my paper measure 5 1/4 x 8 1/2" like the front of my card, I cut 3 1/4" off of the left and right sides. That made it 5 1/4" wide.
Next, I rotated the paper and cut 1 3/4" off of each end to make it 8 1/2" and leave the doily in the center.

I stamped 4 flowers with Melon Mambo ink and one stem with leaves Wild Wasabi ink from the Fabulous Florets(#123027) stamp set onto white cardstock. I cut each one out closely around the edges, leaving a small amount of white.

Cut a piece of Melon Mambo cardstock to 5 1/2 x 2 1/2." Use the Eyelet Border (#119853) punch to punch the long edge.
Cut a piece of Wild Wasabi cardstock to 5 x 2." Use the Scallop Edge Border (#119882) punch to punch the long edge of the Wasabi cardstock. Layer the Wasabi on top of the Mambo cardstock and adhere. Place 3 flowers that you cut out earlier down the center of the Wasabi scalloped cardstock. Adhere these along the left edge of the card front.

Cut a piece of 3/8" Wisteria Wonder Ruffled Ribbon (#122973) to about 6" long. Put adhesive on the back and press it to the card front about 1" from the bottom. Wrap the ends of ribbon around to the back.

Place SU! Dimensionals (#104430) on the back of the stem with flowers. Leave a part of the stem without anything so that it will fit over the ribbon. Stick it above the ribbon on the right side of the card front.

Place Dimensionals on the last flower. Stick it to the top right side.

You are ready to adhere your card front to the card base.

Check to make sure that all of your folds go the right direction. When closed, you will have to fold (do not crease) the butterfly in half or it will stick out of the card. When you open the card, the butterfly should straightened back out, if you didn't crease it.

This would make one dynamite Mother's Day card, if you still have enough time left. I am using mine for an anniversary card. The Teeny Tiny Wishes stamp set has greetings for both.


Wednesday, April 25, 2012

Pull Up Card Surprise

Since I'm a very tactile, touch, feely person, I always enjoy things that have movement. Maybe it's also because I'm never still for very long. lol Anyway, here is a card with a pull tab to give the receiver a surprise.


1. I used some of my Summer Smooches patterned paper (# ) for the background on this card. Using the 1/2" circle punch, I punched out a half circle at the top of the patterned paper. For the layers, I used Marina Mist cardstock at 2 1/2 x 3", Daffodil Delight cardstock at 3 x 3 1/2" and another Summer Smooches patterned paper at 3 1/2 x 4."

2. For the stamping on the Marina Mist, I stamped the daisy from the Fifth Avenue Floral (#113734) in Daffodil Delight classic ink using the masking technique. I stamped the saying from that set on Whisper White cardstock in Marina Mist and then cut it out with the extra large Oval Punch(#119859). I rubbed Marina Mist ink on the edges of the oval and adhered it to the lower section of the stamped layer.

3. I cut out the doily with the triple doily layer punch(#122465) out of Marina Mist, Daffodil Delight and Whisper White. I attached it to the bottom corner of the layered box with a brad from the Everyday Enchantment brads(#126126).

4. Carefully, put adhesive on 3 sides of the back patterned paper and press it to the center of the background paper. Be sure your 1/2 circle punch is at the top.

5. Punch out a circle with the 1/2" circle punch to put at the top of a piece of Daffodil Delight cardstock that is 2 1/2 x 3." Write "Pull" on the blue pull circle. Decorate this card as you please. I put a butterfly cut with the Beautiful Butterflies(#114507) die and my Big Shot. Slide this into the pocket you made with the layers. Now adhere the whole thing to your card base. This gives you a fun card with some movement.

You can put any kind of special picture or message on the card that pulls out to give the recipient a special surprise. Consider add a love note or a note of encouragement, a picture of a baby, or other special person and just something fun on your card.