Showing posts with label gate fold. Show all posts

Monday, May 26, 2014

Gate Fold Thank You

Materials needed:
Old Olive card stock 4 1/4 x 8 1/2"
Patterned paper 2 x 5", 2 pieces 1 1/2 x 2 1/2"
White card stock
Kraft card stock
Upsy Daisy stamp set (#111710, retired)
Trust God stamp set (#126702)
Teeny Tiny Wishes stamp set
Scalloped Oval punch
Sponge dauber
Regals Candy Dots (#130932)
Raspberry Ripple ink
Stampin' Dimenionals (#104430)

1. Score and fold Old Olive card stock 2 1/8" from each end. When you fold, they should meet in the middle.
2. Stamp the silhouette daisy stamp on white card stock in Raspberry Ripple ink. Cut out around the edges of the flowers.
3. Adhere the 2 x 5" pieces of patterned paper on the outside of the folds of the Old Olive card stock. Adhere the smaller piece of patterned paper on the other patterned paper. Place one near the top and one near the bottom of the edges.
4. Place adhesive on the left side back of the daisy cut out piece. Place it on the left gate fold. Be sure that the daisy sticks out over the right side of the gate fold but is not stuck to the right side.
5. Stamp your greeting on the Kraft card stock. Punch it out with the scallop oval punch. Use a sponge dauber to apply Raspberry Ripple ink to the edges of the oval. Place Stampin' Dimensionals on the back of this. Adhere it to the top right side of the card.
6. For the inside, choose a greeting from Trust God stamp set. Stamp it with Raspberry Ripple ink on white card stock. Punch it out with the Blossom punch and adhere it to the inside of the card. Write your message below it.

Monday, March 10, 2014

Floral Gate Fold

Materials needed:
Secret Garden stamp set (#129144)
Tempting Turquoise card stock  5 1/2 x 8 1/2"
Summer Smooches patterned paper (#125409) 2 pieces 1-7/8 x 5"
Raspberry Ripple card stock
Secret Garden dies (#129372)
Season of Style Washi tape (#132155)
Brights Buttons Collection (#119747)
Midnight Muse ink
Floss
Glue Dots (#103683)
Stampin' Dimensionals (#104430)

1. Score and fold the 8 1/2" card stock at 1 7/8" from each end. When you fold these will meet in the middle.
2.  Press a strip of washi tape across the bottom of the patterned paper about 1/2" from the bottom.
3. Adhere the patterned paper to the center of the gate folded card.
4. Stamp the large flower image on the Raspberry Ripple card stock with Midnight Muse ink. Use the Secret Garden die to cut the flower with your Big Shot machine. Place Stampin' Dimenionals on one half of the back of the flower. Press the flower image on the center of the patterned paper. Keep the other half of the flower loose so that the card will open in the center.
5. Thread floss through the button. Add glue dots to the back and adhere to the top left side of the patterned paper.
6. You can add a greeting or note to the inside of the card.

Friday, November 15, 2013

Top Flip Gate Fold Birthday

Well, so far so good this week with getting my cards on here. Hopefully, I'll be able to continue getting a card on Mon, Wed, Fri like I've been doing. Things are really getting busy for me now with Operation Christmas Child National Collection Week being next week. We've been getting our collection center ready for receiving all the shoe boxes and for doing our church packing parties. Last year, we collected over 11,000 shoe boxes from 5 Central Texas counties at our Mid-Texas OCC center, here in Temple. Those, along with over 6 million boxes collected in the US last year, went to poor children in over 130 different countries. We hope to increase our number of boxes this year so that even more children can learn about our lord and savior, Jesus Christ.

Ok, for today, we are turning our gate fold card on end... well, just flipping the card around by a quarter so that it opens top to bottom instead of side to side.

Materials needed:
Crisp Cantaloupe card stock 5 1/2 x 8 1/2"
Patterned paper from Patterns Pack II (#114325, retired) 2 pieces 2 x 5 1/4"
Polka Dot Parade pattern paper (#126902) a 1" strip about 8" long will do
Whisper White card stock
Best of Birthdays stamp set (#132929)
Extra Large Oval punch (#119859)
1/2" Circle Punch (#119869)
1" Circle Punch (#119868)
1 1/4" Circle Punch (#119861)
Modern Label punch (#119849)
Old Olive ink
Tangerine Tango marker
Old Olive marker

1. To gate fold your card, lightly score the card stock at 4 1/4". Fold each side in to touch the scored center. You can score the card stock at 2 1/8" from each side and fold there. Every time I do that, I end up with a gap where they meet in the center. It shouldn't but it always does with me, so I fold to the center.
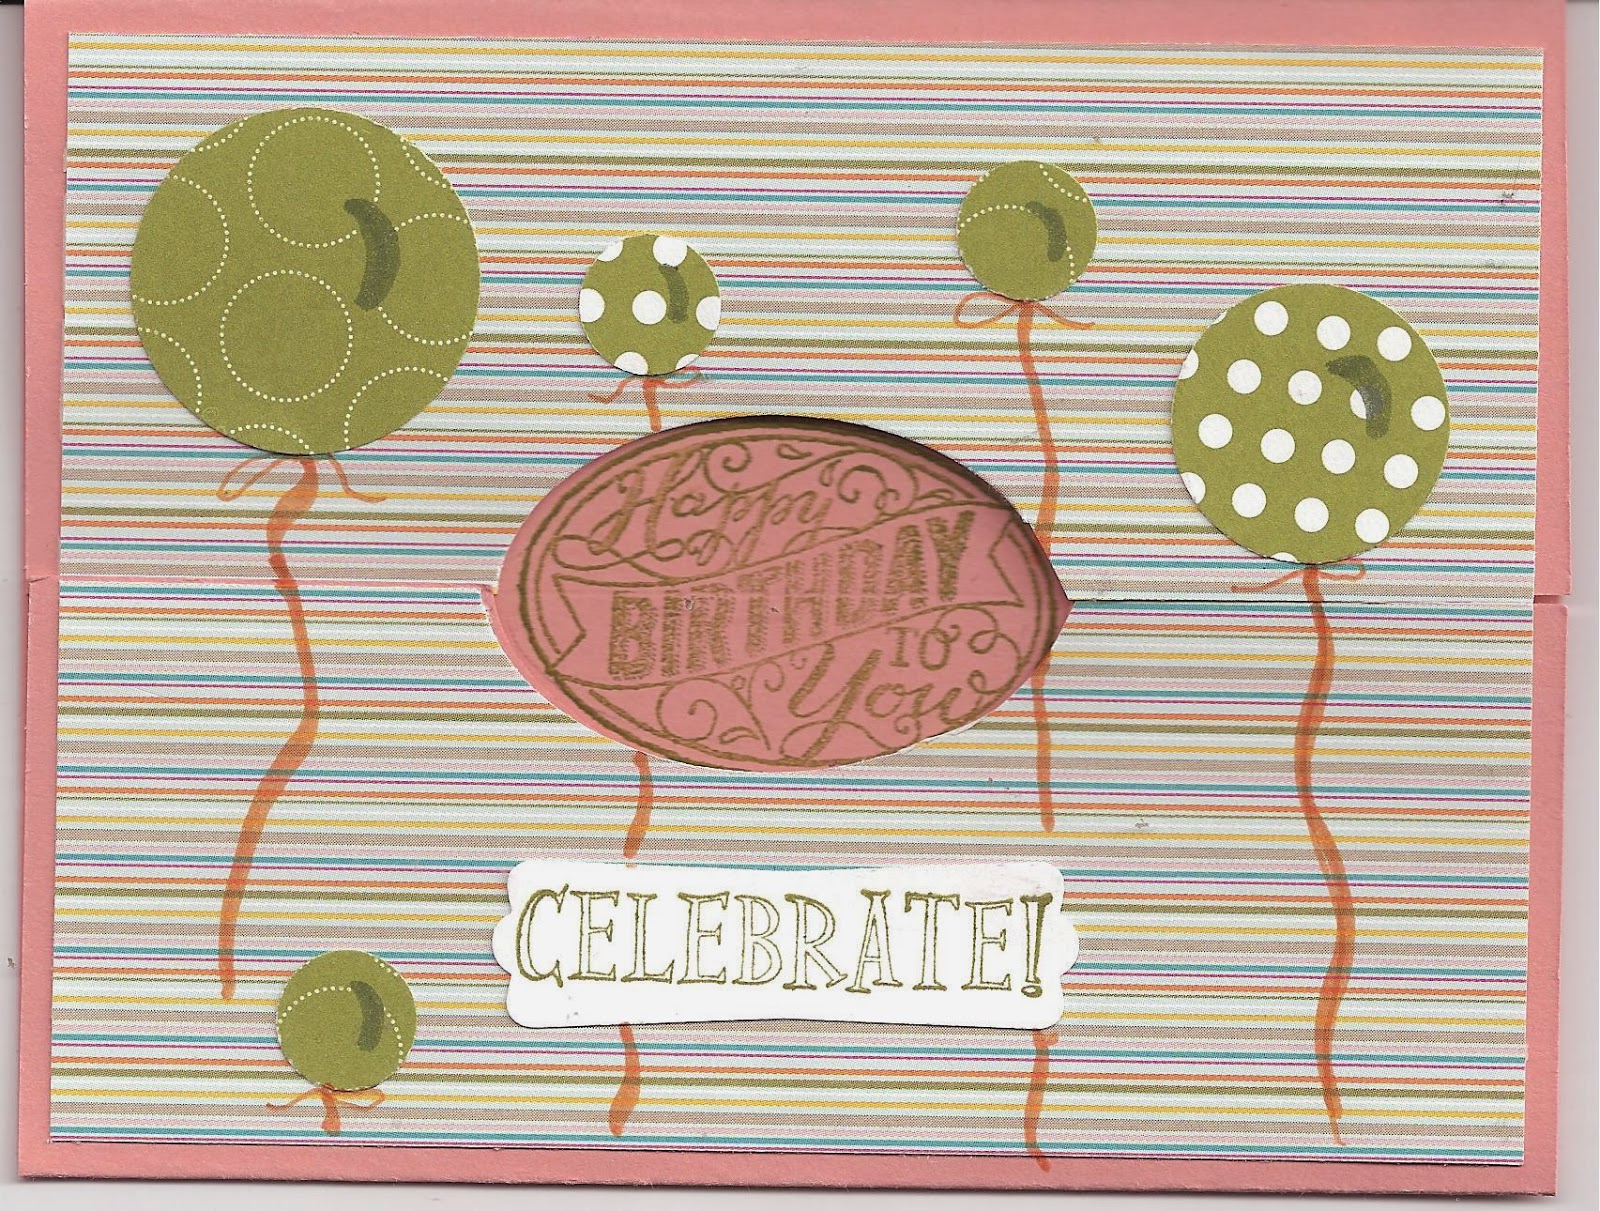
2. Adhere the striped patterned paper on the sides of the gate fold.
3. Use your extra large oval punch to punch a 1/2 of an oval on each side. To do this, turn your punch over so you can see the placement of the card stock.
After you punch the first side, make light pencil marks on the edge of the other side to line up the punch and have the halves look like they were punched at the same time. Punch through the card stock and the patterned paper on both sides.
4. Stamp the oval birthday greeting in Old Olive ink in the center of the oval punch. If you wish, you could mark the oval with a pencil and then punch with the card open. Be sure to erase all your pencil marks.
5. Stamp "celebrate" in Old Olive ink on white card stock. Punch it out with the Modern Label punch. Adhere it to the center of the bottom side of the fold.
6. Punch out circles from the Old Olive Polka Dot Parade paper. I punched 1 circle 1 1/4," 3circles 1" and 3 circles 1/2". Since the paper is doubled sided, it is easy to use both sides of the paper to give you "different" balloons. Adhere the circles on the front of the card as shown. Lay 2 of the 1" circles aside.
7. Use the brush end of the marker to draw balloon strings from each balloon. Use the fine tip to draw ties near the balloons. Use an Old Olive marker to draw crescents on the right side of each circle balloon.
8. Open the card up. Cut 2 stripes of the striped patterned paper to measure 1/8 x 4." Adhere them to either side of the birthday oval placing them fold to fold. Adhere the two 1" circles from step 6 to the tops of these strips of paper, as shown in the picture. Use an Old Olive marker to draw crescents and strings on the circles like we did on the front.
You card is now ready to place in an envelope and mail or give to your best birthday buddy!

Friday, October 18, 2013

Birthday Flowers Gate Fold card

Don't you love to get flowers for your birthday? I do. In fact, I love to get flowers any time of the year for any occasion or for no occasion at all. Here are some flowers to put on your birthday card. I also like to include some flowers on the envelope to give the receiver a sneek peek.

Materials needed:
Raspberry Ripple cardstock 5 1/2 x 8 1/2"
Old Olive Polka Dot Parade patterned paper (#126902) 2 pieces 1 7/8 x 5 1/4", 1 piece 2 5/8 x 4"
Whisper White cardstock 2 1/2 x 3 3/4", extra for stamped images
Flower Shop stamp set (#130942)
Raspberry Ripple 3/8" Satin Stitched Ribbon (#126845)
Raspberry Ripple In Color ink
Pansy punch (#130698)
Stampin' Dimensionals (#104430)

1. Cut your papers to the dimensions listed above. Lay aside.
2. Stamp 4 flower images with Raspberry Ripple ink using a stamp from Flower Shop stamp set. Punch each of these out with the Pansy punch. Lay aside.
3.Score and fold your Raspberry Ripple cardstock at 4 1/4". You can score your cardstock for the side folds but I get a better fit when I fold each side to the center fold and crease. Fold the side to touch the center fold and crease. Do this on both sides.

4. Cut 2 pieces of ribbon 3" each. Place adhesive on the back and adhere to the Old Olive patterned paper about 1" from the bottom. Wrap the ends around to the back.

5.Place adhesive on the backs of the patterned paper and center on each of the side folds. You will have a Raspberry Ripple border all the way around each piece.

6. Place Stampin' Dimensionals on no more than 2 petals of each of 3 flowers. Peel the paper backing off and place so that the dimensionals are only on one side of the card fold.


Place a flower on the top and bottom on the left side. Place the third flower in the center of the right side. Refer to the picture to see how it should be. The flowers will not be adhered all the way across the card. You want to allow it to open in the center.
7. Now you can decorate the inside of the card. When you use a dark cardstock for your base card, it is difficult for a  stamped greeting to be read. On this card I cut a piece of Old Olive Polka Dot paper 2 5/8 x 4" and a piece of white cardstock 2 1/2 x 3 3/4". Layer the white on the patterned paper. Stamp your greeting on the white and adhere the patterned paper to the inside of the card. This also helps to cover up the fold that you created when you made the gate fold of the card.
I added the fourth flower image to the bottom right of the greeting. This still gives you plenty of room for a personal note and your signature.
8. I love to have my envelopes look pretty too so I often stamp on the front or back of the envie with a stamp from the set that I'm using. I stamp 2 or 3 times on the bottom left of the envie and once on the bottom right. Sometimes I'll stamp on the back flap also. Be sure to leave plenty of room in the envie for the address and postage.


Wednesday, June 13, 2012

Doily Gate Fold Card

I do enjoy making fun cards and I think that a gate fold card fits in the fun category! To learn how to make a gate fold check my my earlier tutorial on this technique. Here is today's gate fold card.
This was made using paper from the Floral District(#126919) designer series patterned paper pack. The doily is stamped in Raspberry Ripple using the Delicate Doilies (#122592) stamp set. Punch it out with the 2 1/2" Circle punch(#120906).


When you are punching a stamped design out, turn your stamp over so that you can line up the image in the stamp area. That way, you'll get it stamped like you want it.

I used a piece of Gumball Green cardstock that I cut to 1 1/2 x 5 1/2" to make a scallop border. Punch it with the Scallop Edge Border(#119882) punch. Save the strip of cardstock that the punch cuts off. You can use it later. The Raspberry Ripple strip on the green here was the leftover from punching out a scallop edge on Raspberry Ripple cardstock.

This brad is from the Summer Smooches brad collection (#125589). The greeting is from Teeny Tiny Wishes (#115370) stamped in Gumball Green classic ink. It is punch with the Word Window punch(#119857). The edges are inked with Gumball Green. Don't put adhesives all the way across the greeting tag because you want it to be able to open with the "gate."

 Place Stampin' Dimensionals (#104430) on half of the back of the doily you made earlier.
I find it easier to lay the paper on top of the Dimensionals so that I can see where I'm sticking it.

Here's your completed card. I needed another card so I used some of my leftovers to make the same card again, just a little different.
Have fun making some cards that are a little different than usual.

Wednesday, May 9, 2012

I dig dinosaurs

I have loved dinosaurs since second grade! Well, you need to understand that I don't mean since I was IN second grade but instead, since I TAUGHT second grade. My first year in 2nd grade the first unit we taught in science was about dinosaurs. Still being young & having been in special ed for 6 yrs, where I really couldn't do much of the fun stuff, I had a great time with dinosaurs. That year and every year after! While I don't have all the materials & books that I collected onm dinos, I still think they are great fun! So, I had been looking at the Dinosaur(#122535) stamp set for quite a while. I finally got it! Here is the first card that I made with it. Any little boy would love it & many little girls too.


I made it as a gate fold card, so that's the line you see down the center. If you want to know how to make gate fold cards, check here.

Use the green"stripe" paper that is in the Summer Smooches DSP(#125409) and cut it to 4 1/4 x 5 1/2." I know. That doesn't fit for the gate fold but bear with me.

Across the center of the green paper, stamp a line of trees from the Lovely As A Tree(#115026) stamp set. I stamped this in Wild Wasabi classic ink but I think that Old Olive might have been even better.

Now, cut your paper in half at 2 1/8" so that it will fit on each side of the gate. Adhere Certainly Celery ribbon to each of these pieces and wrap the ends around the back.

Stamp the dinosaurs that you like from the set. There are 4 dinos & 2 sayings. If you wish, you can stamp another dino on the inside of the card to greet the receiver when he opens the card. Color the dinosaurs with Watercolor Pencils(#101879) and a blender pen(#102845). Who says dinosaurs have to be green or brown. To my knowledge, scientists have not found color in those fossils that will tell them what colors those guys really were! Have fun wioth them!

The saying at the top right is from the set stamped with Old Olive classic ink on white cardstock. Punch it out with the Scallop Oval(#3119856) punch and sponge the edges with Old Olive ink.

I used SU! Dimensionals (#104430) on the backs of my dinos to pop them up some and colored a bit of shadow below them with my gray Watercolor Pencil.

All the typos these days I will blame on my finger splint! It's good to have something to blame them on. lol I've got a condition called trigger finger in my right ring finger. The splint helps it not to hurt so much. I've already had the shot that didn't help so the dr. wants to do a simple surgery on it. I'm not opposed to the surgery. I'm just trying to wait till July when I will turn 65 and will be in Medicare. My current insurance is better than nothing but not much. When I'm on Medicare with my supplement, it should pay for almost all of it. This is not life threatening, so I think I can wait. In the mean time, it's sure hard on my typing!

Monday, April 30, 2012

Baby Gate Fold Card

For a while I wasn't making any baby cards but lately, it seems like there is one baby shower after another. Between people at church & former students, there have been quite a few. I love baby shower! Maybe even more than wedding showers...

To make the gate fold, use a piece if Whisper White cardstock cut to 8 1/2 x 5 1/2." Score on your new SU! Scoring Tool(#122334) at 2 1/8" and at 6 3/8." Fold each side in so that they meet in the middle.

Cut patterned paper (I used some Island Indigo from the Brights Collection #117155) to 5 1/2 x 2 1/8" to adhere on each side. Don't stick it to the card stock yet but you will want to be sure that it fits here correctly.

Cut another piece of patterned paper to measure 2 1/8 x 4." I used the reverse side of the same paper. That's one way to know that it matches! Adhere it to each side leaving some border on the top & bottom.(Remember, you're not on your card base yet.)

Make your layer to decorate with one piece of 3 1/4 x 2 1/4" white cardstock, 1 piece of 3 3/4 x 2 3/4" of Marina Mist cardstock and 1 piece of 2 1/2 x 3 /12" Certainly Cerlery cardstock. Using you corner rounder(#119871), punch to round each corner on all 3 piece of cardstock.

You will want to decorate your white cardstock before you build the layers. I used stamps from the retired set Animal Stories to stamp my giraffe in Island Indigo classic ink. I also stamped the owl from that set. With the owl, I punched him out with my 1 1/4" circle punch(#119861). Then I punched out another circle of Certainly Celery with my 1 3/8" circle punch(#119860). I stacked & adhered those two to use on my right panel.
Put adhesive on the back of the white and green and layer, white on green on blue. Before you put adhesive on the back of the blue, check to see how far out over the edge of the card it goes. You will want to leave about 1/2" of the layer sticking out over the edge of the left side. If you put adhesive all over your cardstock, it will stick to the other side & glue your card closed. After you put adhesive over about 3/4 of the back of the layer, press it on to the left panel.

Now you can adhere that panel to the left side of your card base. Check to make sure that your card still closes properly.

Now we want to build our right panel. After you put your 2nd piece of patterned paper on the larger piece, cut a strip if 1/2" Marina Mist Scallop Dots(#122986) ribbon about 6" long. Adhere it down the center of this panel and wrap around to the back.

Adhere the owl on top of the ribbon near the top.

Stamp "Hello Baby" from the Teeny Tiny Wishes (#115370) set onto a piece of Certainly Celery cardstock. Punch it out with the Word Window punch(#119857). Punch out a piece of Marina Mist cardstock with the Modern Label punch(#119849). Adhere the green on top of the blue. Using a 1/16" hand held circle punch, punch a hole through the label greeting and the patterned paper. Place a brad from Everyday Enchantment brads through and close the brad on the back.


You can now put adhesive on the back of this panel and adhere it to the right side if the card base. The greeting and the giraffe with both overlap the tops of the card, so just watch how you close it.


Stamp or write a greeting on the inside to the mother-to-be.