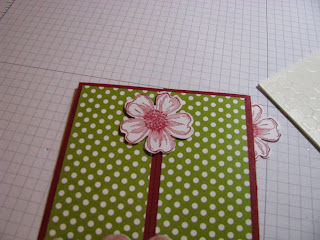
Don't you love to get flowers for your birthday? I do. In fact, I love to get flowers any time of the year for any occasion or for no occasion at all. Here are some flowers to put on your birthday card. I also like to include some flowers on the envelope to give the receiver a sneek peek.
Materials needed:
Raspberry Ripple cardstock 5 1/2 x 8 1/2"
Old Olive Polka Dot Parade patterned paper (#126902) 2 pieces 1 7/8 x 5 1/4", 1 piece 2 5/8 x 4"
Whisper White cardstock 2 1/2 x 3 3/4", extra for stamped images
Flower Shop stamp set (#130942)
Raspberry Ripple 3/8" Satin Stitched Ribbon (#126845)
Raspberry Ripple In Color ink
Pansy punch (#130698)
Stampin' Dimensionals (#104430)
1. Cut your papers to the dimensions listed above. Lay aside.
2. Stamp 4 flower images with Raspberry Ripple ink using a stamp from Flower Shop stamp set. Punch each of these out with the Pansy punch. Lay aside.
3.Score and fold your Raspberry Ripple cardstock at 4 1/4". You can score your cardstock for the side folds but I get a better fit when I fold each side to the center fold and crease. Fold the side to touch the center fold and crease. Do this on both sides.
5.Place adhesive on the backs of the patterned paper and center on each of the side folds. You will have a Raspberry Ripple border all the way around each piece.
Place a flower on the top and bottom on the left side. Place the third flower in the center of the right side. Refer to the picture to see how it should be. The flowers will not be adhered all the way across the card. You want to allow it to open in the center.
7. Now you can decorate the inside of the card. When you use a dark cardstock for your base card, it is difficult for a stamped greeting to be read. On this card I cut a piece of Old Olive Polka Dot paper 2 5/8 x 4" and a piece of white cardstock 2 1/2 x 3 3/4". Layer the white on the patterned paper. Stamp your greeting on the white and adhere the patterned paper to the inside of the card. This also helps to cover up the fold that you created when you made the gate fold of the card.
I added the fourth flower image to the bottom right of the greeting. This still gives you plenty of room for a personal note and your signature.
8. I love to have my envelopes look pretty too so I often stamp on the front or back of the envie with a stamp from the set that I'm using. I stamp 2 or 3 times on the bottom left of the envie and once on the bottom right. Sometimes I'll stamp on the back flap also. Be sure to leave plenty of room in the envie for the address and postage.
Materials needed:
Raspberry Ripple cardstock 5 1/2 x 8 1/2"
Old Olive Polka Dot Parade patterned paper (#126902) 2 pieces 1 7/8 x 5 1/4", 1 piece 2 5/8 x 4"
Whisper White cardstock 2 1/2 x 3 3/4", extra for stamped images
Flower Shop stamp set (#130942)
Raspberry Ripple 3/8" Satin Stitched Ribbon (#126845)
Raspberry Ripple In Color ink
Pansy punch (#130698)
Stampin' Dimensionals (#104430)
1. Cut your papers to the dimensions listed above. Lay aside.
2. Stamp 4 flower images with Raspberry Ripple ink using a stamp from Flower Shop stamp set. Punch each of these out with the Pansy punch. Lay aside.
3.Score and fold your Raspberry Ripple cardstock at 4 1/4". You can score your cardstock for the side folds but I get a better fit when I fold each side to the center fold and crease. Fold the side to touch the center fold and crease. Do this on both sides.
4. Cut 2 pieces of ribbon 3" each. Place adhesive on the back and adhere to the Old Olive patterned paper about 1" from the bottom. Wrap the ends around to the back.
5.Place adhesive on the backs of the patterned paper and center on each of the side folds. You will have a Raspberry Ripple border all the way around each piece.
6. Place Stampin' Dimensionals on no more than 2 petals of each of 3 flowers. Peel the paper backing off and place so that the dimensionals are only on one side of the card fold.
7. Now you can decorate the inside of the card. When you use a dark cardstock for your base card, it is difficult for a stamped greeting to be read. On this card I cut a piece of Old Olive Polka Dot paper 2 5/8 x 4" and a piece of white cardstock 2 1/2 x 3 3/4". Layer the white on the patterned paper. Stamp your greeting on the white and adhere the patterned paper to the inside of the card. This also helps to cover up the fold that you created when you made the gate fold of the card.
I added the fourth flower image to the bottom right of the greeting. This still gives you plenty of room for a personal note and your signature.
8. I love to have my envelopes look pretty too so I often stamp on the front or back of the envie with a stamp from the set that I'm using. I stamp 2 or 3 times on the bottom left of the envie and once on the bottom right. Sometimes I'll stamp on the back flap also. Be sure to leave plenty of room in the envie for the address and postage.


No comments:
Post a Comment