Showing posts with label punches. Show all posts

Friday, March 7, 2014

Blue Flowers & Dragon Fly

I always have fun when I'm layering lots of elements on to a card. I hope you like this one today.

Materials needed:
Greenhouse Gala patterned paper 3 1/2 x 5"
Coastal Cabana card stock 4 1/4 x 5 1/2"
Pacific Point card stock
Bermuda Bay card stock
Melon Mambo card stock
Gumball Green card stock
other pink patterned paper
Flower Fest stamp set (#122280)
Teeny Tiny Wishes stamp set
Winged Brad Buddies from Paper Wishes
Word Window punch
Modern Label punch
2 3/8" Scallop punch
5 point leaf punch
1 1/4" Circle punch
Brads
Pacific Point ink
Stampin' Dimensionals

1.  Stamp your flower image choices on the different colors of card stock. Punch or cut them out.
2. Adhere the patterned paper on top of the Coastal Cabana card stock.
3. Decide on the arrangement of flower images that you like. Then adhere them in place. Have one or two popped up using Stampin' Dimensionals. Leave some of the patterned paper showing. You might want to have one or two extend off of the paper. Trim to the card stock edge.
4. Place the dragonfly brad on the card. Mark the place for the holes for the brads to hold it in place. Punch holes where you  marked. Place the dragonfly on the card by pushing the brads through the holes of the dragonfly and the card.
5. Punch out a Modern Label from Gumball Green. Stamp a greeting from Teeny Tiny Wishes on the Bermuda Bay card stock. Punch it out with the Word Window punch. Adhere it on top of the Modern Label.
6. Punch holes in the Modern Label and the card front. Add brads to hold the greeting in place.
7. Adhere the card front to a card back. Place your favorite saying or note on the inside.

Monday, February 10, 2014

Hello you

 Materials needed:
Dictionary Stamp (#130351)
Regarding Dahlias stamp set (#130327)
Wild Wasabi card stock 4 1/4 x 5 1/2"
White card stock
Curly Label punch (#119851)
Season of Style washi tape (#132155)
Scotch Expressions washi tape
Sponge dauber
Old Olive ink
More Mustard ink
Stampin' Dimensionals (#104430)

1.Stamp the large Dictionary background stamp on the Wild Wasabi card stock in Old Olive ink.
2. Choose several patterns of Washi tape that you like. I chose some from Stampin' Up! and some from Scotch Expressions. Press them on to the Wild Wasabi card stock diagonal, vertical and horitizonal.

3. Stamp the dahlia image with More Mustard ink on white card stock. Carefully cut out around the edges of the image. Add Stampin' Dimensionals to the back of the dahlia image and place on the left bottom of the card stock. 
4. Stamp the "hello you" from the Regarding Dahlias stamp set on white card stock with More mustard ink. Punch the greeting out using a Curly Label punch.
5. Use a sponge dauber to dab More Mustard ink around the edges of the greeting. I find it is easier to put ink on a piece with many edges using a sponge dauber instead of brushing it directly on the ink pad.
6. Adhere the greeting to the top right hand side of the card.
7. Adhere the card front on the card base and add your greeting or note to the inside.


Monday, January 27, 2014

Punchy Valentine

I know it's still a while until Valentine's Day but it will be here before you know it. Can you believe that January 2014 is almost over? Ok, here's the card.
I don't usually do my designs/cards right onto the card base but I did on this one.

Materials needed:
Hearts a Flutter stamp set (#129252)
White Cardstock 5 1/2 x 8 1/2"
Real Red card stock about 3 x 4 1/4"
Blushing Bride pink card stock about 2 x 4 1/2"
Gingham Garden Washi tape (#129252)
Dotted Scallop Ribbon border punch (#119275)
Chevron Border punch (#132154)
My Way punch (#110709, retired)
Xyron 150 (little x)

1. Fold and score the white card stock at 4 1/4."
2. Stamp your choice of hearts at the top of the folded card stock.
3. Place a strip of washi tape about 1/8" below the hearts. If you wish you can continue the washi tape on around the edge of the card to the inside.
 I just did mine to the inside fold but you could go all the way across, if you want. I plan on stamping a greeting on the other side.
4. With the pink card stock and the Dotted Scallop Ribbon border punch, punch to ribbon strips. Adhere one about 1/8" below the washi tape.
5. With the red card stock and the Chevron Border punch, punch out a red chevron border. Cut the card stock so that the chevron is about 1 3/8" wide. Adhere it about 1/8" below the first scalloped border.
6. Adhere the second scalloped border about 1/8" below the red chevron.
7. Punch the red card stock with the My Way punch or another arrows punch. Adhere the arrows below the scalloped border as shown on the card.
****The simplest way to do this is to do all the punching first. All of these will fit through the Xyron little x to put adhesive on the back of each piece. After you have the adhesive on all the pieces, simply pull them off the Xyron strip and place them on the card in order.

Have fun with this simple card. I think you could use a lot of different types of punches to make a card like this one. My inspiration for this card came from the Spring 2014 issue of CardMaker magazine, p. 49.


Friday, October 11, 2013

Orange and Blue

I don't know if the oranges make this card fall or if the blues make it spring. I know most people think of butterflies in the spring but the monarch butterflies come through our area in the fall, usually September. The butterflies on here aren't monarchs but they do have the orange that monarchs have.
I did use several items that SU has retired but I'm sure you can find other things similiar.

Matterials:
Sweet Pea patterned paper (#117161) retired  3 x 5 1/2" & 1 1/2 x 5 1/2"
Whisper White card stock 5 1/2 x 8 1/2"
Coastal Cabana card stock 2 x 5 1/2"
Tangerine Tango card stock scrap
Sycamore Street 1/4" ribbon Tangerine Tango (#130812)
Flower Shop stamp set (#130942)
Teeny Tiny Wishes stamp set (#115370)
1 3/4" Circle punch (#119850)
Pansy Punch (#130698)
Modern Label punch (#119849)
Word Window punch (#119857)
Stylish Stripes Embossing folder (#132174)
Tangerine Tango ink
Brayer
Stampin' Dimenionals (#104430)

1. Cut your patterned paper at 4 1/4 x 5 1/2" first. Then Cut that at 3". This way the top and bottom pieces will match.
2. Score and fold your white card stock at 1 1/2" and 5 1/2". Adhere the patterned paper to the top part of the card. Use the 1 3/4" circle punch to cut half of a circle from the top left side of the paper, cutting all the way through the patterned paper and the card stock base.
3. Stamp 3 flowers from Flower Shop with Tangerine Tango ink on white card stock. Use the Pansy punch to punch the flowers out or your scissors to cut them out.
4. Adhere one flower to the front of the patterned paper, just right of center. Use Stampin' Dimensionals on a second flower and overlap it slightly over the other flower and the bottom edge of this section of the card.
5.  Click here to see the link on coloring and embossing at the same time. Follow these instructions to color and emboss the Coastal Cabana card stock with the Tangerine Tango ink and the Stylish Stripes embossing folder. Adhere the embossed card stock on the inside of the card, even with the top  fold. This will cover up the back part of the circle you punched out earlier.

6. Add Stampin' Dimensionals to the back of the third flower. Adhere it to be seen through the circle "window" of the card. (Caution: If you place it too high, the card may not fit in a regular card envelope.)
7. Adhere a 6" piece of tangerine tango ribbon across the smaller piece of patterned paper, wrapping the ends around to the back. Adhere this smaller piece(1 1/2 x 5 1/2") of patterned paper to the bottom section of the card. It will be easy to see how the pieces fit together if you cut this as I suggested in #1.
8. Stamp your greeting from Teeny Tiny Wishes with Tangerine Tango ink. Cut it out with the Word Window punch. Cut out a piece of Tangerine Tango card stock with the Modern Label punch. Adhere the greeting on to the Modern Label punch. Adhere this on top of the ribbon on the bottom section of the card.
9. Add a greeting or write a special note to the inside of the card.

Friday, September 21, 2012

Scallops & Piercing

I do like to play with my tools. SU! has some of the best tools available, IMO. Here's what I used on this card.

3/8" Midnight Muse satin stiched ribbon (126847)
Adornments Dahlia Assortment (#127556)
Framelits Window Frames Collection (#129021)
Festive Paper Piercing Pack (#127857)
Paper Piercing Tool (#126189)
Field Flowers stamp set (#122762)
Eyelet Border punch (#113692 retired) You could use the Scallop Edge Border punch (#112091)Comf
Comfort Cafe DSP (#126898)
Twitterpated DSP (#125406)

Quick tip for Paper Piercing: Pierce your piece from the back for the piercing to show up better on your paper.

Friday, September 7, 2012

Fall Mason Jar

Well, with September here, are thinking fall yet? I'm hoping it will come soon but it's hard to really know here in Texas. We are still having 100+ degree days. Maybe will have some cooler weather soon.

This is made using:
Orchard Harvest DSP (#126895) from the Holiday catalog
Bravo Burgundy cardstock
Perfectly Preserved stamp set (#126692)
Framelits Cannery Set (#127822)
Framlits Bitty Banners (#129267) for the "just for you" stamp
Dotted Scallop Ribbon Border punch(#119275)
Modern Label punch (#119849)
3/8" Designer Printed Brads (#122940)

Monday, July 30, 2012

Cherry Blossom Card

I posted a quick tip one day last week about using stickers that can be found on sheets of postage stamps and other places. Here are some more details about the card that I posted that day.
Regal Rose cardstock 4 1/4 x 5 1/2"
Gumball Green cardstock 2 x 4 1/4"
Polka Dot Parade DSP (#126902) 1 3/4 x 4"
Whisper White cardstock 2 x 4 1/4"
Fabulous Florets stamp set (#123027)
Primrose Petals In Color ink pad
Tenny Tiny Wishes stamp set (#127802)
Gumball Green 3/8" stitched stain ribbon (#126848)
2 brads from 3/16" Subtles Brads collection (#119738)
Word Window punch (#119857)
Trio Flower punch (#109183 retired)
Dazzling Diamonds glitter (#102023)

For the stamped flowers, I used the "stamp off" techniques. It's very simple. I loaded my stamp up with the color and then stamped the image 3 different times on the cardstock without reinking. That gave me 3 shades of the same color on the cardstock. Then I inked and stamped 3 more times. After I cut the cardstock to size, I inked the edges with the  cardstock directly to the ink pad.

Hope you have a great time stamping!

Saturday, July 7, 2012

A Mound of Petals

For today, we've got a mound of orange flowers sitting on an orange flower background.

  1. Use a 4 1/4 x 5 1/2" piece of Certainly Celery cardstock for your background.

2. On a piece of 4 1/4 x 5 1/2" Tangerine Tango cardstock, stamp repeated flowers all over the cardstock with Tangerine Tango ink. This tone on tone look gives you a nice solid garden look.

3. Cut around the flower edges.


4. With the Trio Flower punch (#109183) from the 2009 SU! catalog, punch about 36 flowers. Since this punch is no longer available, if you don't already have it, you could use the Itty Bitty Shapes Punch(#118309). This punch has 3 shapes on it, one of which is a bitty scallop circle. It is very close to the same size as the trio flower. It will probably give you a slightly different look, but I think that it would still work fine.

5. Punch 2 flowers with the 5 petal flower punch (119880). This punch is designed for flowers but I've always thought it made great leaves. This punch is retired also but SU! has a punch called Blossom Petals Builder(#121808). It has several shapes on it that would be good for leaves also.
6. Place the leaves on top of the Tangerine Tango images that you stamped. You will want them to be a bit to the right of center.


7. Place 2 Stampin' Dimensionals(#104430) on each leaf. They do not have to be center. With a little experimenting, I found that 2 works a lot better than just one for the dimension that you want for this project. 

8. Using the end of an embroidery hook and a soft  mouse pad, push into the center of each petal. You want to give the petals some curve to make them somewhat concave in shape. There may be tools especially made for this purpose, but I've found my embroidery hook works just as well.

9. Doing the petals one at a time, place 2 or 3 petals on each of the dimensionals that you placed on the leaf. With the other petals, place a dot of liquid or school glue on the back of each petal, still working one at a time. Place the petal around the petals that you've already put on the dimensionals. You will want to overlap these and even place some on top of others until you have the look you want. I have some tweezers that I've had for years that I just love to use for working with small pieces.

10. Allow the petals about a 1/2 hour for the glue to dry before you continue.

11. Cut 2 pieces of 3/8" Gumball Green Satin Stitched Ribbon(#126848), one piece about 4 1/2" and the other piece about 6." Apply adhesive to the back of the ribbons and place them on the right and top of the card, overlapping at the corner.

12. Stamp a greeting from Teeny Tiny wishes stamp st(#115370) in Gumball Green ink onto white cardstock.

13. Punch it out with the Word Window punch(#119857). Ink the edges with Gumball Green ink.

14. Punch out a Modern Label punch(#119849) from Certainly Celery cardstock. Ink the edges wotj Gumball Green ink.

15. Adhere the greeting on top of the Modern Label punch.

16. Punch a hole at each end with your 3/16" circle punch.

17.Add a brad from the Everyday Enchantment Brad set (#126126) that was in the 2012 Sale-a-Bration catalog. If you don't have those, SU! has some fabulous new brads available this year in patterns. I just love, love, love patterned brads!

18. Attach this onto you Whisper White card base and you are ready to give it away!

Wednesday, May 30, 2012

Happy Thoughts

How fun has this Blog Hop been! I've loved looking at all the super ideas my fellow Glitter Queens have had on their blogs! And did you see Dee's watering can made with the petite purse die? Just too cute! And Tamara's milk carton die house was adorable too. Everyone's creations are just so fab. I can't wait to try some of the myself! If you've missed any, be sure to go back and check them out.


How often do you think of friends far away? Some I think of often; others not so much. It depends on how much they mean to me, of course. I made this card for those friends that I think of often.

  1. Start with a piece of patterned paper 4 1/4 x 5 1/2" from Summer Smooches (#125409) paper pack. This will be your background piece.

2. Cut a piece of Primrose Petals cardstock to 4 x 5." Use the Scallop Trim Border(#118402) punch to punch all the way around the cardstock.

3. Cut a piece of Gumball Green cardstock to 3 x 4." Use the Scallop Edge Border(#119882) to punch all the way around this one.

4. Place the scalloped Gumball Green cardstock piece in the Stripes(#123128) Textured Impressions embossing folder and run it through the Big Shot machine.

5. Layer these on top of each other and apply adhesive to the back of the 2 cardstocks.

6. Cut a strip of Gumball Green 3/8" Satin Stitched (#126848) ribbon about 5" long. Tie a knot in the middle of the strip. Apply adhesive to the back and press it near the bottom of the card overlapping the Primrose Petals cardstock. Wrap the ends of the ribbon around to the back.

7. Use some of the same patterned paper that you are using for your background paper to make the banner and the butterfly. Place the patterned paper on the Framelits Bitty Banners (#129267) and run it through the Big Shot to cut out the large and the small banner. Flip the small banner over so that the opposite side of the patterned paper is showing. Carefully stamp a greeting from Teeny Tiny Wishes (#115370) on to the small banner. Put adhesive on the back of the small banner and adhere it to the larger banner. Adhere this to the top left of the Gumball Green cardstock.

8. Use the same patterned paper to make a butterfly with the Beautiful Butterflies Bigz die(#114507). Place the smaller butterfly on top of the larger one with the patterned paper reversed like you see in the picture. Make a paper bead(see tomorrow's tutorial) and cover with Crystal Effects (#101055) to go in the center of the butterfly.

9. Before your adhere the butterfly,  stamp a floral image from Field Flowers(#122762) with Primrose Petals classic ink and a seed pod from the same set in Summer Starfruit classic ink. Cut them both out. Place the seed pod on top of the floral image with a Stampin' Dimensional (#104430). Adhere the flower to the center left of the Gumball Green cardstock.

10. Stamp the saying from the Field Flowers set on white cardstock with Primrose Petals classic ink. Cut around it and adhere it to the center of the green cardstock.

11. Adhere the butterfly to the bottom right corner of the card front overlapping the cardstock and ribbon. Trim off any part of the butterfly wings that stick out from the card front.

12. Choose a large button from the Bright Designer Button Collection(#119747). Run a small piece of thread or floss through the holes and tie 2 knots to hold it in place. Put  3 glue dots (#103683) on the back of the button and place it on the top right of the Primrose Petals cardstock.

13. Adhere the card front to your card base and write a note or stamp a greeting on the inside.

Ok, this is the last day of our Blog Hop. Be sure to check out what Anji has for you today. here

Wednesday, March 28, 2012

Punch Bunny


I made this card using a bunny that I made from my punches. The bunny is really easy using punches.

1. Punch all your pieces out first.
You will need 2 white ovals using the small oval (#120908) punch and 2 pretty in pink small ovals.
Punch one white oval with the extra large oval(#119859) punch for the body.
Punch 2 white ovals with the large oval(#119855) punch for the ears.
You need one white circle from the 1 1/4" circle (#119861) punch for the head and one small pink circle using the 1/2" circle (#119869) punch.


2. Cut the 2 small white ovals in half to use for the feet and arms. Place a small amount of adhesive onto the cut edges of the small white ovals. Slide these under the bottom of the extra large oval for feet and under the upper half of the extra large oval for arms.

3. Place adhesive on the back side of the small pink circle and place behind and above one of the feet so that it sticks out slightly.

4. Place adhesive on the back of the small pretty in pink ovals. Place those on the center of 2 large white ovals for the ears. Use a bone folder or your score board to score one of the ears about 1/2" from the top so that is will flop over. Attach these behind the head with adhesive.

5. Put the head over lapping the body.

6. Using your SU! markers draw a face on the bunny and toe & finger marks on the hands and feet. I used Marina Blue for the eyes, Pink Pirouette for the nose and mouth and Early Espresso for the whiskers and eyebrows.

7. Tie a bow in a piece of 1/8" organdy ribbon from the Everyday Enchantment Ribbon and Brad pack that you can get free with a $50 purchase during Sale-a-Bration (until March 31).  Attach it at the bunny's neck with a glue dot(#103683).

8. To complete the card, I used patterned paper from the Flirtatious Specialty(#122360) pack cut 4 1/2 x 5 1/2." I used the small oval punch to cut out some "eggs" for the bunny. I cut the ovals in half and tucked the bottom part under other paper.

9. For grass, I punched Old Olive card stock with the Pinking Hearts border (#117649) punch and place it just barely over the bottom of the bunny.

10. The greeting is from Teeny Tiny Wishes(#115370)[Yes, I use this set ALL the time!] I popped it out with my Word Window punch(#119857) and mounted it on the Modern label (#119849) punch cut in Old Olive. I attached it with a brad from the Everyday Enchantment Ribbon and Brad pack.

I think this will give me a cute Easter card for one of my grandchildren. Hope you enjoy it.


Friday, March 16, 2012

Flower Garden

I just love building a flower garden whether it's in my back yard...
or in my scrap room...

This flower garden was built using stamps from the Flower Fest set (#122280). If you use the unmounted stamps(like I often do), be sure you get some of the clear mount blocks (#118486, 118485, etc). i also used a bunch of my punches as this set was sized to work easily with many of our SU! punches. You don't have to use the punches to do this card. You can just cut each flower by hand but having the punches makes it go much faster! The punches that I used on this card are:
2 3/8" Scallop Circle (118874)
1 3/4" Scallop Circle (119854)
5 Petal Flower (#119880)
Butterfly (#119848)
Fancy Flower (#1189073)
1 3/8" Circle (#119860)
Modern Label (#119849)and
Word Window (#119857)
The colors of cardstock that I used for this are:
Certainly Celery 4 1/4 x 5 1/2"
Rich Razzleberry
Wisteria Wonder In Color
Daffodil Delight
Melon Mambo
I used Rich Razzleberry and Old Olive Classic ink.
1. I used the Certainly Celery for my card background.
2. I used Rich Razzleberry Classic ink to stamp all of my flowers, even the ones on Rich Razzleberry cardstock. You can stamp the flowers however looks good to you. I stamped the leaves with Old Olive ink on Old Olive cardstock. I also used the 5 petalflower punch to punch some extra leaves out of the Old Olive cardstock.
Be sure you stamp and punch out a butterfly also.
3. After you have all of your flowers, leaves & butterfly stamped & punched out or cut out, begin arranging the on your card until you are satisfied with your look. Arrange the leaves on the bottom card & place the flowers over them. You'll want the taller leaves to show out the top.
4. After you've decided where you want the flowers, start sticking them down with your adhesive. Let them overlap in areas and also overlap the leaves. You'll want to let the leaves show some but the main part is the flower show. Use Stampin' Dimensionals (#104430) on the backs of 2 or 3 flowers and the butterfly to give your card some dimension.
5. Before you put the butterfly on, you will want to make and attach some antenna for it. I used some wire that I've had on hand for years now but you could also you thin strips of black paper. Attach the to the back of the butterfly. I used double glue dots (dots on top & underneath the wire). Use glue dots (#103683) to attach the white beads to the top, center of the butterfly. Then peel the paper off the Dimensionals and place your butterfly on your flower garden. I placed mine a bit off center near the top right.
6. Depending on what you plan to use this for, you can then add a greeting. I stamped "happy birthday" from Teeny Tiny Wishes (#115370) with Rich Razzleberry ink on Daffodil Delight cardstock. The Teeny Tiny Wishes set has 24 different greetings that you can use for almost any occasion!
7. I punched out my greeting with my Word Window punch. I then punched out of Old Olive cardstock with the Modern Label (#119849) punch. I put the greeting on top of the label. Then I punched holes with my hand held circle punch. I attached it to the lower left using brads from the Everyday Enchantment Ribbon and Brad Pack (#127279) that you can get free during the Sale-a-Bration promotion. (Until March 31)
8. I mounted that on Whisper White cardstock to complete my card and put a birthday greeting on the inside of the card.
9. As I've mentioned before, I don't like "naked" envelopes, so I used Rich Razzleberry ink to stamp some of the flowers from the set on the front of the envelope. As long as you leave the address and return address area clear, you can stamp all over your card. The Post Office doesn't care, as long as the info they need is where it belongs.


I use the Medium Whisper White envelopes (#107301) that SU! has because I've found them to be the perfect fit for my cards. A few years ago, I could get the right size envelope in many local stores. The past year or so, they have gotten really hard to find. All I find around here are just too big to really look good. SU! also has square envelopes and other sizes. Tomorrow, I will have a tutorial on stamping dominoes to make cool coasters.
Take a look at the cool ideas that Bridgett has for you today! Stamping with Bridgett

Monday, March 12, 2012

Bold Stars

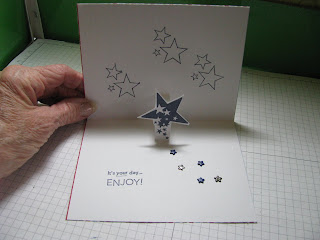
#3 Grandson had a birthday on the 9th. He turned 18. He's already enlisted in the Marines & will be going to boot camp soon. This is the card I made for him.


For this card, you need a piece of white cardstock 5 1/2x 8 1/2", a piece of patterned paper 5 1/2 x 8 3/4", a piece of coordinating patterned paper 3x4" and some scrap white cardstock. I used patterned paper from the Celebrations Designer Series Paper from last year's SU! catalog. I wanted something bright & bold for a young man about to go into the Marines.
1. With the white cardstock, after I folded it in half, I cut 2 slits on the folded side to make a popup. Check out my tutorial on popups that is here This card needs the pop up tab on the inside.
2. From scrap white cardstock, I stamped the stars from the Sprinkled Expressions set (#125130) that is in the Sell-a-Bration catalog. I cut around the edge of the stars and adhered it to the pop up tab.
3. I used 5 tiny star brads to "sprinkle" stars down the bottom of the card. I then stamped stars from Starring You set (#111696) around the top half of the card and a greeting from On Your Birthday set (#111664) to the left of the star brads.
4. Wrap the 5 1/2 x 8 3/4" patterned paper around the outstide of the white cardstock to cover the hole left by the pop up tab. Adhere like shown in the pop up tutorial. You may need to trim a little off of the edges of the patterned paper but I'd rather trim than have it too short.
5. Using the happy birthday star stamp from the Starring You set, I stamped in on scrap white with Night of Navy classic ink (#102977). I punched the circle out with my 1 3/4" circle punch(#119850). I then inked the edges of the circle with the Night of Navy. Using Stampin' Dimensionals (#104430) I popped the circle on the 3x4" piece of patterned paper on the left side.
6. With some 1/4" Real Red Grosgrain ribbon (#109034), I tied a bow around the right side of the patterned paper. To help it stay in place, I used a couple of glue dots (#103683) under the ribbon.
7. I stamped the "look who's turning ()" from the On Your Birthday set in Night of Navy. Punch it out with the 1 1/4" circle punch(#119861). Ink the edges like you did with the other circle. Write the age (18) in the space with a Night of Navy marker(#100069) and adhere to the bottom right corner of the 3x4" paper.
8. Adhere this all to the front of the card in the center.

Monday, March 5, 2012

Cupcake Birthday Card


Ok, this card was fun to make with my new Cupcake Builder punch (#121807). 1. Because I was going to make 6 birthday cards, I used 6 different colors of paper to punch. That gave me a nice variety of colors to use to have for the icing, wrapper, candles, etc. It was easy to mix & match them with this.
2.After I punched out my pieces, I put the little cupcake "paper" wrapper on my score board & scored it to make it look like the design on a real cupcake paper. SU! now has a really cool Simply Scored Scoring Tool that can be used with this. (#122334) As of March 1, there is a diagonal piece to use on it for diagonal scoring also. While I have a score board that I've had for many years, I have not seen the diagonal piece anywhere before. You'll want to get this soon.
3. Before I built my cupcake, I cut a piece of coordinating card stock to measure 2 1/2 x 3". I used my Scallop Edge Border (#118402) to cut one long edge. I then rounded my other corners with my corner rounder (#119871).
4. As I was building my cupcake, I put a SU! dimensional (#104430) under the wrapper & the icing parts to give it some pop.
5. Using my stamp from the Teeny Tiny Wishes set (#115370), I stamped "happy birthday" on white cardstock for all 6 of the cards I was making. (I love this set! It has perfect greetings for just about everything. And they fit right in the Word Window punch perfectly!)
6. Using my Word Window punch (#119857), I lined the greeting up & cut it out. I used the Modern Label (#119849) punch to punch out backings for the greetings from colored cardstock. Adhere the greeting on top of the Modern Label tag.
7. Use the 1/16" handheld circle punch to punch holes & put brads in. I usually punch all the way through the label and the background cardstock. That way the brad ends are on the back & won't show after I adhere my decorated base to my folded cardstock.
8. Using a piece of 1/4" grosgrain ribbon (SU! has 17 different colors of this), tie a bow around the card with the bow to the front.
9. Adhere the card front to the folded card base & you are done.
You can either write a greeting on the inside or use one of many greeting stamps found throughout the SU! catalog.