Friday, August 30, 2013

Birthday Poppies

Materials needed:
Melon Mambo cardstock 4 1/4 x 5 1/2"
Wild Wasabi cardstock 4 x 5 1/4"
Simply Sketched stamp set, hostess (#129672)
Melon Mambo 3/8" Striped organdy Ribbon (#129293)
Brights Candy Dots (#130931) Love 'em!
Candy Dots Brad bases (#132293)
Scallop Oval punch (#119856)

This is a super easy card to make. Simply stamp, tie ribbon, punch greeting, add brads and adhere to base.
I love using the new Candy dots! They are so easy to choose the color you need, stick on top of the brad and voila' you've got the color brad you need. They can also be used without the brads. They are great to just place on top of an item to make it look like a brad or to just add some color somewhere on your card.
Have fun and keep on poppin'.

Wednesday, August 28, 2013

Doily and Daisy

Yes, I'm using what was still on my work table for today's card.

Materials Needed:
Tangerine Tango cardstock 4 1/4 x 5 1/2"
Old Olive cardstock
Patterned paper 1 x 4 1/4"
Whisper White cardstock scrap
Secret Garden stamp set (#129144)
Really Good Greeting stamp set (#130333)
Doilies (#129399)
Simply Scored Scoring Tool (#122334)
Simply Scored Borders Plate (#126192)
1 3/4" Scallop Circle punch (#119854)
Old Olive ink
Tangerine Tango ink

1. Line your Borders Plate onto your Simply Scored Scoring Tool /board. Line your cardstock up with the embossing border that you want for your card. Place the plastic overlay (that comes with the border plate) over the cardstock. Use your scoring tool to emboss the border that you wish onto your cardstock. Turn the cardstock over to see the embossed border.
2. Adhere your patterned paper (I used some a retired scrap that I had) vertically on the right side about 1/2" from the edge.
3. Crumple the center of the doily somewhat to make pleates in the doily. Adhere this to the center of the card, overlapping the patterned paper.
3. Stamp a flower from the Secret Garden stamp set onto Old Olive cardstock with Old Olive ink. Stamp the same flower on the left hand side of the card within your embossed border. Punch out the flower on Old Olive cardstock with the Scallop circle punch. Adhere this to the center of the doily.
4. Stamp your greeting in Tangerine Tango ink on white cardstock. Cut it out around the outside of the greeting. Adhere it to the bottom left side of the card.
5. Adhere your card front onto your card base and add a note or greeting to the inside of the card.
Have fun stamping today! 

Monday, August 26, 2013

Hot, hot, hot summer orange


Materials needed:
Tangerine Tango cardstock 4 1/4 x 5 1/2" plus a small scrap
Baked Brown Sugar cardstock
Summer Starfruit In Color cardstock
Patterned paper (I used a retired piece) 1 1/2 x 5 1/2"
Whisper White cardstock scrap
Secret Garden stamp set (#129144)
Really Good Greetings stamp set (#130333)
Baked Brown Sugar ink
Tangerine Tango ink
Brayer (#102395)
Framelits Labels Collection dies (#125598)
Chevron Embossing folder (#127749)
Modern Label punch (#119849)
Cherry Cobbler Stampin" Emboss powder (122949)
Heat Tool (#129053)
Versa Mark ink
Brights Collection Brads (#119740)

1.  Emboss Tangerine Tango cardstock using the Color and Emboss technique that I posted on Aug. 14. Use Baked Brown Sugar ink to do this technique.
2. Cut 3 different size Framelits Labels using Baked Brown Sugar, Tangerine Tango and Summer Starfruit cardstock. Layer these on top of each other with your adhesive.
3. On the smallest framelit, stamp a flower from the Secret Garden stamp set  with Versa Mark ink. Sprinkle the Cherry Cobbler embossing powder over it. (Be sure to use a tray or a piece of paper to catch the extra powder so you can return it to the container.)
4. Using your heat gun to heat the embossing powder. If you've not done heat embossing before, heat the powder until it melts, about 20-30 seconds. You will be able to see it change color.
5. Adhere the strip of patterned paper across the center of your cardstock base. Adhere the layered dies in the center of that.
6. Stamp a greeting from the Really Good Greetings stamp set with Tangerine Tango ink on white cardstock. Punch the greeting out with the Modern Label Punch. If you've chosen a larger greeting than I did, you will want to use a larger punch.
7. Adhere it to the bottom left corner and add Tangerine Tango brads to the ends of the label.
8. Finish your card by adhering it to a card base. Write or stamp a note on the inside.

Friday, August 23, 2013

Summer Sunflowers


It's hot here in Texas and August is always our hottest month bringing 3 digit temps almost every day. What a good time to think about sunshine and sunflowers! So that's what I've got for you today. Hope you like this. It could be used for almost any occasion. Have fun.

Materials needed:
Whisper White cardstock 4 1/4 x 8 1/2"
Crushed Curry cardstock about 4 1/4 x 5 1/2"
Baked Brown Sugar cardstock, scraps
Sunflower stamp (#123608)
Secret Garden stamp set (#129144)
Feel Goods stamp set (#129684)
Secret Gardens Framelits Dies (#129372)
1/2" Circle Punch (#119869)
Season of Style Designer Washi Tape (132155)
Early Espresso marker
Crushed Curry marker
Crushed Curry In Color ink pad
Baked Brown Sugar In Color ink pad
Stampin' Dimensionals (#104430)
Sponge Dauber (#102892)

1. Score and fold the white cardstock at 4 1/4" or use a separate piece of cardstock that is 4 1/4 x 5 1/2."
2. Use your Early Espresso marker to ink up the Sunflower stamp (#123608) center. Use your Crushed Curry marker to ink up the petals. When you are stamping with a large background stamp, I find it easier to bring the cardstock to the inked stamp. I lay it on top of the inked stamp and press down all over the cardstock. Pick it up and turn it over to find your stamped image.

3. Make 5 small sunflowers using the daisy petal stamp from the Secret Garden stamp set(#129144) and Crushed Curry In Color ink pad to stamp them on white cardstock. Punch them out with the cooresponding Secret Garden Framelits Die(#129372) and your Big Shot machine.
4. Punch 5 circles from Baked Brown Sugar cardstock with the 1/2" Circle Punch (#119869). Use the fine tip of the Early Espresso marker to make circles of small dots to look like sunflower seeds on each circle. Place a Stampin' Dimensional dot on the back of each circle. Put the dots in the center of each flower to complete your sunflowers.
****Helpful hint: I use every bit of my Stampin Dimensionals. After all the hexagonal pieces are used, I use the side and end bits. Cut the size that you want for your piece and stick it in place.****

5. Pull off 3 strips of Washi Tape that are about 3-4" each. Carefully tear each Washi Tape strip down the center to make the strips narrower. Lay your small sunflowers on top  of the sunflower background to see where you want the placement of each one. After that is decided, move each flower and press on a strip of Washi Tape to be the stem for the flowers. Add a full 4 1/4" piece of Washi Tape across the bottom.
6. Adhere each flower in place above the end of the Washi tape. 

7. Stamp the "sunshine" greeting with Baked Brown Sugar ink on to Crushed Curry cardstock. Cut around the edges. Ink up your sponge dauber and ink the edges around the greeting. This will help to pop out the color. Place Stampin' Dimensionals on the back and place it in the bottom left corner of the card. It is ok if it covers some bits of the sunflower petals.
8. Finish the card by daubing Baked Brown Sugar ink on the outside, white edges of the card. IMO, with the card on a white cardstock, daubing or distressing the edges a bit, brings the whole look together.

Wednesday, August 21, 2013

Colored Lace

After learning to color and emboss at the same time from Wednesday, Aug. 14 post, I had fun playing around with the ink on my other embossing folders. These are using the Delicate Designs (#127023) embossing folder. I wondered what it would look like with  the opposite side colored. The top picture is using Bermuda Bay ink the way I showed you last Wednesday. Apply the ink inside the side with the Stampin' Up logo. The bottom one would be the debossed side. I applyed the ink to the opposite side to get this effect. I think both of them are pretty but it just depends on what you want on your project.

For this card, I used the embossed look with the ink applied to the logo side.

Materials needed:
So Saffron cardstock 5 1/2 x 8 1/2" scored and folded at 4 1/4"
Whisper White cardstock
Bermuda Bay cardstock
Bermuda Bay ink
Taken with Teal marker
So Saffron marker
Daffodil Delight marker
Delicate Designs embossing folder (#127023)
Secret Garden stamp set (#129144)
Secret Garden Framelits Dies (#129372)
Very Vintage Designer Buttons (#129327)
Mini glue dots (#103683)
Stampin' Dimensionals (#104430)
Beige or Ecru floss

1. Color and emboss the lace from the Delicate Designs embossing folder with Bermuda Bay In Color ink using the technique from last Wednesday. Trim the embossed area and attach to the bottom edge of the folded So Saffron cardstock. Trim the So Saffron around the edge of the embossed design.
2. Using markers, color the flower stamp from the Secret Garden stamp set. I colored the outer petals Taken with Teal and the inner ones with Daffodil Delight or So Saffron. Stamp one with Bermuda Bay ink on Bermuda Bay cardstock.
3. Use the Secret Garden Framelits Dies and your Big Shot machine to cut out the 3 flowers. Use adhesive to place two flowers on the card as shown. Trim the edge that hangs over the card even with the edge of the card. Put 3 Stampin' Dimensionals on the third flower and place it above the other two.
4. Thread the floss through the Very Vintage button. Place glue dots on the back of the button and press onto the card just about the lacey strip on the left hand side.
5. Since I used the So Saffron for my card base, it is not necessary to attach the card front to the card base. With a light colored cardstock like So Saffron, you can stamp or write a greeting or note on the inside of your card.
Have a scrappy good day and God bless you as you make cards for others.

Monday, August 19, 2013

Flower Garden Wall

For this card, I did the homemade texture paste that I told you how to make last Friday. The idea here was to have the background look like a brick wall in an old garden. I colored the textured paste with Rose Red reinker.

Materials needed:
Kraft cardstock 4 1/4 x 5 1/2"
Whisper White cardstock
Old Olive cardstock
Remember This and That Rotary Stamp (#130133)
Secret Garden stamp set (#129144)
Secret Garden Framelits Dies (#129372)
Modern Label punch (#119849)
Word Window punch (#119857)
Brights Collection brads (#119740)
Daffodil Delight ink
Mariana Mist ink
Wisteria Wonder ink
Lovely Lilac marker
Almost Amethyst marker
Daffidol Delight marker
Metal or plastic stencil

1. Make your brick wall on the cardstock as I showed you on Friday. Add some leaves, if you wish. Set aside to dry.
2. While this is drying, punch out 2-3 plain flowers from the Secret Garden Framelits to use for masking some of the flowers. (See my instructions on masking here if you are not familar with this technique) I stamped 3 different flowers using masks to create this image.
3. Use markers to color in sections of the lily. Cut out loosely around the outside edge of the flowers. Adhere them to the bottom right corner of the card.
4. Stamp the word "remember" with Wisteria Wonder ink on white cardstock. Punch it out with your Word Window punch. Punch out a Modern Label punch with Old Olive cardstock. Adhere the word on top of the label punch.
5. Attach the word with brads.

Have fun playing and experimenting with the homemade texture paste. It's really inexpensive to make and you can do lots of texture with it!

Friday, August 16, 2013

Homemade Textured Paste on card

I love texture and I love when I learn a new technique! Recently I learned how to make my own texture paste. I've used spackle and gesso on my cards and layouts before but that stuff can be kind of expensive, especially the texture pastes that you can buy. Well, making your own is super easy! All you need is baking soda (Yes, from your kitchen), Elmer's (or any brand) school glue, a bowl and a stir stick or knife.

1. Mix about 1/4 cup of baking soda with about 2 tbl school glue. You might want to do less but these would be your proportions. Mix them until it looks like a thick icing. You might need to add a drop or two of water to get the consistency that you want.


2. If you want colored paste instead of white, you can add a drop or two of your SU! reinker. For the leaves on this card, I used a few drops of Old Olive reinker.


3. You can use a plastic or metal stencil (like you see in the top picture) to form the shapes you want. About 12-13 years ago, the brass metal stencils were real popular to use for your embossing before all the embossing folders came out. If you have some of these hiding in your closet or craft room, dig them out for this project. The daisy stencil I used here was from the SU! catalog in 2000. Wow! now that's a while ago! lol
4. Place the stencil flat on your cardstock. You may want to use a bit of repositional tape to hold the stencil in place. Use a popcicle stick, a knife or a paint palette knife (see top picture) to spread the paste onto the top  of the stencil on the cardstock. Scrape off the excess above the stencil and remove the stencil. Allow the paste 15-20 minutes to dry and you have your texture on your card.
5. I used Pacific Point cardstock here and to complete the card, I added a button from the Brights Collection(#119747) of designer buttons from SU!
This dries fairly quickly and will not work well after it has dried. For leftovers, you can place it in a zipper type baggie but it doesn't keep well. It's best if you make just the amount you think you will need for your project.
Finish out your card with a card base and you are ready to amaze your friends!

Wednesday, August 14, 2013

Color and Emboss

After I learned this technique recently, I couldn't wait to try it out and share it with you! It's so easy that it's almost like a "why didn't I think of that" moment.

Materials needed:
Honeycomb Textured Impressions Embossing Folder (#129378)
Big Shot machine
Raining Flowers stamp set (#122767)
Every Little Bit stamp set (#120558)
Hung Up Cute Clips (#129389)
Crushed Curry In Color ink pad
Bermuda Bay In Color ink pad
Coastal Cabana In Color ink pad
Brown Sugar In Color ink pad
Taken with Teal marker
Stampin Dimensionals (#104430)
Whisper White cardstock 4 1/4 x 5 1/2"
scraps of Very Vanilla cardstock
3/16" Corner rounder punch (#119871)
1" Circle punch (#119868)
1 3/8" Circle punch (#119860)
Brayer (#102395)


1. Stamp your images and cut them out first. Any time you are using a 2 step stamp set, be sure you stamp the lighter color first. Then stamp the darker color over the lighter one. 
    a. Cut the hyacinth flower image to be 3 3/4 x 1 3/4"    
    b. Punch all 4 corner of this with the corner rounder.
    c. Stamp your other flowers. Punch the smaller one with the 1" circle punch. Punch the larger one with
the 1 3/8" circle punch. Stamp a bee from the Every Little Bit stamp set in Brown Sugar In Color. Cut loosly around the bee. Lay these pieces aside.
2. Use a piece of 1 1/4 x 2 1/5" Very Vanilla cardstock to hand write your title. I don't have a Bermuda Bay marker so I used my Taken with Teal marker. I think it still looks good. Round each of the corners. Slip the clip on the corner of the tag.

3.  Place a Stampin Dimensional inside the clip on the back. This will hold the clip in place and give dimension to your greeting. Place 2-3 additional dimensionals on the back of the tag.

4. Make your embossed background using your Honeycomb embossing folder and your Big Shot machine.
  Run your brayer over the Crushed Curry ink until it is covered with ink.


5. You will want to run the brayer with color on to the larger side of the embossing folder. This is the side that has the Stampin Up logo on it. Run the brayer across the inside of the embossing folder.


6. Place your white cardstock inside the folder and run it through your Big Shot machine on Tab 1. After you take the folder and the paper out, it will look like this.

Run the folder under cool water to wash the ink off the embossing folder.
7. Now it's time to assemble your card. Adhere the long flower on the left hand side of the honeycomb background. Put a dimensional under the bee and place her near the top of this flower.
8. Adhere the larger circle flower onto the card. Place a dimensional under the 1" circle flower and slightly overlap it onto the other circle flower.
9. With the dimensions on the back of your greeting and clip, adhere this to the top right side of the card.
10. Adhere all of the card front onto your card base.
Send this to a friend to cheer them up or just to say hi. Have fun stamping and card making!


Monday, August 12, 2013

Cute & Cheap Combs and Barrettes

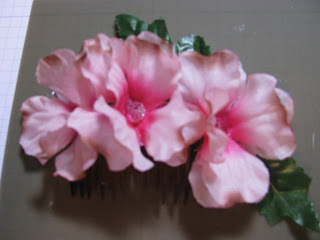
Back on July 19 of this year, I showed you how to decorate inexpensive headbands to make some really cute ones for you girls or for your Operation Christmas Child shoeboxes. Today I'm going to show you how to make cute barrettes and/or combs. It's very similiar to what we did in July and you might have already been experimenting and figured how to do this.

Here are some of the combs and barretts that I've done.
Buy some plain, inexpensive combs and/or barrettes at Wal-Mart, Hobby Lobby or other craft store. I was able to buy 12 combs on a card for $3.97 which averages out to 33 cents per comb. The plain barrettes were 6 for $2.97. If you watch for sales and/or coupons, you might be able to get them even cheaper. You will also need silk flowers and your hot glue gun.
****I've said it before but it bears repeating. Hot glue guns are very hot and can burn your hands, even leaving blisters. Be careful with them. Hot glue guns should not be used by children without adult supervision.*****

For barrettes, I've tried several different ways to keep the two prongs from getting glued together with the hot glue. You will definately want to be aware of this. I've tried plastic boards, rulers, cardboard pieces, etc but have trouble with the hot glue sticking to all of them. It can be pulled off but can leave residue on the barrette. The best thing that I have found for this is a silicone craft sheet, like SU! has (#127853). I love it and any glue that sticks to it peels right off. It's great for hot gluing flowers, etc onto things.

1. Decide what flower/leave/ribbon combination you want to use on the barrette and have your materials ready.
2. With the plain barrette clipped onto the craft sheet, put a bead of hot glue the entire length of the barrette, even onto the pinchy part that you put your fingers on.
 3. Place the first layer on to the hot glue. You might want to use a toothpick or something similiar to press the petals/leaves down into the glue so that you don't burn your fingers. Add some hot glue in  the center of this layer and add your next layer.


 4. Add a bead, button or pearl to the center of the petals.
If you want to add a leaf to this, you will probably want to glue it on first. I usually do 2-3 layers of petals because I think it looks better if it is fuller but that is up to you. You can also cut 6-10 inches of ribbon to add to the barrette, if you like.
This is what it looks like from the back of the silicone craft sheet.
Pull the barrette off the craft sheet and check to make sure the glue is dry. If it's not quite dry, you can leave it clipped to the craft sheet as long as you need too. Hot glue dries fairly quickly but it will not stick the barrette to the silicon craft sheet.
Now let's do some combs. They are basically the same way. Just hot glue a strip across the top of the comb and add your petals/leaves/ ribbon/ etc to the comb.


Adding a gem, pearl, button, etc to the center fo the flowers gives the comb a more finished look.
Hope you enjoy doing these and use your imagination to come up with all sorts of combinations of combs, barrettes and headbands that any  young girl will love!

Friday, August 9, 2013

Believe in Yourself

I made this card to send to a TOPS (Take Off Pounds Sensibly) friend. Dear, sweet Mary had reached her weight loss goal and became a KOPS (Keep Off Pounds Sensibly). Well, things happened in her life like happens to so many of us and she lost her KOPS status. When you're a KOP, you are allowed a 10 lb up or down leeway. Mary was out of her leeway & things just didn't seem to be going right for her to get back to that dr approved weight goal. I know how difficult that can be because it has happened to me. I gained 40 pounds and have not gotten it off yet. But Mary was working hard on getting it off and at our recent weight in, she succeeded! Mary is back within her KOPS weight range now and determined to stay there. Yea Mary!!

Materials needed:
Old Olive cardstock 4 1/4 x 5 1/2"
Brilliant Blue cardstock 4 x 5 1/4"
Summer Smooches patterned paper (retired) 3 1/4 x 4 1/4" each of 2 different coordinating patterns
Whisper White cardstock 1 7/8 x 2 3/4"
Feel Goods stamp set (#129684)
Raspberry Ripple ink
Sycamore Street Buttons (#130923)
dark blue floss or thread
3 1/16" Corner rounder punch (#119871)
Glue Dots (#103683)

1. Round all four corners on the Brilliant Blue cardstock. Adhere it to the Old Olive so that the Old Olive borders show.
2. Angle a piece of the patterned paper cross ways on the card. Trim the corners that go over the edge of the card.
3. Center the other piece of patterned paper on top of that.
4. Stamp your greeting on the Whisper White cardstock in Raspberry Ripple ink. Round all four corners on the white cardstock. Adhere it to the center of the patterned paper.
5. Thread 2 pieces of floss through the button holes and tie a knot. Place glue dots on the back and press down onto the top right corner.
Add a special note to the inside of the card to congratulate your special friend for whatever her accomplishment was! Encouraging others is one of the best things that you can go for another.

Wednesday, August 7, 2013

Birthday Window

This fun birthday card has a double scallop edge over the ribbon. The window is open wishing your friends a happy birthday.

Materials needed:
Basic Gray cardstock 4 1/4 x 5 1/2"
Summer Starfruit cardstock 4 x 5 1/4"
Pear Pizzazz or Certainly Celery cardstock 3 3 /4 x 3 3 /4"
Marina Mist cardstock 3 3/4 x 2"
3/8" Satin Stitched Ribbon Gumball Green (#126848)
Edgelits Adorning Accents dies (#125595)
Cottage Window stamp set (#127282)
Teeny Tiny Wishes stamp set (#115370)
3/16" Corner punch (#119275)
Early Espresso ink
Gumball Green ink
Marina Mist ink

1. Adhere the Gumball Green ribbon about 1 1/4" from the bottom of the Summer Starfruit cardstock. Wrap the ends to the back of the cardstock.
2. Punch all 4 corners on the Summer Starfruit cardstock. Adhere it to the basic gray cardstock.
3. Punch the edges of the green and blue cardstocks with the Edgelits Adorning Accents die. Adhere to the Summer Starfruit cardstock placing the blue just over the ribbon a bit. Layer the green cardstock on top of the blue.
4. Stamp the window and the branch on the cardstock. Stamp the birthday greeting in blue in the window.
5. Adhere the card front to the card base.
You've just finished another birthday card and are ready to play some more. Have a happy stamping day!

Monday, August 5, 2013

Triple Birthday Flowers

If you've been watching my blog for any amount of time, you know that I do lots of birthday cards! I send birthday cards to the senior citizens at my church and also cards to the members of my TOPS group. IMO, it's always fun to get something in the mail that shows someone thought of you. Well, here's another birthday card for a sunny August.


Materials needed:
Basic Gray cardstock 4 1/4 x 5 1/2"
Pacific Point cardstock 4 x 5 1/4"
Bermuda Bay cardstock 2 1/4 x 4"
Crisp Cantaloupe cardstock 2 1/4 x 3 1/2"
Patterns Pack II (retired #114325) or other patterned papers
3/8" Striped Organdy Ribbon Marina Mist (#129292)
Secret Garden Framelits Dies (#129372)
Pacific Point ink
On Your Birthday stamp set (retired #111664)
Modern Label punch (#119849)
Candy Dots Brights (#130931)
Stampin Dimensionals (#104430)

This is a super easy card to make.
1. Adhere your ribbon to the Crisp Cantalupe cardstock and wrap the ends around to the back of the cardstock.
2. Layer the cardstock pieces on the card with adhesive as shown in the picture.
3. Pop the flowers out of patterned paper with the Secret Garden Framelits dies and your Big Shot.
4. Place a Candy Dot in the center of each flower. Adhere the flowers on the cardstock with the flowers slightly overlapping. For the 3rd flower use Stampin Dimensionals to pop it up a bit and give your card some dimension.
5. Attach it to your base card and you are ready to send it to your birthday friends!

Friday, August 2, 2013

Going in Circles for your Birthday


Materials:
Candle pattern from Birthday Basics DSP (#130145) 4 1/4 x 5 1/2"
Crushed Curry cardstock 4 1/4 x 5 1/2"
1/2" Circle Punch (#119869)
1 1/4" Circle Punch (#119861)
1 3/4" Circle punch (#119850)
Best of Birthdays stamp set (#132929)
Mixed Bunch stamp set (#125537)
Candy Dots Brad Bases (#132293)
Brights Candy Dots (#130931)
Bermuda Bay In Color ink
Gingham Garden Washi Tape (#129314)
Pencil
Art Gum eraser

This is an easy card to make.
1. Use your circle punches to punch 4 circles in the patterned paper. Lightly draw a pencil circle on the Crushed Curry cardstock at each circle punch.
2.  Move the patterned paper and stamp in each of the circle on the colored cardstock. Erase the pencil lines.
3. Choose the colors of candy dots that you want for your brads. Carefully peel the candy dots off the plastic backing and place in the center of each brad. Punch a small hole at the top of 3 candles and place the brads there. Bend the backs on the back of the patterned paper.
4. Apply adhesive to the back of the patterned paper and carefully place the paper on the cardstock so that the stamped images shows through the circles.
5. Adhere this to your card base.
6. Decorate the inside of the card with your stamped greeting. Adhere the circles that you punched out of the patterned paper to the inside. Make 2 decorative lines with the Washi tape.
Send the card to a friend who's having a birthday soon.
Happy card making!