I hear that phrase too often or how about "I'm not creative." I refuse to accept either of these statements in any of my classes. These days there are so many people who have already done the drawing for you that all you have to do is learn a few little tricks. That what I'm going to try to share with you today, a couple of little tricks for beginners to add to their crafting.
1. First, let's take a look at these two groups of stamped images.

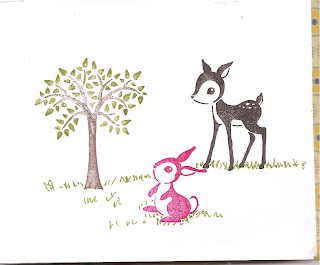 These were made with the same stamps and basically the same colors. The stamp set is Animal Stories (#116716) from SU! 2009-2010 catalog.

 It's a really basic card. I used Marina Mist cardstock for the background, some leftover patterned paper from Summer Smooches DSP((#125409), whisper white cardstock, brads from Everyday Enchantment brad package, and my large oval (#119855) punch.
4. Of course, the color on the truck is a big part of the difference in the cards. I colored it with my Stampin' Pastels (#120962). Pastels is my favorite coloring medium. I find it very easy to blend colors and you can erase your mistakes. YES, you can erase the pastels with an art gum eraser if you mess up!
5. Another difference is that the truck in the second card is not floating in space. While Lt. Paris did find an old 1937 truck floating in the Gamma quadrant in Star Trek Voyager, it's not too often that this really happens. In addition to adding grass around and under your images, you can also add shading. After all, there will be shadows under a truck sitting in the driveway so you need some shadows under the truck on your card. I used a dark green, a lighter green & a little bit of black pastel to blend these together. Be careful with the black. You don't want to use too much or it will look more like mud than shadow. Use a q-tip/cotton swab or your fingers to blend the colors together. Spend a little bit of time practicing on extra paper but it shouldn't take you too long to get the hang of it. Pastels are actually very forgiving!
6. Here are some other shadows for the truck image.

To make these shadows, I used my Watercolor Pencils(#101879), my second favorite coloring medium. I also used 2 Stampin' Write markers on this. I don't like to use these markers to color because I make messes with them. I do use them for writing and line drawing. The shadow under the truck was made with the Watercolor Pencils and a blender pen. It gives you a lighter shadow under the truck & it can be more controlled than the pastels. It's easier to put the color from the pencils exactly where you want them. You then use the blender pen to shade & pull the color out to make lighter areas.
I hope these little tips helped you some. Come back Thursday & I'll have some more tips for beginning paper crafters.
1. First, let's take a look at these two groups of stamped images.

 These were made with the same stamps and basically the same colors. The stamp set is Animal Stories (#116716) from SU! 2009-2010 catalog.
2. The big difference in the two is that the top one looks like stamped images floating on a piece of paper. The bottom looks like a forest scene. Well, sort of, I've never actually seen a rabbit that was Melon Mambo. What makes it different? The grass. So this is when you say "I can't draw." And I say that you don't have to. All I did was use my thin tip of my Old Olive marker to make some scribbles that look like grass. Go around the base(feet) of the animals & tree making a series of n's, w's, & v's. Some of them are connected together. Some aren't. That's all it takes for a grass look, letters that you learned how to make in kindergarten and you can run them together, just like you did when you were in kindergarten! lol
3. Next, we have two manly birthday cards using the popular Loads of Love (#115022) and Loads of Fun (#115197) stamp sets.


4. Of course, the color on the truck is a big part of the difference in the cards. I colored it with my Stampin' Pastels (#120962). Pastels is my favorite coloring medium. I find it very easy to blend colors and you can erase your mistakes. YES, you can erase the pastels with an art gum eraser if you mess up!
5. Another difference is that the truck in the second card is not floating in space. While Lt. Paris did find an old 1937 truck floating in the Gamma quadrant in Star Trek Voyager, it's not too often that this really happens. In addition to adding grass around and under your images, you can also add shading. After all, there will be shadows under a truck sitting in the driveway so you need some shadows under the truck on your card. I used a dark green, a lighter green & a little bit of black pastel to blend these together. Be careful with the black. You don't want to use too much or it will look more like mud than shadow. Use a q-tip/cotton swab or your fingers to blend the colors together. Spend a little bit of time practicing on extra paper but it shouldn't take you too long to get the hang of it. Pastels are actually very forgiving!
6. Here are some other shadows for the truck image.

To make these shadows, I used my Watercolor Pencils(#101879), my second favorite coloring medium. I also used 2 Stampin' Write markers on this. I don't like to use these markers to color because I make messes with them. I do use them for writing and line drawing. The shadow under the truck was made with the Watercolor Pencils and a blender pen. It gives you a lighter shadow under the truck & it can be more controlled than the pastels. It's easier to put the color from the pencils exactly where you want them. You then use the blender pen to shade & pull the color out to make lighter areas.
I hope these little tips helped you some. Come back Thursday & I'll have some more tips for beginning paper crafters.
No comments:
Post a Comment