Monday, April 30, 2012

Baby Gate Fold Card

For a while I wasn't making any baby cards but lately, it seems like there is one baby shower after another. Between people at church & former students, there have been quite a few. I love baby shower! Maybe even more than wedding showers...

To make the gate fold, use a piece if Whisper White cardstock cut to 8 1/2 x 5 1/2." Score on your new SU! Scoring Tool(#122334) at 2 1/8" and at 6 3/8." Fold each side in so that they meet in the middle.

Cut patterned paper (I used some Island Indigo from the Brights Collection #117155) to 5 1/2 x 2 1/8" to adhere on each side. Don't stick it to the card stock yet but you will want to be sure that it fits here correctly.

Cut another piece of patterned paper to measure 2 1/8 x 4." I used the reverse side of the same paper. That's one way to know that it matches! Adhere it to each side leaving some border on the top & bottom.(Remember, you're not on your card base yet.)

Make your layer to decorate with one piece of 3 1/4 x 2 1/4" white cardstock, 1 piece of 3 3/4 x 2 3/4" of Marina Mist cardstock and 1 piece of 2 1/2 x 3 /12" Certainly Cerlery cardstock. Using you corner rounder(#119871), punch to round each corner on all 3 piece of cardstock.

You will want to decorate your white cardstock before you build the layers. I used stamps from the retired set Animal Stories to stamp my giraffe in Island Indigo classic ink. I also stamped the owl from that set. With the owl, I punched him out with my 1 1/4" circle punch(#119861). Then I punched out another circle of Certainly Celery with my 1 3/8" circle punch(#119860). I stacked & adhered those two to use on my right panel.
Put adhesive on the back of the white and green and layer, white on green on blue. Before you put adhesive on the back of the blue, check to see how far out over the edge of the card it goes. You will want to leave about 1/2" of the layer sticking out over the edge of the left side. If you put adhesive all over your cardstock, it will stick to the other side & glue your card closed. After you put adhesive over about 3/4 of the back of the layer, press it on to the left panel.

Now you can adhere that panel to the left side of your card base. Check to make sure that your card still closes properly.

Now we want to build our right panel. After you put your 2nd piece of patterned paper on the larger piece, cut a strip if 1/2" Marina Mist Scallop Dots(#122986) ribbon about 6" long. Adhere it down the center of this panel and wrap around to the back.

Adhere the owl on top of the ribbon near the top.

Stamp "Hello Baby" from the Teeny Tiny Wishes (#115370) set onto a piece of Certainly Celery cardstock. Punch it out with the Word Window punch(#119857). Punch out a piece of Marina Mist cardstock with the Modern Label punch(#119849). Adhere the green on top of the blue. Using a 1/16" hand held circle punch, punch a hole through the label greeting and the patterned paper. Place a brad from Everyday Enchantment brads through and close the brad on the back.


You can now put adhesive on the back of this panel and adhere it to the right side if the card base. The greeting and the giraffe with both overlap the tops of the card, so just watch how you close it.


Stamp or write a greeting on the inside to the mother-to-be.


Sunday, April 29, 2012

Trusting Hearts

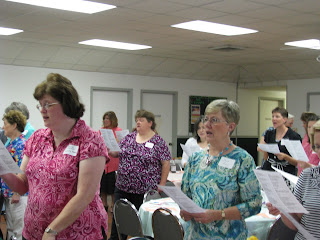
We had our county wide Trusting Hearts event at my church yesterday. After many months of planning, it was nice to see it all come together. I felt like God was glorified in the music, the testimonies and the breakout sessions. Ladies from Holland catered our meal and it was so good! God has really given these ladies talent in the kitchen. Ladies from Immanuel provided glorious music for us to praise God with and Leanne and her crew performed a wonderful song to sign language. Very touching & blessing. Thank you to all who participated in this event and who helped to make it a success. Praise be to God.
Here are a few pictures of some of what went on. Oh, fudge, I just remember, I didn't take any pictures of the great food or the kitchen crew. I had planned to. Oh well...

Patsy Ashbury gives her testimony of dealing with her husbands death and starting life over.


Leanne is so expressive when she signs.


Julie Ann Evans tells about how she had to trust God after she adopted 4 children, one with special needs.

Praising God in song.


These wonderful ladies led our singing and
provided specials.

Saturday, April 28, 2012

Paper flowers

I do enjoy dimensional things on my cards. Yes, often that will increase the postage or even require a special envelope for mailing, but it can be worth it. These kind can also be hand delivered, if desired. Before my friend passed away after suffering with cancer for 3 years, it was definitely worth spending a few extra bucks to send her a special dimensional card.


Here is what we are aiming for today.  The first picture is taken from the top. The second shows a side view so you can see the dimension.

Because you use a liquid glue, you have to allow time for drying for these flowers before you adhere them to your card. I usually allow 24 hours to dry. I suppose that you could make these with hot glue but I get burned using hot glue with large items. I'm a bit scared to try hot glue on these small flowers but that is up to you.

 For this project, all you need is your choice of colored cardstock or patterned paper. I used paper from the Brights collection from SU!, your SU! circle Scallop (#119854) punch, scissors, liquid glue and a toothpick. If you have some reverse tweezers, they are helpful but not required.

1. Punch 5 Scallop Circles. Cut the first one to the center of the circle.
2. For the second one, cut to the center, like you did with the first circle.  Then count 2 scallops and cut to the center again, like you see in the picture.


3. For the third petal, cut to the center, then count 4 scallops and cut.


4. The next petal, cut and then count 6 scallops and cut.

5.  The last scallop circle, cut in half. You can discard the extra pieces that you have cut away or save them for another project.


6. Using the liquid glue, pour glue onto the first two scallops next to the cut. Pull the paper at the cut so that it overlaps the scallop and press on to the glue. Hold for a few seconds to dry slightly. This is where the reverse tweezers are helpful if you have them.


7. Continue gluing and overlapping on each of the circles. They will get progressively smaller.

8. The last one when you use the half scallop circle, you will want to roll up tight and put glue near the end of the rolled petal. This will go in the very center of the flower.
9. Using a toothpick, roll the scallops/petals backward on each flower part.

10. Start with the largest petal. Pour a large amount of liquid glue into the center of the flower.

11. Place the second largest flower into the pool of glue. Hold for a few seconds. It will not be dry, but it should be fairly secure.
 12. Repeat this step with each petal until you get to the very center petal. This is the one that you rolled tight. You will need to snip off about 1/3 of the bottom of this petal at an upward angle. Place this into the center of the flower into a pool of glue.
Your finished flower should look something like this. You will need to set it aside to dry completely. You may want to make more of these right now so you will have several for your planned project. They can be added to your project tomorrow, after they have had time to dry.

I don't know what kind of flower to call this, maybe a carnation, but I do think they are pretty.


Friday, April 27, 2012

Pink, Yellow & Blue

For this card, I used my Large Sizzlis paper Doily die(#125532) with my Big Shot. I used paper from the Flirtetious Speciality pack (#122360 ) and the brads are from the Everyday Enchantment Brad (#126126).  I just love the doilies in this speciality paper pack and they go so great with the Doily die. I also used my Eyelet Edge border punch(#119853 ) to make the border on the Daffidol Delight paper.

The greeting is from the On Your Birthday (#111664) stamp set. I stamped it in Marina Mist classic ink on Whisper White cardstock and popped it out with my Large Oval punch(#119855 ). I cut out a scallop oval with that punch(#119856 ) and put it behind the greeting.

The ribbon is the 1/4" Marina Mist grosgrain ribbon. I don't tie the best bows so I used a couple of glue dots (#103683) to hold my bow in place.

This was a simple card to do but I think it has a pretty look and whoever I send it to for their birthday will enjoy it.

Thursday, April 26, 2012

Letter Stickers

With all the options available these days, I don't use a lot of letter stickers but I do still have quite a few left. After you run out of vowels & the major consonants, how do you make your words for your cards or scrapbook pages? Here are some ways to use those leftover letters to get the letter that you really need. I call them sticker substitutes.

To make a
O--cut the tail off the Q
H--put 2 I's side by side with a leftover piece of sticker for the cross piece
F--cut a leg off an E
E--add a foot to an F
M or W--turn it upside down
P--cut a leg off an R
R--use an extra piece of straight stick to add to a P
V--cut a tail off a Y
T--add extra to the top of an I
B--(a little harder to make it look right) add extra to the middle of a D
I--cut the legs off a K
A--turn over a V and add a cross piece

Hope this will help you use a few more of you letter stickers.

Wednesday, April 25, 2012

Pull Up Card Surprise

Since I'm a very tactile, touch, feely person, I always enjoy things that have movement. Maybe it's also because I'm never still for very long. lol Anyway, here is a card with a pull tab to give the receiver a surprise.


1. I used some of my Summer Smooches patterned paper (# ) for the background on this card. Using the 1/2" circle punch, I punched out a half circle at the top of the patterned paper. For the layers, I used Marina Mist cardstock at 2 1/2 x 3", Daffodil Delight cardstock at 3 x 3 1/2" and another Summer Smooches patterned paper at 3 1/2 x 4."

2. For the stamping on the Marina Mist, I stamped the daisy from the Fifth Avenue Floral (#113734) in Daffodil Delight classic ink using the masking technique. I stamped the saying from that set on Whisper White cardstock in Marina Mist and then cut it out with the extra large Oval Punch(#119859). I rubbed Marina Mist ink on the edges of the oval and adhered it to the lower section of the stamped layer.

3. I cut out the doily with the triple doily layer punch(#122465) out of Marina Mist, Daffodil Delight and Whisper White. I attached it to the bottom corner of the layered box with a brad from the Everyday Enchantment brads(#126126).

4. Carefully, put adhesive on 3 sides of the back patterned paper and press it to the center of the background paper. Be sure your 1/2 circle punch is at the top.

5. Punch out a circle with the 1/2" circle punch to put at the top of a piece of Daffodil Delight cardstock that is 2 1/2 x 3." Write "Pull" on the blue pull circle. Decorate this card as you please. I put a butterfly cut with the Beautiful Butterflies(#114507) die and my Big Shot. Slide this into the pocket you made with the layers. Now adhere the whole thing to your card base. This gives you a fun card with some movement.

You can put any kind of special picture or message on the card that pulls out to give the recipient a special surprise. Consider add a love note or a note of encouragement, a picture of a baby, or other special person and just something fun on your card.

Tuesday, April 24, 2012

50 Ways to Use Brads

I absolutely love brads! I use them often on my cards and on my scrapbook pages. These days you can find brads in many different shapes and sizes, from candles to butterflies and from mini to giant! Sometimes it's hard to think of ways to use items we haven't used a great deal before, but the ways to use brads are almost unending.
SU! has been coming up with some beautiful brads in the past several months. Check out your current catalog or mini or the new catalog that will be out June 1 this year.
 Here are just a few that I've come up with. Any of these can be used on cards on scrapbook los.

50 Ways to Use Brads
1. to anchor a greeting on the card front
2. use as an eye for an animal or character

3. make a decorative line with brads
4. for a corner accent
5. as a flower center
6. to make the body of a butterfly
7. as spots on a ladybug
8. to attach vellum to your card
9. as knob pulls on a chest

10. as windows for a house
11. as a door knob
12. wheels on a car
13. for balloons with a string hanging down
14. to hang tags on a clothesline
15. as bubbles
16. as clouds in the sky
17. the bell clapper on a bell
18. Christmas ornaments
19. a dog's nose
20. to look like they are spilling out of a box or other object
21. buttons for a snowman
22. ear rings
23. buttons on clothes on a baby card

24. to outline an item
25. to make a shape, like a star
26. as a clasp on a purse
27. to hang things from
28. to anchor a clothes line
29. to attach layers of cardstock
30. dates on a calendar
31. to attach the center of a snowflake
32. to hold down a paper strip across your card front
33. as sprinkles on a cupcake or ice cream
34. the flame on a candle
35. robot parts


36. smoke from a train or chimney
37. a ring
38. spots on a butterfly
39. a corner accent on a layer or photo
40. Christmas tree topper
41. on the points of a crown
42. to deocrate an Easter egg
43. stars in the night sky
44. the moon or sun
45. to attach a tag
46. a part of a music note
47. nuts
48. the button on top of a grad cap
49. a line for a belt
50. the center of a clock to attach the hands

Monday, April 23, 2012

Garden background look


The background on this card looks a bit like an out of focus picture of leaves, etc in a garden. We have the in focus plants at the front with our stamped image. This background texture was made with the waxed paper technique that I posted on this past Saturday. For this card then, make a background with Certainly Celery and Old Olive using the waxed paper technique.

Cut a piece of blue from the Brights Collection(#117155) cut 5 1/2 x 1 1/2." Adhere it to the left side of the background cardstock.

Stamp an image in Old Olive from the Just Believe(#120453) set on Whisper White cardstock. Cut loosely around the outside of the image. Adhere it above the blue paper, covering the edge a bit.

Cut a piece of 1/2" Marina Mist scallop dots ribbon(#122986) to about 6." Adhere it to the card covering the bottom edge of the image. Wrap the ends around to the back of the card.

Use the brush end of your Old Olive, Certainly Celery and Marina Mist Stampin' Write markers to color directly onto your stamp. Give the stamp of huff/breath of air to freshen the ink. Stamp onto your white cardstock.

Cut this image out. Place SU! Dimensionals(#104430) on the back and adhere over the ribbon and the other image. Be sure to just overlap the image slightly so that both will show.

Stamp the circle image with Old Olive cardstock. Color the flowers with your Marina Mist marker. Use your 1" circle punch(#119868) to pop out the image. Adhere it to your card on the right about 1/3 of the way from the top of the card.

Adhere this to your 8 1/2 x 5 1/2" card base. Add your greeting or a note to the inside.

Sunday, April 22, 2012

Fun and Friends

So sorry this is so late getting up here. I schedule it to post at 5 am but lately, it's not been posting until I have time to go online & click on schedule again. I'll try to fogure out what's going on so it will post before I even get out of bed!

On a recent Saturday, some of us got together for a stamp club. We are starting out small but that gives us room to grow. We had tons of fun playing with stamps and getting ink all over our hands. I taught them how to do the waxed paper technique and they mixed colors together that I had not even thought of. That always happens when we get different minds together & use the creativity that God gave us!

Alice is opening another color of ink.

Cheri is layering some papers.

Here Alice is working on the waxed paper technique.


 A few weeks ago, my friends & I did a short road trip to take in some of the beautiful Texas wildflowers. We shared the cost of a van so that we could all ride together, instead of in a caravan. What fun!

The bluebonnets are still not as full and solid as we had some years before the drought hit us but at least, they are back.
We stopped at the Antique Rose Garden outside of Brenham, TX. Even their flowers weren't as pretty as years past but they were still gorgeous!

 What I wouldn't give for a gazebo covered in roses in my backyard! And a rose trellis leading up to the house. Well, I can always dream...

Here, my dear friend, Marian, takes a break in the shade.
We are so fortunate that God gives us beautiful flowers, trees & grasses to enjoy.

Psalm 27:4
One thing have I asked of the LORD, that will I seek after: that I may dwell in the house of the LORD all the days of my life, to gaze upon the beauty of the LORD and to inquire in his temple.


Psalm 50:2

Out of Zion, the perfection of beauty, God shines forth.
Psalm 96:6

Splendor and majesty are before him; strength and beauty are in his sanctuary.

Saturday, April 21, 2012

Waxed paper technique


This makes a fun background look on your regular white cardstock. You can use any colors that you want to try together to come up with some fun looks. Different shades of greens can give you a nice garden look while yellows, oranges & browns can make your paper look like suede. Thanks to my friend Gail Goodman for directing me to this cool technique.


1. Take a piece of waxed paper slightly larger than the cardstock you are working with. Crumble it up into a small ball; then smooth it back out.


2. Place this waxed paper between 2 sheets of cardstock. I used cardstock 4 ¼” x 5 ½” to use as my card background.


3. Place a clean sheet of plain paper on your surface to protect it. Lay your cardstock sandwich on top of it.

4. Run a hot iron over the top of piece of cardstock for about 15-20 seconds to give the waxed paper time to melt. Throw away the waxed paper. You now have to cards to do this technique with.


5. Place one of the pieces of cardstock on top of a piece of scrap paper to protect your work surface.


6. Choose 2 shades of the same color ink, one light and one darker. Exp. Certainly Celery and Old Olive Rub the light colored ink directly on the cardstock and rub ink all over the cardstock with the waxed paper. Give the ink about a minute to dry. Do the same with the dark ink. (Be sure to use the light color first or you will have a mess with your ink pad.) The dark ink does not have to totally cover the lighter ink. You will want to leave some of the light ink showing in spots.


7. Use a dry paper towel to wipe the wax off of the card to make your texture really show.


Try this technique with just one color or with 3 colors to see the effect that you get.


It makes a fun background for a garden, wild animals, leather look, etc depending on the colors that you use.

Come back Monday to see a card made using this technique for the background.